Sub-Zero BI-36S Built-In Installation Guide - Page 31
Grille Panel Assembly
 |
View all Sub-Zero BI-36S manuals
Add to My Manuals
Save this manual to your list of manuals |
Page 31 highlights
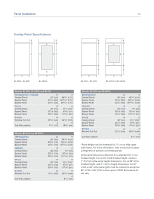
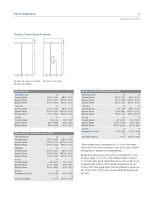
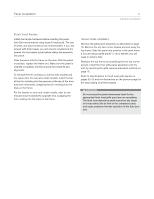
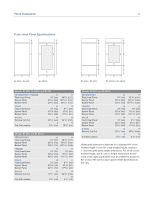
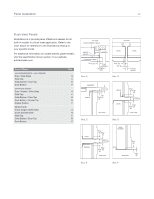
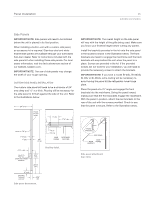
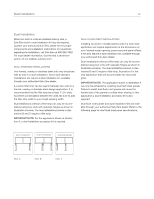
Panel Installation 31 subzero.com/specs Flush Inset Panels Install the handle hardware before inserting the panel. Sub-Zero recommends using larger D-style pulls. The use of small, one-piece knobs is not recommended. If you use screws with thick heads, you will need to countersink the screws into the backer panel before sliding the assembly into place. Slide the panel into the frame on the door. With the panel in position, replace the frame end. Make sure the panel is inserted completely into the channel for proper fit and alignment. To reinstall the trim molding on side-by-side models and the upper door for over-and-under models, insert the top of the trim molding into the grooves at the top of the door and work downward, snapping the trim molding into the clips on the frame. For the drawer on over-and-under models, start at one end and move towards the opposite end, snapping the trim molding into the clips on the frame. GRILLE PANEL ASSEMBLY Remove the grille panel assembly as described on page 16. Remove the top two corner screws and pull away the top frame. Slide the panel into position in the grille frame. If you are using a grille panel 1/4" (6) or thinner, you will need to install a filler. Reattach the top frame by reinstalling the two top corner screws. Install the inner grille panel assembly onto the unit, by reversing the grille removal procedure outlined on page 16. Refer to specifications for flush inset grille panels on pages 32-33 and the illustrations on the previous page for the exact sizing of all three panels. Do not exceed the panel dimensions listed for the appropriate flush inset grille panel you are specifying. The flush inset decorative panel cannot be any larger or it may restrict the air flow to the compressor area and cause problems with the operation of the Sub-Zero unit.
-
 1
1 -
2
-
3
-
4
-
5
-
6
-
7
-
8
-
9
-
10
-
11
-
12
-
13
-
14
-
15
-
16
-
17
-
18
-
19
-
20
-
21
-
22
-
23
-
24
-
25
-
 26
26 -
 27
27 -
 28
28 -
 29
29 -
 30
30 -
 31
31 -
 32
32 -
 33
33 -
 34
34 -
 35
35 -
 36
36 -
37
-
38
-
39
-
40
 |
 |
