Synology SA3400 Recovery Media Creation Guide - Page 19
Enable TFTP service, Con the RAMDISK
 |
View all Synology SA3400 manuals
Add to My Manuals
Save this manual to your list of manuals |
Page 19 highlights
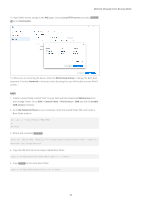
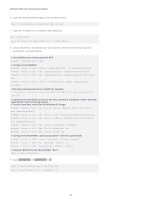
Method 2: Manually Create Recovery Media 8. Create a BCD file as an administrator by using the command line interface (CLI) and entering the commands below. // Use bcdedit.exe to create space for BCD: bcdedit /createstore c:\BCD // Configure the RAMDISK: bcdedit /store c:\BCD /create {ramdiskoptions} /d "Ramdisk options" bcdedit /store c:\BCD /set {ramdiskoptions} ramdisksdidevice boot bcdedit /store c:\BCD /set {ramdiskoptions} ramdisksdipath \Boot\boot. sdi bcdedit /store c:\BCD /create /d "winpe boot image" /application osloader // The last command will return a GUID, for example: // The entry {a4f89c62-2142-11e6-80b6-00155da04110} was successfully created. // Copy the returned GUID to use it in the next command. Substitute 'GUID1' with the copied GUID in the commands below: // Create a new boot record for the Windows PE image: bcdedit /store c:\BCD /set {GUID1} device ramdisk=[boot]\Boot\boot. wim,{ramdiskoptions} bcdedit /store c:\BCD /set {GUID1} path \windows\system32\winload.exe bcdedit /store c:\BCD /set {GUID1} osdevice ramdisk=[boot]\Boot\boot. wim,{ramdiskoptions} bcdedit /store c:\BCD /set {GUID1} systemroot \windows bcdedit /store c:\BCD /set {GUID1} detecthal Yes bcdedit /store c:\BCD /set {GUID1} winpe Yes // Configure BOOTMGR, substituting 'GUID 1' with the copied GUID: bcdedit /store c:\BCD /create {bootmgr} /d "boot manager" bcdedit /store c:\BCD /set {bootmgr} timeout 30 bcdedit /store c:\BCD -displayorder {GUID1} -addlast // Copy this BCD file to the shared folder "Boot" copy c:\BCD y:\Boot\BCD 9. Copy bootmgr.exe and pxeboot.n12 to y:. copy y:\Boot\bootmgr.exe y:\bootmgr.exe copy y:\Boot\pxeboot.n12 y:\pxeboot.n12 10. Unmount "boot.wim" when done. Dism.exe /Unmount-Wim /MountDir:"C:\winpe\mount" /COMMIT 11. Sign in to your DSM, go to Control Panel > File Services, and tick Enable TFTP service. Select the PXE shared folder as the TFTP root folder. 12. Enable DHCP server from Control Panel > DHCP Server > Network Interface. 17
-
 1
1 -
2
-
3
-
4
-
5
-
6
-
7
-
8
-
9
-
10
-
11
-
12
-
13
-
 14
14 -
 15
15 -
 16
16 -
 17
17 -
 18
18 -
 19
19 -
 20
20 -
 21
21 -
 22
22 -
 23
23 -
 24
24 -
25
-
26
-
27
-
28
-
29
-
30
 |
 |
