Synology SA3400 Recovery Media Creation Guide - Page 22
Local TFTP server, boot loader, BIOS Setup Utility, Network, SMB Service, Control Panel, File Services
 |
View all Synology SA3400 manuals
Add to My Manuals
Save this manual to your list of manuals |
Page 22 highlights
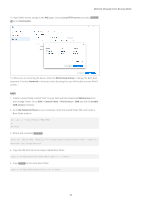
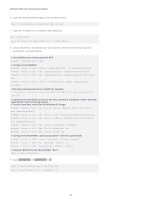
Method 2: Manually Create Recovery Media 12. Open DHCP Server and go to the PXE page. Choose Local TFTP server and select bootx64. efi as the boot loader. 13. When you are restoring the device, enter the BIOS Setup Utility to change the BIOS boot sequence. Prioritize Network in the boot order. By doing this, you will be able to enter WinPE via PXE. MBR 1. Create a shared folder named "PXE" on your NAS and then download SMB Service from the Package Center. Go to DSM > Control Panel > File Services > SMB and tick the Enable SMB service checkbox. 2. Go to My Network Places on your computer, enter the shared folder PXE, and create a Boot folder under it. net use y: \\Your-Remote-NAS\PXE y: md Boot 3. Mount and customize boot.wim. Dism.exe /Mount-Wim /WimFile:"C:\winpe\media\sources\boot.wim" /index:1 / MountDir:"C:\winpe\mount" 4. Copy the PXE boot file to the newly created Boot folder. copy C:\winpe\mount\windows\Boot\pxe\*.* y:\Boot 5. Copy boot.sdi to the same Boot folder. copy C:\winpe\media\Boot\boot.sdi y:\Boot 20
-
 1
1 -
2
-
3
-
4
-
5
-
6
-
7
-
8
-
9
-
10
-
11
-
12
-
13
-
14
-
15
-
16
-
 17
17 -
 18
18 -
 19
19 -
 20
20 -
 21
21 -
 22
22 -
 23
23 -
 24
24 -
 25
25 -
 26
26 -
 27
27 -
28
-
29
-
30
 |
 |
