Synology SA3400 Recovery Media Creation Guide - Page 24
Boot Recovery Media (ISO Image or USB Drive), Backup for Business Recovery Wizard
 |
View all Synology SA3400 manuals
Add to My Manuals
Save this manual to your list of manuals |
Page 24 highlights
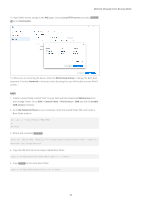
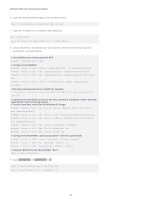
Method 2: Manually Create Recovery Media 10. Unmount "boot.wim" when done. Dism.exe /Unmount-Wim /MountDir:"C:\winpe\mount" /COMMIT 11. Sign in to your DSM, go to Control Panel > File Services > Advanced > TFTP, and tick the Enable TFTP service checkbox. Select the PXE shared folder as the TFTP root folder. 12. Install a DHCP Server from the Package Center. To enable the DHCP server, go to DHCP Server > Network Interface. 13. Open DHCP Server and go to the PXE page. Choose Local TFTP server and select bootx64. efi as the boot loader. 14. When you are restoring the device, enter the BIOS Setup Utility to change the BIOS boot sequence. Prioritize Network in the boot order. By doing this, you will be able to enter WinPE via PXE. Boot Recovery Media (ISO Image or USB Drive) After you have mounted the ISO image or attached the USB drive to the device intended for restoration, press F2 to enter the BIOS mode once your device has been rebooted. Please note that this hotkey may vary according to different vendors. Afterwards, navigate to the Boot tab, and prioritize the order of CD-ROM Drive and Removable Devices according to where the recovery media is located. Exit the setup process and you will be directed to Synology Active Backup for Business Recovery Wizard, which will start the recovery process automatically. 22
-
 1
1 -
2
-
3
-
4
-
5
-
6
-
7
-
8
-
9
-
10
-
11
-
12
-
13
-
14
-
15
-
16
-
17
-
18
-
 19
19 -
 20
20 -
 21
21 -
 22
22 -
 23
23 -
 24
24 -
 25
25 -
 26
26 -
 27
27 -
 28
28 -
 29
29 -
30
 |
 |
