TEAC CD-RW890 CD-RW890 Manual - Page 17
Before Recording, Recording, ANALOG ANALOG - cd recorder manual
 |
View all TEAC CD-RW890 manuals
Add to My Manuals
Save this manual to your list of manuals |
Page 17 highlights
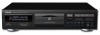
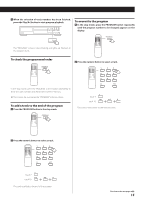
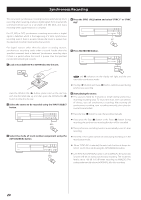
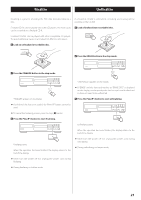
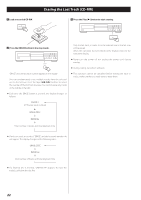
Before Recording Recording (1) Before you start recording, make sure that you understand the following points: < Up to 99 tracks can be recorded according to the CD standards. When a 100th track is about to be recorded, recording will stop automatically. < A track less than 10 seconds in length on an audio CD cannot be recorded . < If the Stop (H) button or Pause (J) button is pressed within 10 seconds from the beginning of a track, the unit continues to record no signal and stops when the track's length reaches 10 seconds. < When recording is finished, "PMA WRITE" blinks for a few seconds, and then the unit goes into the stop mode. Do not apply shock or vibration to the unit while recording or "PMA WRITE" blinks. < When the available recording time reaches 0, recording will stop automatically. < If a half-way recorded disc is inserted, recording continues next to the last recorded track. < You can add tracks to an unfinalized recordable disc. Once finalized, a CD-R disc is "fixed" and behaves in the same way as a CD. Finalized CD-RW discs, however, can be unfinalized, erased and re-recorded. < When the auto track function is used, the tracks are separated based on the specified level. Therefore, if a silent part is contained at the beginning or in the middle of a track, the playback time may not be the same as the actual length of the track. < When track numbers are added to continuous music such as live performances, the sound is cut a moment. < If a disc recorded with this unit is played with another player, noises may occur when the track changes. 1 Load a recordable CD-R or CD-RW disc into the unit. Press the OPEN/CLOSE (L) button, place a disc on the disc tray with the disc label side up, and then press the OPEN/CLOSE (L) button to close the disc tray. Make sure "NO TOC" and "CD-R" (or "CD-RW") indicator lights on the display. 2 Select the source to be recorded using the INPUT SELECT button. Each time the INPUT SELECT button is pressed, the display changes as follows: DIGITAL (OPTICAL IN) Select this to record a source connected to the DIGITAL IN terminal. ANALOG (ANALOG IN) Select this to record a source connected to the ANALOG IN terminal. < The input source cannot be changed during recording. 3 Select the mode of track number assignment using the AUTO/MANUAL button. When the AUTO/MANUAL button is pressed once, the current increment level is displayed. Press the AUTO/MANUAL button repeatedly to select another setting. S-LVL -60 S-LVL -50 S-LVL -40 S-LVL -30 MANUAL < After 2 seconds have passed, the display returns to the track/time display. Continue to the next page 17
-
 1
1 -
2
-
3
-
4
-
5
-
6
-
7
-
8
-
9
-
10
-
11
-
 12
12 -
 13
13 -
 14
14 -
 15
15 -
 16
16 -
 17
17 -
 18
18 -
 19
19 -
 20
20 -
 21
21 -
 22
22 -
23
-
24
-
25
-
26
-
27
-
28
 |
 |