TEAC CD-RW890 CD-RW890 Manual - Page 19
To stop recording, To monitor the input signal, Manual track division, Press the Play, or the Pause - manual for
 |
View all TEAC CD-RW890 manuals
Add to My Manuals
Save this manual to your list of manuals |
Page 19 highlights
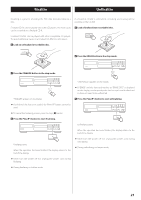
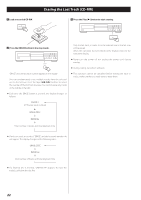
To pause recording Play the source to be recorded and adjust the recording level so that the loudest sound does not exceed the "OVER" indicator on the peak level meter. The level can be adjusted as follows: MIN. DOWN UP MAX. -∞ −60 dB 0 dB +12 dB < When the POWER button or the Stop (H) button is pressed, the recording level is reset to 0 dB. < The volume level differs depending on the source (record, cassette tape, CD, etc.). To record various sources at the appropriate volume, the recording level should be adjusted for each source. Press the Pause (J) button. "WAITING" briefly appears on the display, then recording is paused. To restart recording, press the Play (y) button or the Pause (J) button. < You cannot restart recording while "WAITING" is displayed. < Remember that every time recording is paused or stopped, a new track number will always be assigned. It is not possible to record in two "stages" within one track. 6 Press the Play (y) or the Pause (J ) button to start recording. To monitor the input signal Recording starts. 7 Play the source to be recorded. When the playback of the source has been finished, press the Stop (H) button to stop recording. When no recordable disc is loaded in the unit, press the RECORD button. "MONITOR" appears on the display, and you can monitor the input source via the PHONES jack and the output terminals. The meters show the current input level. Exit the monitor mode by pressing the Stop (H) button. To stop recording Manual track division Press the Stop (H) button to stop recording. < If the CD-R is finalized, it can be played with another CD player. It is possible to divide a track into multiple tracks by pressing the RECORD button while recording. < Manual track division is possible regardless of the AUTO/MANUAL setting. < A track cannot be less than 10 seconds in length. The RECORD button will not work if it is pressed within 10 seconds from the beginning of a track. 19
-
 1
1 -
2
-
3
-
4
-
5
-
6
-
7
-
8
-
9
-
10
-
11
-
12
-
13
-
 14
14 -
 15
15 -
 16
16 -
 17
17 -
 18
18 -
 19
19 -
 20
20 -
 21
21 -
 22
22 -
 23
23 -
 24
24 -
25
-
26
-
27
-
28
 |
 |
