TP-Link TL-SG1016PE Easy Smart Switch User Guide - Page 21
User Account
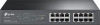 |
View all TP-Link TL-SG1016PE manuals
Add to My Manuals
Save this manual to your list of manuals |
Page 21 highlights
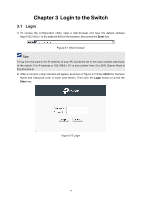
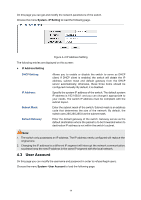
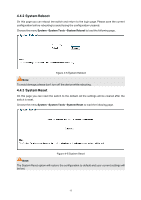
On this page you can get and modify the network parameters of the switch. Choose the menu System→IP Setting to load the following page. Figure 4-2 IP Address Setting The following entries are displayed on this screen: IP Address Setting DHCP Setting: IP Address: Subnet Mask: Default Gateway: Allows you to enable or disable the switch to serve as DHCP client. If DHCP client is enabled, the switch will obtain the IP address, subnet mask and default gateway from the DHCP server automatically; otherwise, these three items should be configured manually. By default, it is disabled. Specify the system IP address of the switch. The default system IP address is 192.168.0.1 and you can change it appropriate to your needs. The switch IP address must be compliant with the subnet layout. Enter the subnet mask of the switch. Subnet mask is an address code that determines the size of the network. By default, the switch uses 255.255.255.0 as the subnet mask. Enter the default gateway of the switch. Gateway serves as the default destination where the packet is to be forwarded when its destination IP address is not within the switch's subnet. Note: 1. The switch only possesses an IP address. The IP address newly configured will replace the original one. 2. Changing the IP address to a different IP segment will interrupt the network communication, so please keep the new IP address in the same IP segment with the local network. 4.3 User Account On this page you can modify the username and password in order to refuse illegal users. Choose the menu System→User Account to load the following page. 14
-
 1
1 -
2
-
3
-
4
-
5
-
6
-
7
-
8
-
9
-
10
-
11
-
12
-
13
-
14
-
15
-
 16
16 -
 17
17 -
 18
18 -
 19
19 -
 20
20 -
 21
21 -
 22
22 -
 23
23 -
 24
24 -
 25
25 -
 26
26 -
27
-
28
-
29
-
30
-
31
-
32
-
33
-
34
-
35
-
36
-
37
-
38
-
39
-
40
-
41
-
42
-
43
-
44
-
45
-
46
-
47
-
48
-
49
-
50
-
51
 |
 |
