TRENDnet TEW-823DRU User's Guide - Page 32
Set up DHCP reservation, Advanced, Setup, LAN Settings, Enable, Computer Name, IP Address
 |
View all TRENDnet TEW-823DRU manuals
Add to My Manuals
Save this manual to your list of manuals |
Page 32 highlights
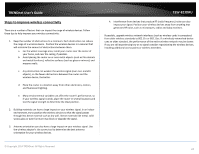
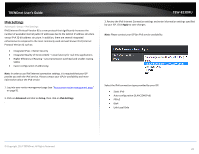
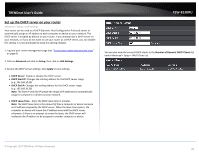
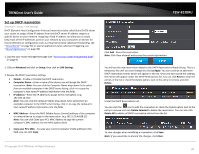
TRENDnet User's Guide Set up DHCP reservation Advanced > Setup > LAN Settings DHCP (Dynamic Host Configuration Protocol) reservation (also called Static DHCP) allows your router to assign a fixed IP address from the DHCP server IP address range to a specific device on your network. Assigning a fixed IP address can allow you to easily keep track of the IP addresses used on your network by your computers or devices for future reference or configuration such as virtual server (also called port forwarding, see "Virtual Server" on page 36) or special applications (also called port triggering, see "Special Applications" on page 38). 1. Log into your router management page (see "Access your router management page" on page 9). 2. Click on Advanced and click on Setup, then click on LAN Settings. 3. Review the DHCP reservation settings. • Enable - Enable or Disable the DHCP reservation. • Computer Name - Enter a name of the device you will assign the DHCP reservation. Note: You can click the Computer Name drop-down list to select from an available computer in the DHCP server listing, click >> to copy the computer's host name/IP address information into the fields. • IP Address - Enter the IP address to assign to the reservation. (e.g. 192.168.10.101) Note: You can click the Computer Name drop-down list to select from an available computer in the DHCP server listing, click >> to copy the computer's host name/IP address information into the fields. • MAC Address - Enter the MAC (Media Access Control) address of the computer or network device to assign to the reservation. (e.g. 00:11:22:AA:BB:CC) Note: You can click Clone your PC's MAC Address to copy the current computer's MAC address into the MAC address field. • Copy your PC's MAC - To copy your current computer's MAC address to the field, you can click Copy. © Copyright 2014 TRENDnet. All Rights Reserved. TEW-823DRU Click Add - Saves the reservation. Note: Click Clear discards and erases the current information. You will see the new reservation added to the DHCP Reservations Ready Group. This is a temporary list until you save changes by clicking Apply. You can continue to add more DHCP reservation entries which will appear in this list. Once you have saved the settings, the entries will appear under the DHCP Reservations list. You can click Reset to clear the entries in the list or check the Delete option, next to the entry to remove and click Delete. Under the DHCP Reservations List, You can click the icon to edit the reservation or check the Delete option next to the entry to remove and click Delete Selected to delete the reservation. You can also click Delete All to delete all DHCP reservation entries from the list. To save changes when modifying a reservation, click Save. Note: If you would like to discard the changes, click Clear. 29
-
 1
1 -
2
-
3
-
4
-
5
-
6
-
7
-
8
-
9
-
10
-
11
-
12
-
13
-
14
-
15
-
16
-
17
-
18
-
19
-
20
-
21
-
22
-
23
-
24
-
25
-
26
-
 27
27 -
 28
28 -
 29
29 -
 30
30 -
 31
31 -
 32
32 -
 33
33 -
 34
34 -
 35
35 -
 36
36 -
 37
37 -
38
-
39
-
40
-
41
-
42
-
43
-
44
-
45
-
46
-
47
-
48
-
49
-
50
-
51
-
52
-
53
-
54
-
55
-
56
-
57
-
58
-
59
-
60
-
61
-
62
-
63
-
64
 |
 |
