Thermador MEDS302WS Instruction manual - Page 26
Risk Of Electric Shock
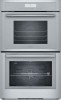 |
View all Thermador MEDS302WS manuals
Add to My Manuals
Save this manual to your list of manuals |
Page 26 highlights
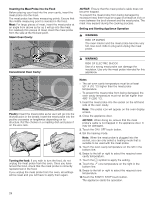
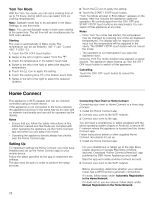
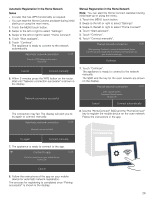
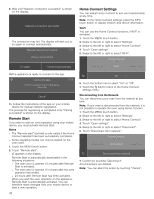
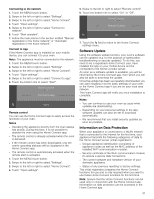
Inserting the Meat Probe into the Food Before placing your food into the oven cavity, insert the meat probe into the food. The meat probe has three measuring points. Ensure that the middle measuring point is inserted in the food. Meat: For large pieces of meat, insert the meat probe at an angle from above as far as it will go into the meat. For relatively thin pieces of meat, insert the meat probe from the side at the thickest point. Steam Oven Cavity: NOTICE: Ensure that the meat probe's cable does not become trapped. To prevent the meat probe from being damaged by excessive heat, there must be a gap of at least an inch or more between the broil element and the meat probe. The meat may expand during the cooking process. Setting and Starting Appliance Operation 9 WARNING RISK OF BURNS The oven interior and the meat probe become very hot. Use oven mitts to plug and unplug the meat probe. Conventional Oven Cavity: 9 WARNING RISK OF ELECTRIC SHOCK Use of a wrong meat probe can damage the insulation. Use only the meat probe intended for this appliance. Poultry: Insert the meat probe as far as it will go into the thickest point in the breast. Insert the meat probe into the poultry crosswise or lengthwise depending on its structure. Put the chicken in a roasting dish and place it on the wire rack. Turning the food: If you wish to turn the food, do not unplug the meat probe from the oven. Once you have turned the food, check that the meat probe is correctly repositioned in the food. If you unplug the meat probe from the oven, all settings will be reset and you will have to apply them again. Notes ▯ The set oven cavity temperature must be at least 50° F (10 °C) higher than the meat probe temperature. ▯ To prevent the meat probe from being damaged, the oven cavity temperature must not be set higher than 480° F (250 °C). 1. Insert the meat probe into the socket on the left-hand side of the oven cavity. Note: The probe icon will appear on the oven display screen. 2. Close the appliance door. NOTICE: When doing so, ensure that the meat probe's cable is not trapped in the appliance door. It may be damaged. 3. Touch the ON l OFF touch button. 4. Set the heating mode. Note: When the meat probe is plugged into the socket, you can only select a heating mode that is suitable to be used with the meat probe. 5. Touch the oven cavity temperature on the left in the bottom line. 6. Swipe to the left or right to select the required oven cavity temperature. 7. Touch the 8 symbol to apply the setting. 8. Touch the ¥ core temperature on the right in the bottom line. 9. Swipe to the left or right to select the required core temperature. 10.Touch the START l STOP touch button. The appliance starts the operation. 26
-
 1
1 -
2
-
3
-
4
-
5
-
6
-
7
-
8
-
9
-
10
-
11
-
12
-
13
-
14
-
15
-
16
-
17
-
18
-
19
-
20
-
 21
21 -
 22
22 -
 23
23 -
 24
24 -
 25
25 -
 26
26 -
 27
27 -
 28
28 -
 29
29 -
 30
30 -
 31
31 -
32
-
33
-
34
-
35
-
36
-
37
-
38
-
39
-
40
-
41
-
42
-
43
-
44
-
45
-
46
-
47
-
48
-
49
-
50
-
51
-
52
-
53
-
54
-
55
-
56
-
57
-
58
-
59
-
60
-
61
-
62
-
63
-
64
-
65
-
66
-
67
-
68
-
69
-
70
-
71
-
72
-
73
-
74
-
75
-
76
-
77
-
78
-
79
-
80
-
81
-
82
-
83
-
84
-
85
-
86
-
87
-
88
-
89
-
90
-
91
-
92
-
93
-
94
-
95
-
96
-
97
-
98
-
99
-
100
-
101
-
102
-
103
-
104
-
105
-
106
-
107
-
108
-
109
-
110
-
111
-
112
-
113
-
114
-
115
-
116
-
117
-
118
-
119
-
120
 |
 |
