Thermador PRD486GDHU Installation Instructions - Page 12
Step 4: Installing Anti-Tip, Device - parts
 |
View all Thermador PRD486GDHU manuals
Add to My Manuals
Save this manual to your list of manuals |
Page 12 highlights
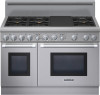
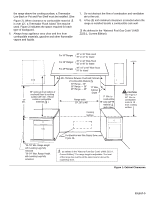
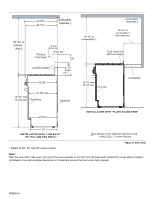
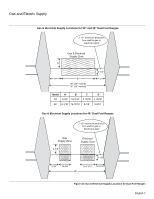
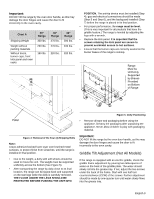
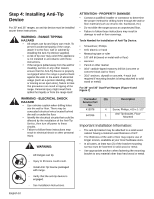
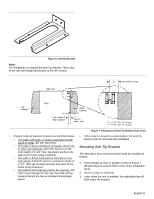
Step 4: Installing Anti-Tip Device For 30" and 36" ranges, an anti-tip device must be installed as per these instructions. WARNING - RANGE TIPPING HAZARD • All ranges can tip and injury can result. To prevent accidental tipping of the range, attach it to the floor, wall or cabinet by installing the Anti-Tip Device supplied. • A risk of tip-over may exist if the appliance is not installed in accordance with these instructions. • If the range is pulled away from the wall for cleaning, service or any other reason, ensure that the Anti-Tip Device is properly reengaged when the range is pushed back against the wall. In the event of abnormal usage (such as a person standing, sitting, or leaning on an open door), failure to take this precaution can result in tipping of the range. Personal injury might result from spilled hot liquids or from the range itself. WARNING - ELECRICAL SHOCK HAZARD • Use extreme caution when drilling holes into the wall or floor. There may be concealed electrical wires located behind the wall or under the floor. • Identify the electrical circuits that could be affected by the installation of the Anti-Tip Device, then turn off power to these circuits. • Failure to follow these instructions may result in electrical shock or other personal injury. WARNING: - All Ranges can tip. - Injury to Persons could result. - Install Anti-Tip Device packaged with range. - Verify that the anti-tip device is engaged. - See Installation Instructions. ATTENTION - PROPERTY DAMAGE • Contact a qualified installer or contractor to determine the proper method for drilling holes through the wall or floor material (such as ceramic tile, hardwood, etc.) • Do not slide the range across an unprotected floor. • Failure to follow these instructions may result in damage to wall or floor coverings. Tools Needed for Installation of Anti-Tip Device: • Screwdriver, Phillips • Drill, electric or hand • Measuring tape or ruler • 1/8" drill bit (wood or metal wall or floor) • Hammer • Pencil or other marker • 3/16" carbide-tipped masonry drill bit (concrete or concrete block wall or floor) • 3/16" anchors, drywall or concrete, 4 each (not required if mounting bracket is being attached to solid wood or metal) For 30" and 36" Dual Fuel Ranges (Figure 6 and Figure 7) Thermador Service Part No. 415078 647936 Qty Description 4 Screw, Phillips, #10 x 1-1/2" 1 Anti-Tip Bracket, FloorMounted Important Installation Information: • The anti-tip bracket may be attached to a solid wood cabinet having a minimum wall thickness of 3/4". • The thickness of the wall or floor may require use of longer screws, available at your local hardware store. • In all cases, at least two (2) of the bracket mounting screws must be fastened to solid wood or metal. • Use appropriate anchors when fastening the mounting bracket to any material other than hard-wood or metal. English 10
-
 1
1 -
2
-
3
-
4
-
5
-
6
-
 7
7 -
 8
8 -
 9
9 -
 10
10 -
 11
11 -
 12
12 -
 13
13 -
 14
14 -
 15
15 -
 16
16 -
 17
17 -
18
-
19
-
20
-
21
-
22
-
23
-
24
-
25
-
26
-
27
-
28
-
29
-
30
-
31
-
32
-
33
-
34
-
35
-
36
-
37
-
38
-
39
-
40
-
41
-
42
-
43
-
44
-
45
-
46
-
47
-
48
-
49
-
50
-
51
-
52
-
53
-
54
-
55
-
56
-
57
-
58
-
59
-
60
-
61
-
62
-
63
-
64
-
65
-
66
-
67
-
68
 |
 |