Thermador PRD486GDHU Installation Instructions - Page 19
Step 8: Door Removal and, Reinstallation
 |
View all Thermador PRD486GDHU manuals
Add to My Manuals
Save this manual to your list of manuals |
Page 19 highlights
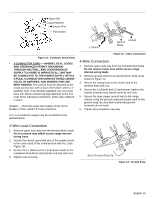
Model 30" 36" 48" Chart C: Backguard Kit Model Numbers 6" Std. Low Back 9" Low Back 22" Pot and Pan Shelf Included with Range N/A N/A N/A PA36GLBH PA48GLBH PA30GHSH PA36GHSH PA48GHSH Flush Island Trim PA30GITH Included with Range Included with Range Step 8: Door Removal and Reinstallation CAUTION USE CAUTION WHEN REMOVING THE DOOR. THE DOOR IS VERY HEAVY. • Make sure oven is cool and power to oven has been turned off before removing the door. Failure to do so could result in electrical shock or burns. • The oven door is heavy and fragile. Use both hands to remove or replace the door. • Grasp only the sides of the oven door when removing or replacing it. • Failure to grasp the oven door firmly and properly could result in personal injury and product damage. • With the door off, never release the levers and try to close the hinges. Without the weight of the door, the powerful springs will snap the hinges closed with great force. To Remove the Oven Door: 1. Fully open the oven door. 2. Flip the hinge clip toward you (see Photo B.) 3. Close the door until it stops; the open hinge clip will hold the door about halfway open. 4. Grasp the door on the sides. The door is heavy and fragile - always use both hands. Lift the door up and out (there will be some spring resistance to overcome). When the front of the door is high enough, you will be able to pull the door straight out. 5. Place the door in a safe and stable location. Photo A: Hinge bracket in closed position Photo B: Flip hinge clip toward you English 17
-
 1
1 -
2
-
3
-
4
-
5
-
6
-
7
-
8
-
9
-
10
-
11
-
12
-
13
-
 14
14 -
 15
15 -
 16
16 -
 17
17 -
 18
18 -
 19
19 -
 20
20 -
 21
21 -
 22
22 -
 23
23 -
 24
24 -
25
-
26
-
27
-
28
-
29
-
30
-
31
-
32
-
33
-
34
-
35
-
36
-
37
-
38
-
39
-
40
-
41
-
42
-
43
-
44
-
45
-
46
-
47
-
48
-
49
-
50
-
51
-
52
-
53
-
54
-
55
-
56
-
57
-
58
-
59
-
60
-
61
-
62
-
63
-
64
-
65
-
66
-
67
-
68
 |
 |
