Thermador PRD486GDHU User Manual - Page 3
About This Manual, Introduction - installation instructions
 |
View all Thermador PRD486GDHU manuals
Add to My Manuals
Save this manual to your list of manuals |
Page 3 highlights
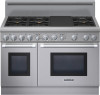
About This Manual How This Manual Is Organized This manual contains several sections: • The "Safety" section describes important safety precautions. Please read this section before using your new appliance. • "Using The Cooktop" and "Using the Oven" sections describe how to operate the appliance and how to ensure a long life for your appliance. • The "Care and Maintenance" section describes how to clean and maintain your appliance. • The "Before Calling For Service" section includes troubleshooting tips and your Warranty. Before using your appliance, be sure to read this manual. Pay special attention to the Important Safety Instructions located at the beginning of the manual. Introduction Gas Type Verification WARNING: If the information in this manual is not followed exactly, a fire or explosion may result causing property damage, personal injury or death. • Do not store or use gasoline or other flammable vapors and liquids in the vicinity of this or any other appliance. • WHAT TO DO IF YOU SMELL GAS • Do not try to light any appliance. • Do not touch any electrical switch. • Do not use any phone in your building. • Immediately call your gas supplier from a neighbor's phone. Follow the gas supplier's instructions. • If you cannot reach your gas supplier, call the fire department. • Installation and service must be performed by a qualified installer, service agency or the gas supplier. The Thermador Professional® Ranges are freestanding units available in a number of configurations. All models feature a gas cooking surface with a professional size, electric convection, self-cleaning oven with convection broil capability. The 48" model has an electric self-cleaning auxiliary oven with broil capability. Verify the type of gas supplied to the location. Ensure that the appliance is connected to the type of gas for which it is certified. All models are certified for use with natural gas. Field conversion of the appliance for use with propane gas supply will require a conversion kit. Make certain your range and gas type are the same. Refer to the product rating label which can be located as indicated on page 38. CAUTION: When connecting the unit to propane gas, make certain the propane gas tank is equipped with its own high-pressure regulator in addition to the pressure regulator supplied with the range. The maximum gas pressure to this appliance must not exceed 14.0 inches water column (34.9 mb) from the propane gas tank to the pressure regulator. Important: All ranges must be installed with a backguard. The 30" model comes with a Low Back, while the 36" and 48" models come with a Flush Island Trim. Other available backguards must be ordered separately and installed at the back of the range. The three backguard choices include a Low Back, Pot and Pan Shelf, or Flush Island Trim. Before using the range, insure that it is equipped with a proper backguard. DO NOT attempt to use a backguard that is not designed to fit your particular model range. Refer to the Installation Instructions accompanying this appliance for more information. English 1
-
 1
1 -
 2
2 -
 3
3 -
 4
4 -
 5
5 -
 6
6 -
 7
7 -
 8
8 -
 9
9 -
10
-
11
-
12
-
13
-
14
-
15
-
16
-
17
-
18
-
19
-
20
-
21
-
22
-
23
-
24
-
25
-
26
-
27
-
28
-
29
-
30
-
31
-
32
-
33
-
34
-
35
-
36
-
37
-
38
-
39
-
40
-
41
-
42
-
43
-
44
-
45
-
46
-
47
-
48
-
49
-
50
-
51
-
52
-
53
-
54
-
55
-
56
-
57
-
58
-
59
-
60
-
61
-
62
-
63
-
64
-
65
-
66
-
67
-
68
-
69
-
70
-
71
-
72
-
73
-
74
-
75
-
76
-
77
-
78
-
79
-
80
-
81
-
82
-
83
-
84
-
85
-
86
-
87
-
88
-
89
-
90
-
91
-
92
-
93
-
94
-
95
-
96
-
97
-
98
-
99
-
100
-
101
-
102
-
103
-
104
-
105
-
106
-
107
-
108
-
109
-
110
-
111
-
112
-
113
-
114
-
115
-
116
-
117
-
118
-
119
-
120
-
121
-
122
-
123
-
124
-
125
-
126
-
127
-
128
-
129
-
130
-
131
-
132
 |
 |