Thermador PRD486GDHU User Manual - Page 4
Safety - manual
 |
View all Thermador PRD486GDHU manuals
Add to My Manuals
Save this manual to your list of manuals |
Page 4 highlights
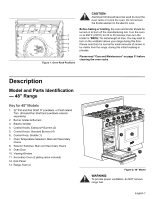
This manual contains important Care and Use information for all Thermador Professional® Ranges. When using this manual, it is critical that you know the model number of your range, as some information will be unique to each range. The model number may be found on the rating plate located on the range as identified on page 38 of this manual. The charts on the following pages summarize the various range models and identify the features of each range Safety IMPORTANT SAFETY INSTRUCTIONS READ AND SAVE THESE INSTRUCTIONS Gas and Electrical Requirements and Grounding Instructions PLEASE READ CAREFULLY 30" Dual-Fuel Models: 240/208 volts, 60 Hz., 35 Amp electrical circuit required for each line. 36" Dual-Fuel Models: 240/208 volts, 60 Hz., 35 Amp electrical circuit required for each line. 48" Dual-Fuel Models: 240/208 volts, 60 Hz., 50 Amp electrical circuit required for each line. WARNING: ALWAYS DISCONNECT THE ELECTRICAL PLUG FROM THE WALL RECEPTACLE BEFORE SERVICING THIS UNIT It is recommended that a dedicated circuit servicing this appliance be provided. The use of gas cooking appliances results in the production of heat and moisture. CAUTION: FOR PERSONAL SAFETY, THIS APPLIANCE MUST BE CONNECTED TO A PROPERLY GROUNDED AND POLARIZED ELECTRICAL POWER SUPPLY. WARNING: To avoid possible burn or fire hazard, a backguard designed specifically for this range must be installed whenever the range is used. See Installation Instructions for electrical requirements and grounding instructions. It is the personal responsibility and obligation of you, the user, to have this appliance connected to the electrical power supply by a qualified electrician, in accordance with the National Electrical Code and/or applicable local codes and ordinances. CAUTION - ALL MODELS: IN CASE OF AN ELECTRICAL FAILURE If for any reason a gas control knob is turned ON and there is no electrical power to operate the electronic igniters on the range's cooktop burners, turn OFF the gas control knob and wait 5 minutes for the gas to dissipate before lighting the burner manually. To light the burners manually, carefully hold a lighted match to the burner ports and turn the gas control knob to . During a power failure, you can use the standard cooktop burners, but each must be lit with a match. DO NOT attempt to light the two left burners manually. These burners are equipped with the ExtraLow® feature and cannot be lit manually. English 2
-
 1
1 -
 2
2 -
 3
3 -
 4
4 -
 5
5 -
 6
6 -
 7
7 -
 8
8 -
 9
9 -
 10
10 -
11
-
12
-
13
-
14
-
15
-
16
-
17
-
18
-
19
-
20
-
21
-
22
-
23
-
24
-
25
-
26
-
27
-
28
-
29
-
30
-
31
-
32
-
33
-
34
-
35
-
36
-
37
-
38
-
39
-
40
-
41
-
42
-
43
-
44
-
45
-
46
-
47
-
48
-
49
-
50
-
51
-
52
-
53
-
54
-
55
-
56
-
57
-
58
-
59
-
60
-
61
-
62
-
63
-
64
-
65
-
66
-
67
-
68
-
69
-
70
-
71
-
72
-
73
-
74
-
75
-
76
-
77
-
78
-
79
-
80
-
81
-
82
-
83
-
84
-
85
-
86
-
87
-
88
-
89
-
90
-
91
-
92
-
93
-
94
-
95
-
96
-
97
-
98
-
99
-
100
-
101
-
102
-
103
-
104
-
105
-
106
-
107
-
108
-
109
-
110
-
111
-
112
-
113
-
114
-
115
-
116
-
117
-
118
-
119
-
120
-
121
-
122
-
123
-
124
-
125
-
126
-
127
-
128
-
129
-
130
-
131
-
132
 |
 |