Thermador PRD486JDGU Use and Care Manual
Thermador PRD486JDGU Manual
 |
View all Thermador PRD486JDGU manuals
Add to My Manuals
Save this manual to your list of manuals |
Thermador PRD486JDGU manual content summary:
- Thermador PRD486JDGU | Use and Care Manual - Page 1
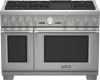
THERMADOR PROFESSIONAL® PRO GRAND DUAL FUEL RANGES CUISINIÈRES MIXTES PROFESSIONALmc PRO-GRAND DE THERMADOR PARA ESTUFAS MIXTAS PROFESSIONAL® PRO GRAND™ de THERMADOR - Thermador PRD486JDGU | Use and Care Manual - Page 2
THERMADOR PROFESSIONAL® PRO GRAND DUAL FUEL RANGES CUISINIÈRES MIXTES PROFESSIONALmc PRO GRAND de THERMADOR PARA ESTUFAS MIXTAS PROFESSIONAL® PRO GRAND™ de THERMADOR Models Modèles Modelos PRD36 PRD48 - Thermador PRD486JDGU | Use and Care Manual - Page 3
a moment to review the Use and Care Guide. You will find the answers to all of your questions as well as some very important safety information. Pay special attention to the Important Safety Instructions located at the beginning of the manual. Your THERMADOR® product is ready and waiting to be used - Thermador PRD486JDGU | Use and Care Manual - Page 4
ás de informaciones esenciales en materia de seguridad. Ponga especial atención a las Instrucciones de seguridad importantes, situadas al principio del manual. ¡Su producto THERMADOR® está listo y solo espera a que Usted lo use para su próxima creación gastronómica! Nuestros productos se fabrican - Thermador PRD486JDGU | Use and Care Manual - Page 5
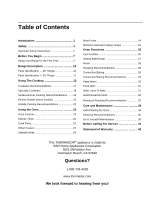
33 Care and Maintenance 34 Self-Cleaning the Oven 34 Cleaning Recommendations 36 Do-It-Yourself Maintenance 39 Before Calling For Service 41 Statement of Warranty 42 This THERMADOR® appliance is made by BSH Home Appliances Corporation 5551 McFadden Ave. Huntington Beach, CA 92649 - Thermador PRD486JDGU | Use and Care Manual - Page 6
installer, service agency or the gas supplier. The THERMADOR PROFESSIONAL® ranges are freestanding units available in a number of configurations. All models feature a gas cooking surface with a professional size, electric convection, self-cleaning oven with broil capability. This manual contains - Thermador PRD486JDGU | Use and Care Manual - Page 7
A THERMADOR® SERVICING THIS UNIT. It is recommended that a dedicated circuit servicing this appliance be provided. The use of gas cooking appliances Manual for electrical requirements and grounding instructions. It is the personal responsibility and obligation of you, the user, to have this appliance - Thermador PRD486JDGU | Use and Care Manual - Page 8
gas has had time to dissipate. Wait at least 5 minutes before using the range. Do not repair or replace any part of the appliance unless specifically recommended in this manual. All other servicing should be referred to a qualified technician. Children should not be left alone or unattended in an - Thermador PRD486JDGU | Use and Care Manual - Page 9
READ AND SAVE THESE INSTRUCTIONS Never use any part of the range or oven for storage. Flammable materials can catch fire and plastic items may melt or ignite. Do not hang articles from any part of the appliance or place anything against the oven. Some fabrics are quite flammable and may - Thermador PRD486JDGU | Use and Care Manual - Page 10
linings may also trap heat, causing a fire hazard. WARNING: The appliance is for cooking. Based on safety considerations, never use the oven or cooktop to warm or heat a room. Also, such use can damage the cooktop or oven parts. When using the cooktop: DO NOT TOUCH THE BURNER GRATES OR THE IMMEDIATE - Thermador PRD486JDGU | Use and Care Manual - Page 11
an authorized service center for service. To avoid a fire hazard, grease accumulation must be prevented by frequently cleaning the ventilation hood and filters. In case of fire or when intentionally "flaming" liquor or other spirits on the range's cooktop, follow manufacturer's instructions. Use - Thermador PRD486JDGU | Use and Care Manual - Page 12
good ventilation during and immediately after self cleaning the oven. 3. Operating the unit according to the instructions in this manual. Do not store or use corrosive chemicals, vapors, flammables, or nonfood products in or near this appliance. It is specifically designed for use when heating or - Thermador PRD486JDGU | Use and Care Manual - Page 13
, Wok Support Ring, Toe Kick, and other accessories are available from your THERMADOR® dealer. 4. Position the racks correctly in the oven. The under the front of the rail guides. Push the rack into the oven, lifting the rack stops over the front of the rail guides. Slide the rack into position. - Thermador PRD486JDGU | Use and Care Manual - Page 14
oven. IMPORTANT: When placing the gliding rack in the oven, make sure the front supports on the rack guides hood is a recirculation type open a window). Set oven at 500ºF/ 260ºC and let the oven go through a 2 hour cycle at high heat then shut off the oven of the range's cooktop (see Figure 14 and - Thermador PRD486JDGU | Use and Care Manual - Page 15
Description Model and Parts Identification - 48" Range 11 11 22 22 55 8 66 7 7 78 7 9 9 Back (ordered separately) 14. Burner Grates & Burners 15. Electric Griddle 16. Main Oven (3 racks included) 17. Secondary Oven (2 racks included) 18. Range Feet (4) 19. Leg Cover Assembly (4), Toe Kick - Thermador PRD486JDGU | Use and Care Manual - Page 16
Range Identification 4 5 3 1 Main Electric Oven Interior 1. Oven Interior Lights (2) 2. Broil Element 3. Oven Temperature Sensor 4. Temperature Probe Outlet (also located on the left side of the small oven cavity on select models) 5. Rack Guides 6. Full Access® Oven Rack (3 included, not shown - Thermador PRD486JDGU | Use and Care Manual - Page 17
the other on the rangetop. Left Rear XLO Center Rear Griddle Right Rear XLO XLO Left Front Center Front XLO XHI Right Front Figure 10: Cooktop Symbols Operation of the Burners • Press in on the knob and turn it counter-clockwise to the setting. • The igniter for the selected burner sparks - Thermador PRD486JDGU | Use and Care Manual - Page 18
BTU Output for Standard Star® Burners • HI is equivalent to 18,000 BTU / HR (15,000 BTU / HR using Propane). • SIM is equivalent to 2,100 BTU / HR. BTU Output for ExtraLow Star® Burners • HI is equivalent to 18,000 BTU / HR (15,000 BTU / HR using Propane). • SIM is equivalent to 3,000 BTU / HR. • - Thermador PRD486JDGU | Use and Care Manual - Page 19
burner fails to ignite, refer to "Before Calling For Service" on page 41. Ignitor Automatic Re-Ignition If any one on the Star® burner bases for the cooktop to function properly. If the burner cap is not properly placed, one or more of the following problems may occur. • Burner flames are too - Thermador PRD486JDGU | Use and Care Manual - Page 20
as shown in Figure 14. Power Failure • In the event of a power failure, only the Standard burners can be manually lit. It is necessary to light each one individually. • If the cooktop is being used when the power failure occurs, turn all knobs to the OFF position. • The Standard Star® burners can - Thermador PRD486JDGU | Use and Care Manual - Page 21
burners should be adjusted by a certified installer or agency to ensure proper combustion. 2) Ensure proper ventilation with an open window or use a ventilation fan or hood when cooking with gas. 3) Always operate the unit according to the instructions in this manual. English 16 - Thermador PRD486JDGU | Use and Care Manual - Page 22
Cookware Recommendations WARNING: To avoid risk of serious injury, damage to appliance or cookware, please observe the following: • Bakeware, such as large casserole pans, cookie sheets, etc. should never be used on the cooktop. • Placement of large stock pots should be staggered when used on the - Thermador PRD486JDGU | Use and Care Manual - Page 23
the Recommendations Use the chart on page 19 through page 20 as a guide. The settings you use will vary depending on the pans selected and Round bottom woks must be used with a support ring. The Wok pan and the porcelain-coated cast iron wok support ring must be purchased separately (PWOKRINGHC). - Thermador PRD486JDGU | Use and Care Manual - Page 24
Surface Burner Cooking Recommendations Food Start Setting BEVERAGES Cocoa BREADS French Toast, Pancakes, Grilled Sandwiches BUTTER Melting MED - heat milk, cover MED - preheat skillet SIM - to start melting Finish Setting Standard Star® Burner SIM - finish heating SIM to MED - cook Finish - Thermador PRD486JDGU | Use and Care Manual - Page 25
Food Start Setting Finish Setting Standard Star® Burner Finish Setting ExtraLow (XLO) Star® Burners Poaching: Chicken, whole or pieces, Fish Simmering: Stewed Chicken, Corned Beef, Tongue, etc. MED HI - Cover, bring liquids to a boil HI - cover, bring liquid to a boil To finish cooking Simmer - Thermador PRD486JDGU | Use and Care Manual - Page 26
griddle plate. See the instructions that come with the grill prescribed by the Use and Care Guide. Figure 24: Griddle Control Knob performance. See Installation Manual for procedure to appliance. The excessive airflow could be from an air-conditioning register or ceiling fan blowing at the cooktop - Thermador PRD486JDGU | Use and Care Manual - Page 27
use. When removing the tray, use care when tipping it so that the contents do not spill. • The griddle plate and its grease tray are dishwasher safe. • After cooling, pour the grease into a grease-resistant container for disposal. Cooking on the Griddle 1. Turn the knob to the appropriate cooking - Thermador PRD486JDGU | Use and Care Manual - Page 28
food is consistently either too brown or too light for your tastes. • The oven must be turned off in order to set an offset value. • The Offset continue to run the inputted offset value indefinitely until the user manually chooses to render it otherwise or until the unit loses power, in which - Thermador PRD486JDGU | Use and Care Manual - Page 29
griddle on the cooktop are still fully functional during Sabbath mode. • For double oven models, Sabbath Mode is available for both ovens, but not at should not touch any part of the cooking dish or parts of the oven, as this will affect the accuracy of the results. 4. Close the oven door. 5. Press - Thermador PRD486JDGU | Use and Care Manual - Page 30
determined by the U. S Department of Agriculture Food Safety and Inspection Service, are as follows: Fresh ground beef, veal, lamb, pork Do not wash probe in the dishwasher; use warm, soapy water instead to clean it. • To prevent possible burns, wait until the oven has cooled before trying to - Thermador PRD486JDGU | Use and Care Manual - Page 31
• Allow at least 1" (25.4mm) of space between the pans and the oven walls so heat can circulate around each pan. • Stagger bakeware so that one is directly above another. Allow 11/2" (38mm) above and below each pan. Main Oven One Rack Baking • The Bake mode is best for baking on one rack with - Thermador PRD486JDGU | Use and Care Manual - Page 32
preheat' from 375°F/ 191°C down to 250°F/ 121°C, and the number of bars will increase the closer it gets to that temperature as the oven cools down. 5. The temperature gauge will start to move toward the temperature setting. The temperature indicator reflects the temperature setting. • The needle of - Thermador PRD486JDGU | Use and Care Manual - Page 33
• When roasting whole chickens or turkey, tuck wings behind back and loosely tie legs with kitchen string. MEAT AND POULTRY IN COVERED PAN OVEN RACK TEMPERATURE LEVEL COOK TIME END TEMP Beef: Pot roast, 3-4 pounds Beef brisket Beef chuck Meatloaf 350°F / 177°C 350°F / 177°C 350°F / 177°C 350 - Thermador PRD486JDGU | Use and Care Manual - Page 34
and baking times vary. For accurate information, write the Extension Service, Colorado State University, Fort Collins, Colorado 80521. There may food. The moisture will condense on any surface cooler than the inside of the oven, such as the control panel. Rack Positions (see Figure 1 on Page 8) - Thermador PRD486JDGU | Use and Care Manual - Page 35
oven mode is not Oven oven to preheat before placing the item in the oven oven. 3. Place warmed dish in the oven. Close the door. • Do not open the oven door unnecessarily. Opening the door will reduce the temperature of the oven oven walls or oven oven door. DO NOT continue to use the oven - Thermador PRD486JDGU | Use and Care Manual - Page 36
maintains the warm, non-drafty environment needed for proofing yeast leavened products. The proofing temperature is preset at 100°F/ 38°C. To Set the Secondary Oven for Proofing 1. Place dough in dish and loosely cover. 2. Use any rack level that accommodates the size of the bowl or pan. Close the - Thermador PRD486JDGU | Use and Care Manual - Page 37
heating up to the broiling temperature. When the broiler is turned off, the blower remains on until the oven temperature cools to 375°F/ 191°C. DO NOT continue to use the broiler if the cooling blower fails to activate while broiling. Call a qualified service agency to repair the range. English 32 - Thermador PRD486JDGU | Use and Care Manual - Page 38
Breasts Chicken Thighs Half Chickens Roast Chicken Turkey RACK NUMBER OVEN MODE CONTROL TEMPERATURE SETTING APPROXIMATE COOKING TIME 4 Broil or 325°F/ 163°C Roast 75 to 90 minutes 20 to 25 min/lb SPECIAL INSTRUCTIONS AND TIPS Broil until no pink in center Time depends on rareness of steak - Thermador PRD486JDGU | Use and Care Manual - Page 39
Oven(s) WARNING: • Children should not be left alone or unattended in an area where appliances are in use. • During the self-clean cycle, exterior surfaces may become hotter than usual. Parts of the appliance an open window, or use a ventilation fan or hood. • Keep pet birds out of the kitchen or - Thermador PRD486JDGU | Use and Care Manual - Page 40
approximately 2 hours to complete. Do not turn either of the oven control knobs to the OFF position until the automatic lock cycles recommended on the chart. 4. Most exterior parts of this appliance can be cleaned with hot sudsy water instructions on its package. The following chart gives directions - Thermador PRD486JDGU | Use and Care Manual - Page 41
Cleaning Recommendations PART/MATERIAL SUGGESTED CLEANERS IMPORTANT REMINDERS Brass Star® Burner cap is correctly seated on the burner base. Control Knobs/Metal Bezels/Chrome Full Access® Oven Racks/Chrome Exterior Finish/Backguard Stainless Steel • Hot sudsy water; rinse and dry immediately. - Thermador PRD486JDGU | Use and Care Manual - Page 42
Clean the grease tray after each use. remove it spills the grease. • May be placed in dishwasher. • Wash in detergent and hot water; rinse and dry. • Stubborn soil: Soft Scrub®. Griddle crack the aluminum plate. • Do not clean any part of the grill or griddle in a selfcleaning oven. English 37 - Thermador PRD486JDGU | Use and Care Manual - Page 43
PART may be used. Apply with a damp sponge or cloth according to the manufacturer's instructions. Rinse thoroughly and wipe dry with a soft cloth. If cleaners such as dry with a soft cloth. DO NOT CLEAN IN SELF-CLEANING OVEN To loosen cooked on food, sprinkle empty hot grid with powdered laundry - Thermador PRD486JDGU | Use and Care Manual - Page 44
appliance oven use. DO NOT USE a standard household light bulb in any oven. Call THERMADOR® Customer Care Center at 1-800-735-4328 or your nearest THERMADOR Location 4. Support the glass lens cover with two fingers along the bottom edge to prevent the cover from falling to the bottom of the oven. 5. - Thermador PRD486JDGU | Use and Care Manual - Page 45
Power Failure In the event of a power failure, only the standard Star® burners can be lit manually. It is necessary to light each standard burner individually (see also page 15). If the range's cooktop is being used when the power failure occurs, turn all of the burner control knobs to the OFF - Thermador PRD486JDGU | Use and Care Manual - Page 46
or is the circuit breaker tripped? • Is the manual shut-off valve closed, preventing the flow of gas? oven cavity and the range side panel. Keep your invoice for Warranty validation. Model Number Serial Number Date of Purchase Dealer's Name Dealer's Phone Number Service Center's Name Service - Thermador PRD486JDGU | Use and Care Manual - Page 47
BSH Home Appliances Corporation THERMADOR® in this Statement of Limited Product Warranty applies only to the THERMADOR® appliance sold to parts. THERMADOR's sole liability and responsibility hereunder is to repair manufacturer-defective Product only, using a English 42 THERMADOR-authorized service - Thermador PRD486JDGU | Use and Care Manual - Page 48
instructions, mishandling, unauthorized service (including selfperformed "fixing" or exploration of the appliance product or this manual without notification. In no event shall THERMADOR® have any parts; Products on which the serial numbers have been altered, defaced, or removed; service visits - Thermador PRD486JDGU | Use and Care Manual - Page 49
1 Sécurit 2 Instructions de sécurité importantes service technique 42 Énoncé de garantie limitée du produit 43 Cet appareil électroménager de THERMADORmc est fait par BSH Home Appliances Corporation 5551 McFadden Ave. Huntington Beach, CA 92649 Des questions? 1-800-735-4328 www.thermador - Thermador PRD486JDGU | Use and Care Manual - Page 50
installé et que la patte de l'appareil est retenue par le support lorsque vous remettez la cuisinière en place. Ne faites pas fonctionner l'appareil si le support anti-bascule n'est pas en place. La nonobservation des instructions du présent guide peut entraîner la mort ou causer de graves brûlures - Thermador PRD486JDGU | Use and Care Manual - Page 51
locaux en vigueur. Français 2 Avant d'utiliser la cuisinière, assurez-vous qu'elle est munie d'un dosseret adéquat. Consultez les instructions d'installation qui accompagnent cet appareil pour obtenir de plus amples renseignements. AVERTISSEMENT: Pour éviter tout risque de brûlure ou d'incendie, un - Thermador PRD486JDGU | Use and Care Manual - Page 52
les blessures Votre cuisinière PROFESSIONALmc de THERMADOR est conçue pour être fiable et être correctement effectués. Suivez les instructions d'installation fournies avec le produit. l'appareil, sauf sous recommandation expresse du présent guide. Toute autre réparation doit être effectuée par - Thermador PRD486JDGU | Use and Care Manual - Page 53
DE SÉCURITÉ IMPORTANTES LISEZ ET CONSERVEZ CES INSTRUCTIONS AVERTISSEMENT: POUR RÉDUIRE LES RISQUES DE FEU DE BRÛLURE. Si les flammes ne disparaissent pas immédiatement, ÉVACUEZ LES LIEUX ET APPELEZ LE SERVICE D'INCENDIE. • NE PRENEZ JAMAIS UN POÊLON EN FEU - Vous pourriez vous brûler. • N' - Thermador PRD486JDGU | Use and Care Manual - Page 54
sol, au mur ou à une armoire à l'aide du dispositif anti-bascule fourni. • L'appareil risque de basculer s'il n'est pas installé conformément à ces instructions. • En déplaçant la cuisinière pour la nettoyer, la AVERTISSEMENT: N'utilisez JAMAIS cet appareil pour chauffer une pièce. Ceci peut causer - Thermador PRD486JDGU | Use and Care Manual - Page 55
DE SÉCURITÉ IMPORTANTES LISEZ ET CONSERVEZ CES INSTRUCTIONS Les grandes casseroles, les plaques à biscuits, etc. ne doivent jamais être utilisées sur la surface de cuisson. Soyez prudent et assurez-vous que les - Thermador PRD486JDGU | Use and Care Manual - Page 56
é pour obtenir du service. 1. Assurez-vous qu'il y a une bonne ventilation lorsque vous cuisinez. 2. Assurez-vous qu'il y a une bonne ventilation pendant et immédiatement après l'autonettoyage du four. 3. Faites fonctionner l'appareil conformément aux instructions du présent guide. Ne rangez pas - Thermador PRD486JDGU | Use and Care Manual - Page 57
du produit 1 Guide de trucs pratiques 1 1 1 1 1 Manuel d'installation 1 1 1 Guide d'utilisation et d' lors de toutes vos futures communications avec le service à la clientèle. Inscrivez-les également de plaque chauffante, plinthe, anneau support pour wok et autres accessoires en - Thermador PRD486JDGU | Use and Care Manual - Page 58
toujours les grilles avant de procéder à l'autonettoyage. 5 4 3 2 1 Figure 1 : Positions des grilles dans le grand four 5. Les grilles coulissantes Full Accessmc de THERMADOR sont standards sur tous les modèles : vous pouvez tirer et pousser les grilles dans le four avec un effort minime - même - Thermador PRD486JDGU | Use and Care Manual - Page 59
de sûreté et retirez-la du four.. Les cuisinières PROFESSIONALmc de THERMADOR dégagent parfois une odeur particulière ou de la fumée lors de la vous mettez la grille coulissante dans le four, assurez-vous que les supports frontaux des glissières sont appuyés dans les grandes fentes des coins - Thermador PRD486JDGU | Use and Care Manual - Page 60
Description Identification du modèle et des pièces - Cuisinière de 48 po 11 11 22 22 55 8 66 7 7 78 7 9 9 1100 9 9 1100 1111 12 12 44 33 11 Figure 4 : Tableau de commande de la cuisinière mixte de 48 pouces Légende du modèle de 48 po 13 14 13 15 14 14 14 15 14 14 1. Bouton - Thermador PRD486JDGU | Use and Care Manual - Page 61
Identification du modèle et des pièces - Cuisinière de 36 po Légende du modèle de 36 po 1. Garniture d'îlot (inclus), étagère haute ou dosseret bas (commandés séparément) 2. Grilles et brûleurs (plaque chauffante située au centre pour certains modèles) 3. Bouton de commande: brûleurs ExtraLowmc (3) - Thermador PRD486JDGU | Use and Care Manual - Page 62
2 11 66 2 9 88 72 44 55 33 11 Intérieur du four au gaz principal 1. Lumières intérieures (2) 2. Brûleurs à infrarouge du grilloir (2) 3. Capteur de température du four 4. Prise de la sonde thermique (également située du côté gauche dans le petit four de certains modèles) 5. Glissières des grilles - Thermador PRD486JDGU | Use and Care Manual - Page 63
Enjoliveur Bouton Figure 9 : Bouton de commande standard d'un brûleur Starmc Fonctionnement des brûleurs Brûleur arrière gauche Brûleur arrière droit XLO Brûleur arrière central XLO Plaque chauffante BTU des brûleurs standards • HI équivaut à 15 000 BTU/h (13 000 BTU/h avec propane). • SIM é - Thermador PRD486JDGU | Use and Care Manual - Page 64
touchez pas les brûleurs pendant que les allumeurs produisent des étincelles. Si un brûleur ne s'allume pas, consultez la section « Avant d'appeler le service technique ». Français 15 - Thermador PRD486JDGU | Use and Care Manual - Page 65
Rallumage automatique Si un ou plusieurs brûleurs s'éteignent, l'allumeur électronique produit automatiquement des étincelles pour rallumer la flamme. Ne touchez pas aux brûleurs pendant que les allumeurs produisent des étincelles. IMPORTANT: • Pour assurer une bonne combustion, n'utilisez pas la - Thermador PRD486JDGU | Use and Care Manual - Page 66
OFF. • La plaque chauffante et le gril ne peuvent être utilisés pendant une panne de courant. • Si vous détectez une odeur de gaz, consultez les instructions de sécurité de la page 1. AVERTISSEMENT: En cas de panne de courant, mettez tous les boutons à la position OFF. Seuls les brûleurs standards - Thermador PRD486JDGU | Use and Care Manual - Page 67
Récipients recommandés AVERTISSEMENT: Pour éviter tout risque de dommages sérieux à l'appareil ou à un récipient, observez les consignes suivantes: • Les grands récipients, les plaques à biscuits, etc. ne doivent pas être utilisés sur la surface de cuisson. • Placez les grandes casseroles de façon - Thermador PRD486JDGU | Use and Care Manual - Page 68
des brûleurs Starmc peut être un réglage de cuisson ou de maintien de température. Figure 22 : Wok à fond rond dans un anneau de support Augmentez ou diminuez la flamme progressivement. Laissez le temps au récipient et aux aliments de réagir au nouveau réglage. • Woks - Les woks à fond plat ou - Thermador PRD486JDGU | Use and Care Manual - Page 69
maintenir la faire fondre HI - Couvrir, porter l'eau à température* SIM à MED - terminer la ébullition, ajouter les céréales cuisson selon les instructions sur l'emballage. XLO - peut être remué pour Utiliser XLO faire fondre plus vite DESSERTS SIM à MED - cuire selon la SIM à MED Bonbons - Thermador PRD486JDGU | Use and Care Manual - Page 70
cuisson Laisser mijoter Identique aux brûleurs standards Identique aux brûleurs standards Identique aux brûleurs standards Faire cuire selon les instructions du sachet XLO - Pour maintenir la chaleur, couvrir XLO - laisser mijoter sans couvercle pour que la sauce épaississe XLO - Pour maintenir la - Thermador PRD486JDGU | Use and Care Manual - Page 71
tement en aluminium est conçu pour remplacer la plaque chauffante. Consultez les instructions de la plaque chauffante pour obtenir de plus amples détails. La plaque d'une façon autre que ce qui est indiqué dans le guide d'utilisation et d'entretien. Figure 24 : Bouton de commande de la plaque - Thermador PRD486JDGU | Use and Care Manual - Page 72
AVIS: Le rendement de la plaque chauffante ou du gril peut varier si la circulation d'air près de l'appareil est trop élevée. Une circulation d'air excessive pourrait provenir d'un ventilateur de plafond ou d'un appareil de climatisation soufflant sur la surface de cuisson. Cela pourrait prolonger - Thermador PRD486JDGU | Use and Care Manual - Page 73
Utilisation du four Fonctions de cuisson supplémentaires Commandes pour le réglage du four 1. La touche ENTER confirme la sélection. 2. La touche (-) augmente le temps ou la température, et la touche (+) les diminue. Ces touches servent également à choisir l'une des fonctions du menu : minuterie, - Thermador PRD486JDGU | Use and Care Manual - Page 74
Utilisation du mode sabbat Le mode sabbat sert à répondre à l'exigence de ne pas travailler le jour du sabbat. Le four reste allumé à une température précise aussi longtemps que nécessaire. L'utilisateur peut préparer un repas avant le jour de congé puis le laisser à sa fonction de conservation de - Thermador PRD486JDGU | Use and Care Manual - Page 75
minimales considérées comme sécuritaire pour qu'un aliment puisse être mangé, comme établi par le U. S Department of Agriculture Food Safety and Inspection Service, sont les suivantes: Viande hachée fraîche (bœuf, veau, 160 °F agneau, porc) (72 °C) Côtelettes, filets et rôtis de bœuf, de veau et - Thermador PRD486JDGU | Use and Care Manual - Page 76
• Des plaques commerciales à pâtisserie pleine grandeur (18 po x 26 po - 457 mm x 660 mm) peuvent être utilisées dans les fours de 36 et 48 pouces (914 mm et 1219 mm). Position des grilles de four Les positions des grilles de four sont numérotées comme un ascenseur. Le numéro un correspond à la - Thermador PRD486JDGU | Use and Care Manual - Page 77
Réglage pour cuisson au four/cuisson par convection/rôtissage Commandes du petit four Commandes du four principal BROIL CLEAN Réglage des fours 1. Placez la grille à la position désirée et fermez la porte. 2. Réglez l'anneau de sélection de mode (Figure 31) à Bake (cuisson au four), Convection - Thermador PRD486JDGU | Use and Care Manual - Page 78
Conseils avec le mode rôtissage • Le mode rôtissage est excellent pour les viandes ou les volailles plus tendres, lorsque la viande est braisée et qu'un plat fermé est utilisé. • Ajoutez du liquide, comme de l'eau, du jus, du vin, du bouillon ou du fond de sauce pour des plats plus savoureux et plus - Thermador PRD486JDGU | Use and Care Manual - Page 79
en mode cuisson ou cuisson à convection, les recettes et les durées de cuisson varient. Pour une information précise, écrivez à Extension Service, Colorado State University, Fort Collins, Colorato 80521. Vous pourriez avoir à payer des frais pour obtenir les bulletins. Précisez le type d'information - Thermador PRD486JDGU | Use and Care Manual - Page 80
60 à 75 minutes 325°F / 163°C 20 à 25 minutes 425°F / 218°C ou selon les instructions de l'emballage 350°F / 177°C 10 à 15 minutes 55 à 70 minutes 425°F / 218°C 425 °F/60-66 °C. • Les aliments doivent être à une température de service (plus de 140 °F/60 °C) avant d'être mis au four. 3. Mettez - Thermador PRD486JDGU | Use and Care Manual - Page 81
et de réchauffer des plats, grâce à ses réglages à basse température. Les plats cuisinés chauds peuvent être conservés à la température de service. Réglez le four sur au mode de cuisson au four et utilisez la température indiquée dans le tableau. AVERTISSEMENT: SALUBRITÉ ALIMENTAIRE - Le ministère - Thermador PRD486JDGU | Use and Care Manual - Page 82
. • Une grande lèchefrite de deux pièces est fournie avec votre cuisinière PROFESSIONALmc de THERMADOR. Les jus de cuisson coulent au travers de la grille quadrillée dans la partie inférieure, se met pas en marche. Appelez un centre de service qualifié pour que le four soit réparé. Français 33 - Thermador PRD486JDGU | Use and Care Manual - Page 83
de poulet Demi-poulets Poulet à rôtir Dinde No. de Grille 4 4 4 3 3 4 3 3 2 2 Mode du Four Réglage de Température Temps de Cuisson Approximatif Instructions Particulières et Conseils Grilloir ou grilloir par convection Grilloir ou grilloir par convection 15 à 20 minutes Faire griller jusqu - Thermador PRD486JDGU | Use and Care Manual - Page 84
Entretien et nettoyage Autonettoyage du four AVERTISSEMENT : • Ne laissez pas d'enfants seuls ou sans surveillance dans un endroit où des électroménagers sont en cours d'utilisation. • Durant le cycle d'autonettoyage, les surfaces extérieures de l'appareil peuvent devenir plus chaudes que d' - Thermador PRD486JDGU | Use and Care Manual - Page 85
Verrouillage Lorsque le cycle d'autonettoyage se met en marche, la porte se verrouille automatiquement. La jauge de température se dirige vers CLEAN cinq minutes après le début du cycle. Assurez-vous que la porte est verrouillée. Vous pouvez mettre fin à l'autonettoyage en mettant le bouton de - Thermador PRD486JDGU | Use and Care Manual - Page 86
Marques de produit Les marques de produits utilisées sont destinées à indiquer un type de produit nettoyant et non à en faire la promotion. L'omission d'une marque ne signifie pas qu'elle convient ou ne convient pas. De nombreux produits sont distribués à grande échelle et il est possible de les - Thermador PRD486JDGU | Use and Care Manual - Page 87
PIÈCE/MATÉRIAU Grilles Porcelaine émaillée sur fonte Plateau à graisse de la plaque Aluminium avec revêtement antiadhésif Plateau à graisse Soulevez la poignée et enlevez le plateau PRODUITS NETTOYANTS SUGGÉRÉS • Produits nettoyants non abrasifs : eau chaude et produit détergent, Fantasticmc, - Thermador PRD486JDGU | Use and Care Manual - Page 88
les brûleurs ne s'allumeront pas. Un nettoyant comme du Soft Scrubmc peut être utilisé. Appliquez avec une éponge ou un chiffon humide selon les instructions du fabricant. Bien rincer et assécher avec un chiffon doux. Si vous utilisez un produit comme Bar Keeper's Friendmc, Bon-amimc, Cometmc ou - Thermador PRD486JDGU | Use and Care Manual - Page 89
une ampoule standard à usage domestique dans le four. Appelez le centre de service à la clientèle de THERMADORmc au 1-800-735-4328 ou le détaillant la faisant glisser vers l'arrière jusqu'à ce que les deux broches sortent du support en céramique. 8. Ne touchez pas au verre de la nouvelle ampoule de - Thermador PRD486JDGU | Use and Care Manual - Page 90
leur. • Consultez le manuel d'installation. Appelez un électricien qualifié pour qu'il effectue la mise à la terre adéquate de la cuisinière. • Consultez les instructions d'installation. Appelez un électricien qualifié pour qu'il effectue une mise à la terre adéquate pour la cuisinière. Français 41 - Thermador PRD486JDGU | Use and Care Manual - Page 91
schémas de câblage électrique et les dessins placés dans la zone de la base ne doivent pas être enlevés sauf par un technicien de service. Remettez-les en place après l'entretien. Emplacement de la plaque signalétique Emplacement du schéma de câblage Figure 34 : Emplacement de la plaque signal - Thermador PRD486JDGU | Use and Care Manual - Page 92
et à qui elle s'applique La garantie limitée fournie par BSH Home Appliances THERMADORmc dans le présent énoncé de garantie limitée du produit s' , THERMADORmc ou l'un de ses prestataires de services agréés réparera le produit sans frais de votre part (sous réserve de certaines limitations énoncées - Thermador PRD486JDGU | Use and Care Manual - Page 93
négligée, altération, manquement à observer les instructions de fonctionnement, manipulation sans précaution, service non autorisé (y compris le "bricolage" fait soi . 2. Enregistrement de votre produit en ligne au thermador.com 3. Appel au service à la clientèle de THERMADORmc au 1-800-735-4328. - Thermador PRD486JDGU | Use and Care Manual - Page 94
de limpieza 36 Mantenimiento hecho por usted mismo 39 Antes de solicitar servicio 41 Declaración de garantía limitada del producto 42 Este electrodoméstico de THERMADOR® está hecho por BSH Home Appliances Corporation 5551 McFadden Ave. Huntington Beach, CA 92649 ¿Preguntas? 1-800-735-4328 www - Thermador PRD486JDGU | Use and Care Manual - Page 95
. Este manual contiene información importante de uso y cuidado para todas las estufas PROFESSIONAL® de THERMADOR. Cuando use este manual, es debidamente utilizado. Incline levemente la estufa por delante tirando de la parte posterior para asegurarse de que el soporte antivuelco esté bien enganchado - Thermador PRD486JDGU | Use and Care Manual - Page 96
pulgadas entre los materiales combustibles y la parte trasera de la estufa, todos los modelos e instalar una consola trasera baja o un estante alto THERMADOR® cuando el espacio horizontal es inferior a 12 pulg. adéquat. Consultez les instructions d'installation qui accompagnent cet appareil - Thermador PRD486JDGU | Use and Care Manual - Page 97
evitar lesiones Con el cuidado adecuado, su nueva estufa PROFESSIONAL® de THERMADOR ha sido diseñada para ser un aparato seguro y fiable. estufa. No repare o reemplace ninguna parte del aparato a menos que haya sido recomendado específicamente en este manual. Para cualquier otro servicio, contrate a - Thermador PRD486JDGU | Use and Care Manual - Page 98
d) Use ollas de tamaño adecuado. Siempre use utensilios de cocina adecuados para el tamaño del fogón o del quemador. No cuelgue artículos de ninguna parte del aparato y no apoye nada contra la hornilla. Algunas telas son muy inflamables y pueden prender fuego. Si la estufa está cerca de una ventana - Thermador PRD486JDGU | Use and Care Manual - Page 99
para cocinar. Basado en consideraciones de seguridad, nunca use la hornilla o la estufa para calentar una habitación. Además, tal uso puede dañar las partes de la estufa o de la hornilla. ADVERTENCIA: NUNCA utilice esta unidad como un calentador para calentar el cuarto. El hacerlo puede sufrir una - Thermador PRD486JDGU | Use and Care Manual - Page 100
provocados por la acción del spray podrían inflamarse o causar la corrosión de partes metálicas en presencia de calor. Proteja el dispositivo de autolimpieza. Limpie solamente las partes indicadas en este manual. No use ningún tipo de detergente comercial para hornilla o recubrimientos de protecci - Thermador PRD486JDGU | Use and Care Manual - Page 101
producto 1 1 1 Guía de trucos prácticos 1 1 1 Manual de instalación 1 1 1 Manual de uso y cuidado 1 1 1 *Todos los modelos se venden Por favor, recicle el material de embalaje ya que todo lo que utiliza THERMADOR® para empacar sus aparatos es reciclable. 1. Asegúrese de tener los - Thermador PRD486JDGU | Use and Care Manual - Page 102
de las rejillas en la hornilla 5. Las rejillas correderas Full Access® de THERMADOR vienen con todos los modelos: Puede tirar y empujar las rejillas en hornilla, levantándola par encima de los topes de seguridad situadas en la parte delantera de las guías. Empuje la rejilla a su sitio. Cuando pone - Thermador PRD486JDGU | Use and Care Manual - Page 103
: Para quitar o cambiar una rejilla de posición, tire de la rejilla hacia adelante. Levante la parte delantera por encima de los topes de seguridad y quítela. Las estufas PROFESSIONAL® de THERMADOR emiten a veces olores particulares o humo cuando se usan por primera vez. Esos olores o este humo - Thermador PRD486JDGU | Use and Care Manual - Page 104
Descripción Identificación del modelo y de las piezas - Estufas de 48 pulg 11 11 22 22 55 8 66 7 7 78 7 9 9 1100 9 9 1100 1111 12 12 44 33 11 Figura 4: Tablero de control de la estufa mixta de 48 pugladas Clave para el modelo de 48 pulgadas 13 14 13 15 14 14 14 15 14 14 1. - Thermador PRD486JDGU | Use and Care Manual - Page 105
Identificación del modelo y de las piezas - Estufas de 36 pulg Clave para el modelo de 36 pulgadas 1. Adorno de tipo isla (incluido), estante alto o consola de protección baja (vendidos por separado) 2. Rejillas y quemadores (plancha situada en el centro para algunos modelos 3. Perillas de control: - Thermador PRD486JDGU | Use and Care Manual - Page 106
Usar la estufa Quemadores sellados Anillo Perilla Figura 9: Perilla de control estándar de un quemador Star® El símbolo sobre cada perilla de control identifica la posición que ocupa en la superficie de la estufa. Los símbolos de la Figura 10 corresponden al modelo de estufa de 48 pulg. Figura 8: - Thermador PRD486JDGU | Use and Care Manual - Page 107
• Se prende la luz azul de señal directamente encima de cada perilla de quemador. Se enciende la luz cuando uno de los quemadores queda prendido y se apaga cuando está en la posición OFF. BTU de los quemadores estándares • HI equivale a 15,000 BTU / HR (13,000 BTU/HR con gas propano). • SIM equivale - Thermador PRD486JDGU | Use and Care Manual - Page 108
• Es normal no ver burbujas después de revolver un alimento. • Se pueden formar burbujas cuando la llama se prende y desaparecer cuando la llama se apaga. Aún cuando la llama está apagada, habrá vapor y una ligera agitación en la superficie del líquido. POWERBOOST® La perilla de control POWERBOOST, - Thermador PRD486JDGU | Use and Care Manual - Page 109
Verificación de la posición de las tapas de los quemadores • Compruebe cada quemador para asegurarse de que no hay espacio entre la tapa y la base del quemador. Vea las Figuras 14 y 15 para ejemplos de tapa de quemador instalada correcta e incorrectamente. • Puede intentar mover con cuidado las - Thermador PRD486JDGU | Use and Care Manual - Page 110
Descripción de la llama Azul oscuro Cono secundario Azul claro ADVERTENCIA: Este producto contiene, en el caso de una utilización normal para la que está concebido, uno o varios productos químicos que, según el Estado de California, pueden causar cáncer, defectos de nacimiento u otros daños - Thermador PRD486JDGU | Use and Care Manual - Page 111
Recomendaciones para los utensilios de cocina PRECAUCIÓN: Para evitar dañar seriamente el aparato o las ollas, lea las siguientes instrucciones: • Nunca se deben usar grandes utensilios en la superficie de la estufa, como cazuelas grandes, bandejas para galletas, etc. • Las ollas grandes para - Thermador PRD486JDGU | Use and Care Manual - Page 112
Utensilios especiales de cocina Olla a presión 8 a 22 cuartos de galón (7,6 a 20,9 litros), con una base de 8 a 11 pulg. (203 a 279 mm) y una profundidad de 6,5 a 12 pulg. (165 - 305 mm). Figura 21: Olla tipo wok con base plana Consejos para usar ollas a presión: • Es preferible usar una base - Thermador PRD486JDGU | Use and Care Manual - Page 113
Recomendaciones de cocción con los quemadores de la estufa Alimento BEBIDAS Cacao (Chocolate) PANES Pan Francés, Crepas, Sándwich a la plancha MANTEQUILLA Derretir CEREALES Harina de maíz, Sémola, Avena CHOCOLATE Derretir Ajuste Inicial MED - calentar la leche, cubrir MED - precalentar la sartén - Thermador PRD486JDGU | Use and Care Manual - Page 114
Alimento Fritura: chuletas de cordero, filetes delg., hamburguesas., salchichas enteras Escalfado: pollo, entero o piezas, pescado Hervido a fuego lento: Pollo estofado, carne curada, Lengua, etc. PASTA Macarrones, Fideos, Espaguetis OLLA DE PRESIÓN Carne Verduras Arroz SALSAS A base de tomate - Thermador PRD486JDGU | Use and Care Manual - Page 115
la plancha si la bandeja o la parrilla no están instaladas. No utilice la plancha de una forma distinta de lo que está indicado en el manual de uso y cuidado.. Figura 24: Perilla de control de la plancha • La plancha se ajusta electrónicamente a las temperaturas indicadas en las perillas, de 150 - Thermador PRD486JDGU | Use and Care Manual - Page 116
AVISO: El rendimiento de la plancha / estufa puede variar si el flujo de aire alrededor del aparato es demasiado elevado. El flujo de aire excesivo podría provenir de un registro de aire acondicionado o de un ventilador de techo que sopla hacia el aparato. Esto podría prolongar el tiempo de - Thermador PRD486JDGU | Use and Care Manual - Page 117
Usar la hornilla Funciones adicionales de la hornilla Mandos para el ajuste de la hornilla Nota: • No se puede usar el Temporizador de la hornilla cuando se usa una sonda térmica. • El máximo ajuste del Temporizador de la hornilla es de 12 horas. 1. La tecla ENTER confirma la selección. 2. La - Thermador PRD486JDGU | Use and Care Manual - Page 118
un hueso, grasa o cartílago. • La sonda no debe tocar el plato o partes de la hornilla ya que esto influirá en la exactitud de los resultados. 4. Cierre la lo estableció el U. S Department of Agriculture Food Safety and Inspection Service, son las siguientes: Carne molida fresca (res, 160 °F (72 - Thermador PRD486JDGU | Use and Care Manual - Page 119
desenchufar la sonda. • No almacene la sonda en la hornilla. Funciones de la hornilla Recomendaciones para hornear Precalentamiento de la hornilla La mayor parte de los tiempos de cocción en las recetas están diseñados para una hornilla precalentada y necesitan de la hornilla que haya alcanzado una - Thermador PRD486JDGU | Use and Care Manual - Page 120
alto, como un pastel tipo bizcocho, se puede usar la posición de rejilla #2. Las tartas, para que la corteza esté bien cocida sin que la parte superior esté demasiado dorada, salen mejor en la posición de rejilla #2. Para asar piezas grandes de carne o pollo, como una chuleta de res o un pavo - Thermador PRD486JDGU | Use and Care Manual - Page 121
la hornilla. 6. Cuando la hornilla está precalentada, coloque los alimentos que quiere cocer. Asar La temperatura de la función asar es más alta en la parte superior que con el modo hornear. Esta temperatura superior sirve para asar de forma tradicional con una olla abierta, cuando se desea grasa de - Thermador PRD486JDGU | Use and Care Manual - Page 122
Convección Cocinar con un sistema por convección El modo hornear por convección ofrece muchas ventajas. Al usar este modo, un ventilador en la parte trasera de la hornilla hace circular el aire uniformemente dentro de la hornilla. El calor se extiende uniformemente en la hornilla. Así, los alimentos - Thermador PRD486JDGU | Use and Care Manual - Page 123
en el modo de BAKE o CONVECTION BAKE, las recetas y las duraciones de cocción recomendadas pueden variar. Para tener más información, escriba a Extension Service, Colorado State University, Fort Collins, Colorado 80521. Puede ser que tenga que pagar para obtener los boletines. Especifique el tipo de - Thermador PRD486JDGU | Use and Care Manual - Page 124
Recomendaciones para hornear por convección ALIMENTO TAMAÑO DEL MOLDE Galletas Pasteles con relleno Hojaldre Pasteles Bundt™ Brownies o galletas Panecillos Pan rápido Molletes Tarta de fruta Pasteles de fruta Pan levadura Rollos de pan Rollos de canela Pastel levadura para café Bandeja para - Thermador PRD486JDGU | Use and Care Manual - Page 125
Preparación de masa (solamente modelos de 48 pulg.) La función de preparación de masa proporciona un ambiente caliente y sin corrientes de aire necesario para la preparación de productos derivados del pan. La temperatura de preparación de masa está preajustada a 100 °F/38 °C. Como ajustar la - Thermador PRD486JDGU | Use and Care Manual - Page 126
cerrada durante el uso del grill. • Su estufa PROFESSIONAL® de THERMADOR viene con una bandeja grande de asar de dos piezas. La grasa procedente de la cocción cae por las ranuras de la parte superior a la parte inferior de la bandeja, alejándose del calor intenso de los quemadores - Thermador PRD486JDGU | Use and Care Manual - Page 127
Recomendaciones para gratinar Se deben colocar todas las carnes en la bandeja de asar vendida con la estufa. ALIMENTOS RES Carne molida Hamb., ½ pulg. (12,7 mm) Filete falda Solomillo NO. DE REJILLA 4 4 4 MODO DE LA HORNILLA Grill o grill por convección Grill o grill por convección Grill o grill - Thermador PRD486JDGU | Use and Care Manual - Page 128
ón de llamas o de humo. Este aparato está diseñado para limpiar el interior de la hornilla y la parte de la puerta del interior de la hornilla. Los bordes exteriores de la puerta no forman parte de la zona de limpieza. Limpie esta área. Antes de ajustar la hornilla al modo de autolimpieza - Thermador PRD486JDGU | Use and Care Manual - Page 129
autolimpieza dura unas cuatro horas. Cuando termina el ciclo se apagan las luces OVEN y CLEANING. No cambie la perilla de control de la hornilla a la en la tabla. 4. Se pueden limpiar la mayoría de las partes de este aparato con agua jabonosa caliente (menos cuando hay indicaciones contrarias - Thermador PRD486JDGU | Use and Care Manual - Page 130
Recomendaciones de limpieza PIEZA / MATERIAL Base de quemador de cobre y tapa de hierro colado DETERGENTES SUGERIDOS • Agua jabonosa caliente; enjuagar y secar bien. • Detergentes poco abrasivos: Bon Ami®, Limpiador para aluminio y acero inoxidable Cameo®, Pulido de bronce para todo propósito - Thermador PRD486JDGU | Use and Care Manual - Page 131
. Limpiar la superficie del asador o de la plancha con agua jabonosa tibia y enjuagar con agua tibia. Secar con un trapo suave. • Cuando haya partículas de alimentos pegadas a la bandeja del asador o de la plancha, quitarlas con un detergente poco abrasivo como Soft Scrub®. • Nunca se debe lavar - Thermador PRD486JDGU | Use and Care Manual - Page 132
PIEZA MATERIAL Encendedores/ Cerámica Bandejas de limpieza / Adornos Porcelana esmaltada (acabado lustroso) DETERGENTES SUGERIDOS • Usar un poco de algodón INDICACIONES IMPORTANTES • No use herramientas afiladas para humedecido con agua, Formula 409® o Fantastic® raspar los encendedores. Son frá - Thermador PRD486JDGU | Use and Care Manual - Page 133
diseñada para hornillas. NO USE una bombilla estándar en la hornilla. Póngase en contacto con atención al cliente de Thermador en el 1-800-735-4328 o con la tienda Thermador más cerca para obtener información sobre las bombillas que tiene que utilizar con su estufa. Debe tener el número de serie de - Thermador PRD486JDGU | Use and Care Manual - Page 134
Apagón En el caso de un apagón se pueden encender solamente los quemadores estándares manualmente. Es necesario prender cada quemador estándar individualmente. Si se está usando la estufa cuando se produzca el fallo de luz, gire todas las perillas de control de los quemadores a la posición OFF. - Thermador PRD486JDGU | Use and Care Manual - Page 135
Antes de solicitar servicio Antes de solicitar servicio, compruebe lo siguiente para evitar cargos innecesarios de servicio. Asegúrese de comprobar primero estos puntos: • ¿Hay un apagón en el área? • ¿Se quemó un fusible en la casa o se activó el disyuntor? • ¿Está conectada la estufa a la - Thermador PRD486JDGU | Use and Care Manual - Page 136
de esta garantía y a quiénes se aplica La garantía limitada otorgada por BSH Home Appliances Thermador en esta Declaración de Garantía Limitada del Producto se aplica únicamente al electrodoméstico Thermador vendido a usted, el primer comprador usuario, siempre que el Producto haya sido Comprado - Thermador PRD486JDGU | Use and Care Manual - Page 137
los mecanismos internos del electrodoméstico realizados por uno mismo) por parte de cualquier persona. • Ajuste, alteración o modificación de el derecho a modificar el producto sin previo aviso. Registre su producto THERMADOR® para asegurarse de recibir un servicio oportuno y de tener acceso a la - Thermador PRD486JDGU | Use and Care Manual - Page 138
Department if you have any questions or in the unlikely event that your Thermador appliance needs service. Our service team is ready to assist you. www.thermador.com/support 1-800-735-4328 Parts & Accessories Parts, filters, descalers, stainless steel cleaners and more can be purchased in the
-
 1
1 -
 2
2 -
 3
3 -
 4
4 -
 5
5 -
 6
6 -
 7
7 -
8
-
9
-
10
-
11
-
12
-
13
-
14
-
15
-
16
-
17
-
18
-
19
-
20
-
21
-
22
-
23
-
24
-
25
-
26
-
27
-
28
-
29
-
30
-
31
-
32
-
33
-
34
-
35
-
36
-
37
-
38
-
39
-
40
-
41
-
42
-
43
-
44
-
45
-
46
-
47
-
48
-
49
-
50
-
51
-
52
-
53
-
54
-
55
-
56
-
57
-
58
-
59
-
60
-
61
-
62
-
63
-
64
-
65
-
66
-
67
-
68
-
69
-
70
-
71
-
72
-
73
-
74
-
75
-
76
-
77
-
78
-
79
-
80
-
81
-
82
-
83
-
84
-
85
-
86
-
87
-
88
-
89
-
90
-
91
-
92
-
93
-
94
-
95
-
96
-
97
-
98
-
99
-
100
-
101
-
102
-
103
-
104
-
105
-
106
-
107
-
108
-
109
-
110
-
111
-
112
-
113
-
114
-
115
-
116
-
117
-
118
-
119
-
120
-
121
-
122
-
123
-
124
-
125
-
126
-
127
-
128
-
129
-
130
-
131
-
132
-
133
-
134
-
135
-
136
-
137
-
138
 |
 |

THERMADOR PROFESSIONAL
®
PRO GRAND DUAL FUEL RANGES
CUISINIÈRES MIXTES PROFESSIONAL
mc
PRO-GRAND
DE THERMADOR
PARA ESTUFAS MIXTAS PROFESSIONAL
®
PRO GRAND™ de THERMADOR