Toshiba 100CT User Manual - Page 43
Go to Procedure 3., B2V output
 |
View all Toshiba 100CT manuals
Add to My Manuals
Save this manual to your list of manuals |
Page 43 highlights
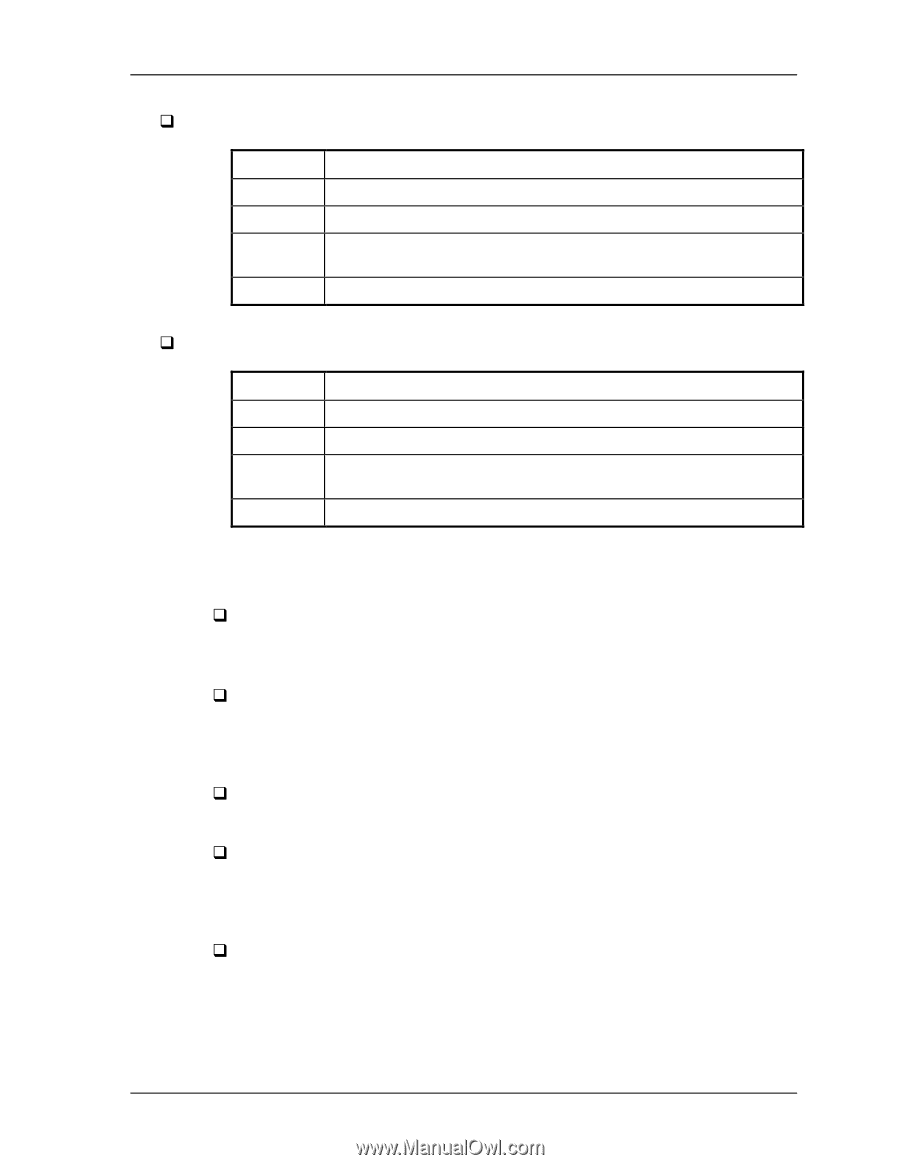
File No. 960-140 B2V output Error code Meaning 70h B2V voltage is over the limit (2.88V). 71h B2V voltage is under the limit (2.13V) when power supply is turned on. 72h B2V voltage is under the limit (2.13V) when the computer is booting up. 73h B2V voltage is over the limit (2.13V) when power supply is turned off. B1V output Error code Meaning 80h B1V voltage is over the limit (2.16V). 81h B1V voltage is under the limit (1.44V) when power supply is turned on. 82h B1V voltage is under the limit (1.44V) when the computer is booting up. 83h B1V voltage is over the limit (1.44V) when power supply is turned off. Check 2 In the case of error code 10h: Make sure the AC adapter is firmly connected to the computer is DC IN socket and to power source. If this cables are connected correctly, go to the following step: Replace the AC adapter with a new one. If the error still exists, go to Procedure 5. Check 3 In the case of error code 20h: Make sure the battery pack is correctly installed in the computer. If the battery pack is correctly installed, go to the following step: Replace the battery pack with a new one. If the error still exists, go to Procedure 5. Check 4 In the case of error code 21h: Go to Procedure 3. Check 5 When for any other error, go to Procedure 5. 1-10
-
 1
1 -
2
-
3
-
4
-
5
-
6
-
7
-
8
-
9
-
10
-
11
-
12
-
13
-
14
-
15
-
16
-
17
-
18
-
19
-
20
-
21
-
22
-
23
-
24
-
25
-
26
-
27
-
28
-
29
-
30
-
31
-
32
-
33
-
34
-
35
-
36
-
37
-
 38
38 -
 39
39 -
 40
40 -
 41
41 -
 42
42 -
 43
43 -
 44
44 -
 45
45 -
 46
46 -
 47
47 -
 48
48 -
49
-
50
-
51
-
52
-
53
-
54
-
55
-
56
-
57
-
58
-
59
-
60
-
61
-
62
-
63
-
64
-
65
-
66
-
67
-
68
-
69
-
70
-
71
-
72
-
73
-
74
-
75
-
76
-
77
-
78
-
79
-
80
-
81
-
82
-
83
-
84
-
85
-
86
-
87
-
88
-
89
-
90
-
91
-
92
-
93
-
94
-
95
-
96
-
97
-
98
-
99
-
100
-
101
-
102
-
103
-
104
-
105
-
106
-
107
-
108
-
109
-
110
-
111
-
112
-
113
-
114
-
115
-
116
-
117
-
118
-
119
-
120
-
121
-
122
-
123
-
124
-
125
-
126
-
127
-
128
-
129
-
130
-
131
-
132
-
133
-
134
-
135
-
136
-
137
-
138
-
139
-
140
-
141
-
142
-
143
-
144
-
145
-
146
-
147
-
148
-
149
-
150
-
151
-
152
-
153
-
154
-
155
-
156
-
157
-
158
-
159
-
160
-
161
-
162
-
163
-
164
-
165
-
166
-
167
-
168
-
169
-
170
-
171
-
172
-
173
-
174
-
175
-
176
-
177
-
178
-
179
-
180
-
181
-
182
-
183
-
184
-
185
-
186
-
187
-
188
-
189
-
190
-
191
-
192
-
193
-
194
-
195
-
196
-
197
-
198
-
199
-
200
-
201
-
202
-
203
-
204
-
205
-
206
-
207
-
208
-
209
-
210
-
211
-
212
-
213
-
214
-
215
-
216
-
217
-
218
-
219
-
220
-
221
-
222
-
223
-
224
-
225
-
226
-
227
-
228
-
229
-
230
-
231
-
232
-
233
-
234
-
235
-
236
 |
 |