Toshiba 100CT User Manual - Page 45
Procedure 4, Quick Charge Check, Go to Procedure 5.
 |
View all Toshiba 100CT manuals
Add to My Manuals
Save this manual to your list of manuals |
Page 45 highlights
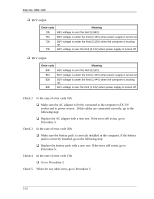
File No. 960-140 Procedure 4 Quick Charge Check The power supply may not charge the battery pack. Perform the following procedures: 1. Reinstall the battery pack. 2. Attach the AC adapter and turn on the power. If you cannot turn on the power, go to Procedure 5. 3. Run the Diagnostic test, go to System test and execute subtest 06 (quick charge) described in Chapter 3. 4. When quick charge is complete, the diagnostics test displays the result code. Check the result code against the table below and perform any necessary check. Result code 0 1 2 3 4 5 6 7 8 Contents The battery is quick charging normally. The battery is fully charged. The AC adapter is not attached. The AC adapter's output voltage is not normal. The Battery is not installed. The battery's output voltage is not normal. The battery's temperature is not normal. A bad battery is installed. Any other problems. Check items Normal Normal Check 1 Check 1 Check 2 Check 3 Check 4 Check 2 Check 5 Check 1 Make sure the AC adapter and AC power cord are firmly plugged into the DC IN socket and the wall outlet. If these cables are connected correctly, replace the AC power cord and AC adapter. Check 2 Make sure the battery is properly installed. If the battery is properly installed, replace it with a new one. Check 3 The battery pack may be completely discharged. Wait a few minutes to charge the battery pack. If the battery pack is still not charged, replace the battery pack with a new one. Check 4 The battery's temperature is too hot or cold. Return the temperature to a normal operating condition. If the battery pack still is not charged, replace the battery pack with a new one. Check 5 Go to Procedure 5. 1-12
-
 1
1 -
2
-
3
-
4
-
5
-
6
-
7
-
8
-
9
-
10
-
11
-
12
-
13
-
14
-
15
-
16
-
17
-
18
-
19
-
20
-
21
-
22
-
23
-
24
-
25
-
26
-
27
-
28
-
29
-
30
-
31
-
32
-
33
-
34
-
35
-
36
-
37
-
38
-
39
-
 40
40 -
 41
41 -
 42
42 -
 43
43 -
 44
44 -
 45
45 -
 46
46 -
 47
47 -
 48
48 -
 49
49 -
 50
50 -
51
-
52
-
53
-
54
-
55
-
56
-
57
-
58
-
59
-
60
-
61
-
62
-
63
-
64
-
65
-
66
-
67
-
68
-
69
-
70
-
71
-
72
-
73
-
74
-
75
-
76
-
77
-
78
-
79
-
80
-
81
-
82
-
83
-
84
-
85
-
86
-
87
-
88
-
89
-
90
-
91
-
92
-
93
-
94
-
95
-
96
-
97
-
98
-
99
-
100
-
101
-
102
-
103
-
104
-
105
-
106
-
107
-
108
-
109
-
110
-
111
-
112
-
113
-
114
-
115
-
116
-
117
-
118
-
119
-
120
-
121
-
122
-
123
-
124
-
125
-
126
-
127
-
128
-
129
-
130
-
131
-
132
-
133
-
134
-
135
-
136
-
137
-
138
-
139
-
140
-
141
-
142
-
143
-
144
-
145
-
146
-
147
-
148
-
149
-
150
-
151
-
152
-
153
-
154
-
155
-
156
-
157
-
158
-
159
-
160
-
161
-
162
-
163
-
164
-
165
-
166
-
167
-
168
-
169
-
170
-
171
-
172
-
173
-
174
-
175
-
176
-
177
-
178
-
179
-
180
-
181
-
182
-
183
-
184
-
185
-
186
-
187
-
188
-
189
-
190
-
191
-
192
-
193
-
194
-
195
-
196
-
197
-
198
-
199
-
200
-
201
-
202
-
203
-
204
-
205
-
206
-
207
-
208
-
209
-
210
-
211
-
212
-
213
-
214
-
215
-
216
-
217
-
218
-
219
-
220
-
221
-
222
-
223
-
224
-
225
-
226
-
227
-
228
-
229
-
230
-
231
-
232
-
233
-
234
-
235
-
236
 |
 |
