Toshiba 100CT User Manual - Page 55
HDD Troubleshooting
 |
View all Toshiba 100CT manuals
Add to My Manuals
Save this manual to your list of manuals |
Page 55 highlights
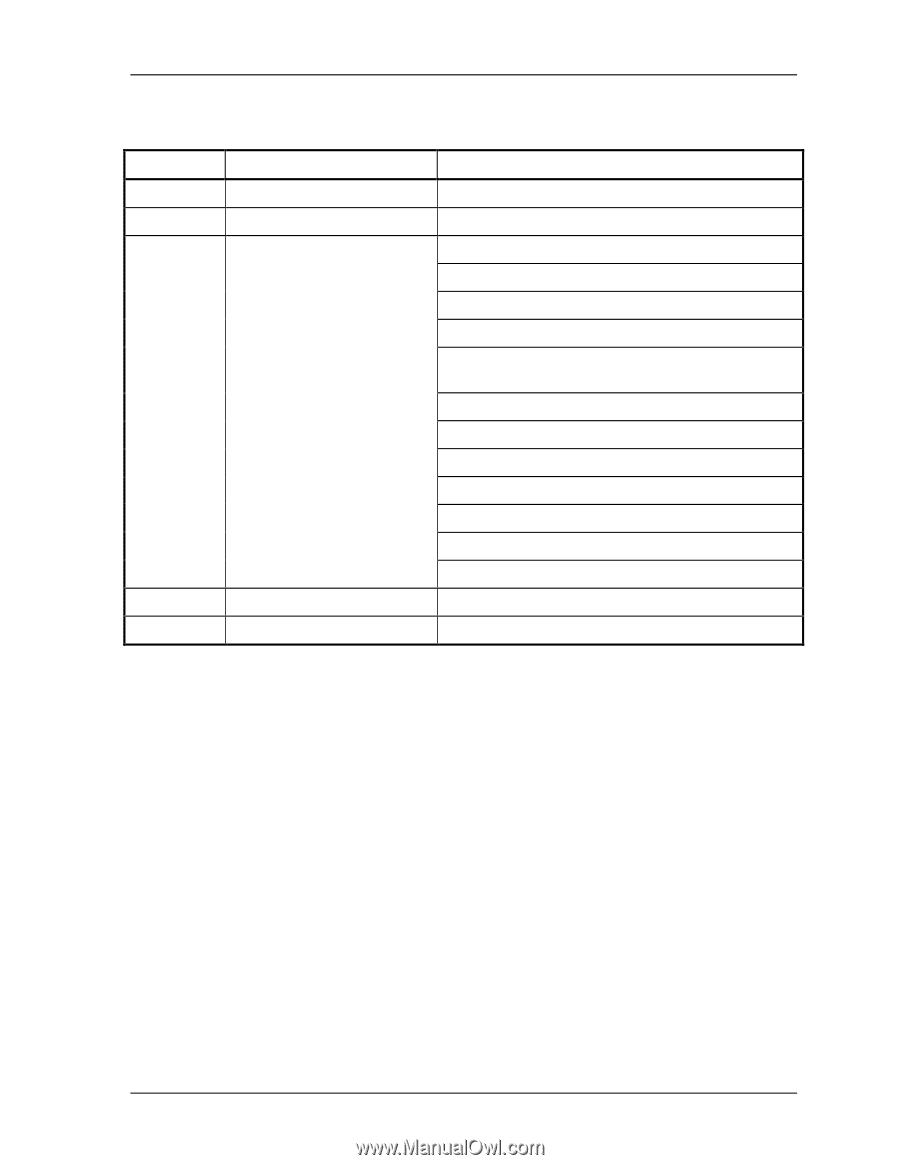
File No. 960-140 Table 2-3 Printer port LED boot mode status (5/5) LED Status Test item A0h Boot password C0h External I/O check A6h BIOS information update FEh System ROM check FFh End Message Boot password External I/O check Set font address Set shadow RAM size Set expansion memory size to CMOS System resource update Set extended memory size to runtime BIOS for INT15h ACPI table update Set SCT area to runtime BIOS Set battery save mode Send date to PS microprocessor Close PCI device configuration area Protect system BIOS Cache control System ROM check Check 1 If any of the following error codes display, go to Procedure 5. B0h, B2h, B3h, 00h, 01h, 05h, 06h, 03h, 04h, 02h, 71h, 07h, 73h, 74h, 72h, 76h, 79h, 77h, 78h, 81h, 82h, 7Bh, 7Ch, 7Ah, 08h, 09h, 0Dh, 19h, 1Fh, 20h, 21h, 25h, 30h, 40h, 41h, 42h, 70h, 80h, A0h, C0h, A6h, FEh Check 2 If error code 83h is displayed, go to the following sections: Section 2.5. FDD Troubleshooting Section 2.6. HDD Troubleshooting 1-22
-
 1
1 -
2
-
3
-
4
-
5
-
6
-
7
-
8
-
9
-
10
-
11
-
12
-
13
-
14
-
15
-
16
-
17
-
18
-
19
-
20
-
21
-
22
-
23
-
24
-
25
-
26
-
27
-
28
-
29
-
30
-
31
-
32
-
33
-
34
-
35
-
36
-
37
-
38
-
39
-
40
-
41
-
42
-
43
-
44
-
45
-
46
-
47
-
48
-
49
-
 50
50 -
 51
51 -
 52
52 -
 53
53 -
 54
54 -
 55
55 -
 56
56 -
 57
57 -
 58
58 -
 59
59 -
 60
60 -
61
-
62
-
63
-
64
-
65
-
66
-
67
-
68
-
69
-
70
-
71
-
72
-
73
-
74
-
75
-
76
-
77
-
78
-
79
-
80
-
81
-
82
-
83
-
84
-
85
-
86
-
87
-
88
-
89
-
90
-
91
-
92
-
93
-
94
-
95
-
96
-
97
-
98
-
99
-
100
-
101
-
102
-
103
-
104
-
105
-
106
-
107
-
108
-
109
-
110
-
111
-
112
-
113
-
114
-
115
-
116
-
117
-
118
-
119
-
120
-
121
-
122
-
123
-
124
-
125
-
126
-
127
-
128
-
129
-
130
-
131
-
132
-
133
-
134
-
135
-
136
-
137
-
138
-
139
-
140
-
141
-
142
-
143
-
144
-
145
-
146
-
147
-
148
-
149
-
150
-
151
-
152
-
153
-
154
-
155
-
156
-
157
-
158
-
159
-
160
-
161
-
162
-
163
-
164
-
165
-
166
-
167
-
168
-
169
-
170
-
171
-
172
-
173
-
174
-
175
-
176
-
177
-
178
-
179
-
180
-
181
-
182
-
183
-
184
-
185
-
186
-
187
-
188
-
189
-
190
-
191
-
192
-
193
-
194
-
195
-
196
-
197
-
198
-
199
-
200
-
201
-
202
-
203
-
204
-
205
-
206
-
207
-
208
-
209
-
210
-
211
-
212
-
213
-
214
-
215
-
216
-
217
-
218
-
219
-
220
-
221
-
222
-
223
-
224
-
225
-
226
-
227
-
228
-
229
-
230
-
231
-
232
-
233
-
234
-
235
-
236
 |
 |