Toshiba HDNB120XKEG1 Canivo Personal Cloud User Manual (English) - Page 16
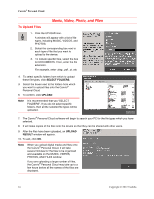
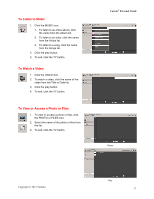
Music, Video, Photo, and Files
 |
View all Toshiba HDNB120XKEG1 manuals
Add to My Manuals
Save this manual to your list of manuals |
Page 16 highlights
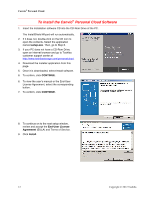
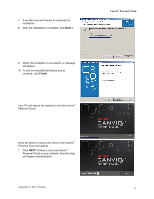
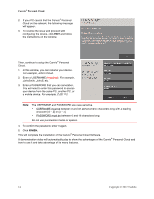
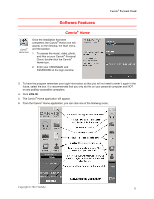
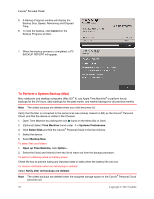
Canvio® Personal Cloud Music, Video, Photo, and Files To Upload Files 1. Click the UPLOAD icon. A window will appear with a list of file types, including MUSIC, VIDEOS, and PHOTOS. 2. Select the corresponding box next to each type of file that you want to upload to the device. 3. To include specific files, select the box for DOCUMENTS. Then, enter the file extension. For example, enter .dwg, .pdf, .ai, etc. 4. To select specific folders from which to upload these file types, click SELECT FOLDERS. 5. Select the boxes next to the folders from which you want to upload files onto the Canvio® Personal Cloud 6. To confirm, click UPLOAD. Note It is recommended that you "SELECT FOLDERS". If you do not select specific folders, then all the selected file types will be uploaded. 7. The Canvio® Personal Cloud software will begin to search your PC for the file types which you have selected. 8. It will make copies of the files onto the device so that they can be shared with other users. 9. After the files have been uploaded, an UPLOAD RESULT window will appear. 10. To exit, click OK. Note When you upload digital media and files onto the Canvio® Personal Cloud, it will take several minutes for the files to be organized and available on the MUSIC, VIDEOS, PHOTOS, AND FILES window. If you are uploading a large number of files, the Canvio® Personal Cloud may take up to a few hours before all the names of the files are displayed. 16 Copyright © 2012 Toshiba
-
 1
1 -
2
-
3
-
4
-
5
-
6
-
7
-
8
-
9
-
10
-
 11
11 -
 12
12 -
 13
13 -
 14
14 -
 15
15 -
 16
16 -
 17
17 -
 18
18 -
 19
19 -
 20
20 -
 21
21 -
22
-
23
-
24
-
25
-
26
-
27
-
28
-
29
-
30
-
31
-
32
-
33
-
34
-
35
-
36
-
37
-
38
-
39
-
40
 |
 |
