Toshiba PH3100U-1EXB User's Guide for Desktop External Hard Drives - Page 18
Checking used/free disk space and drive properties, Installing the Drive Monitor - usb
 |
UPC - 883974254644
View all Toshiba PH3100U-1EXB manuals
Add to My Manuals
Save this manual to your list of manuals |
Page 18 highlights
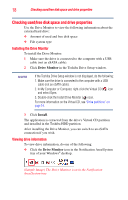
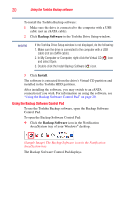
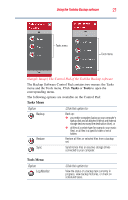
18 Checking used/free disk space and drive properties Checking used/free disk space and drive properties Use the Drive Monitor to view the following information about the external hard drive: ❖ Amount of used and free disk space ❖ File system type Installing the Drive Monitor To install the Drive Monitor: 1 Make sure the drive is connected to the computer with a USB cable (not an eSATA cable). 2 Click Drive Monitor in the Toshiba Drive Setup window. NOTE If the Toshiba Drive Setup window is not displayed, do the following: 1. Make sure the drive is connected to the computer with a USB cable (not an eSATA cable). 2. In My Computer or Computer, right-click the Virtual CD ( ) icon and select Open. 3. Double-click the Install Drive Monitor ( ) icon. For more information on the Virtual CD, see "Drive partitions" on page 14. 3 Click Install. The application is extracted from the drive's Virtual CD partition and installed in the Toshiba HDD partition. After installing the Drive Monitor, you can switch to an eSATA connection if you wish. Viewing drive information To view drive information, do one of the following: ❖ Click the Drive Monitor icon in the Notification Area/System tray of your Windows® desktop. (Sample Image) The Drive Monitor icon in the Notification Area/System tray
-
 1
1 -
2
-
3
-
4
-
5
-
6
-
7
-
8
-
9
-
10
-
11
-
12
-
 13
13 -
 14
14 -
 15
15 -
 16
16 -
 17
17 -
 18
18 -
 19
19 -
 20
20 -
 21
21 -
 22
22 -
 23
23 -
24
-
25
-
26
-
27
-
28
-
29
-
30
-
31
-
32
-
33
-
34
-
35
-
36
-
37
-
38
-
39
-
40
-
41
-
42
-
43
-
44
-
45
-
46
-
47
-
48
-
49
-
50
-
51
-
52
-
53
-
54
-
55
-
56
-
57
-
58
-
59
-
60
-
61
-
62
-
63
-
64
-
65
-
66
-
67
-
68
 |
 |
