Toshiba Qosmio X300 PQX31C-01G022 Users Manual Canada; English - Page 170
Using the USB floppy diskette drive
 |
View all Toshiba Qosmio X300 PQX31C-01G022 manuals
Add to My Manuals
Save this manual to your list of manuals |
Page 170 highlights
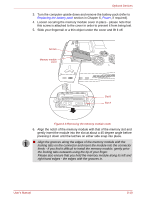
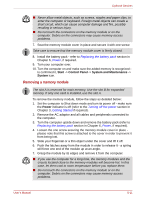
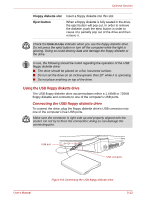
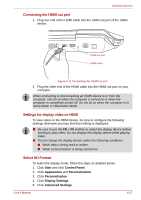
Optional Devices Floppy diskette slot Eject button Insert a floppy diskette into this slot. When a floppy diskette is fully seated in the drive, the eject button will pop out. In order to remove the diskette, push the eject button in order to cause it to partially pop out of the drive and then remove it. Check the Disk-In-Use indicator when you use the floppy diskette drive. Do not press the eject button or turn off the computer while the light is glowing. Doing so could destroy data and damage the floppy diskette or the drive. In use, the following should be noted regarding the operation of the USB floppy diskette drive: ■ The drive should be placed on a flat, horizontal surface. ■ Do not set the drive on an incline greater than 20° while it is operating. ■ Do not place anything on top of the drive. Using the USB floppy diskette drive The USB floppy diskette drive accommodates either a 1.44MB or 720KB floppy diskette and connects to one of the computer's USB ports. Connecting the USB floppy diskette drive To connect the drive, plug the floppy diskette drive's USB connector into one of the computer's free USB ports. Make sure the connector is right side up and properly aligned with the socket. Do not try to force the connection; doing so can damage the connecting pins. USB port USB connector User's Manual Figure 8-8 Connecting the USB floppy diskette drive 8-13
-
 1
1 -
2
-
3
-
4
-
5
-
6
-
7
-
8
-
9
-
10
-
11
-
12
-
13
-
14
-
15
-
16
-
17
-
18
-
19
-
20
-
21
-
22
-
23
-
24
-
25
-
26
-
27
-
28
-
29
-
30
-
31
-
32
-
33
-
34
-
35
-
36
-
37
-
38
-
39
-
40
-
41
-
42
-
43
-
44
-
45
-
46
-
47
-
48
-
49
-
50
-
51
-
52
-
53
-
54
-
55
-
56
-
57
-
58
-
59
-
60
-
61
-
62
-
63
-
64
-
65
-
66
-
67
-
68
-
69
-
70
-
71
-
72
-
73
-
74
-
75
-
76
-
77
-
78
-
79
-
80
-
81
-
82
-
83
-
84
-
85
-
86
-
87
-
88
-
89
-
90
-
91
-
92
-
93
-
94
-
95
-
96
-
97
-
98
-
99
-
100
-
101
-
102
-
103
-
104
-
105
-
106
-
107
-
108
-
109
-
110
-
111
-
112
-
113
-
114
-
115
-
116
-
117
-
118
-
119
-
120
-
121
-
122
-
123
-
124
-
125
-
126
-
127
-
128
-
129
-
130
-
131
-
132
-
133
-
134
-
135
-
136
-
137
-
138
-
139
-
140
-
141
-
142
-
143
-
144
-
145
-
146
-
147
-
148
-
149
-
150
-
151
-
152
-
153
-
154
-
155
-
156
-
157
-
158
-
159
-
160
-
161
-
162
-
163
-
164
-
 165
165 -
 166
166 -
 167
167 -
 168
168 -
 169
169 -
 170
170 -
 171
171 -
 172
172 -
 173
173 -
 174
174 -
 175
175 -
176
-
177
-
178
-
179
-
180
-
181
-
182
-
183
-
184
-
185
-
186
-
187
-
188
-
189
-
190
-
191
-
192
-
193
-
194
-
195
-
196
-
197
-
198
-
199
-
200
-
201
-
202
-
203
-
204
-
205
-
206
-
207
-
208
-
209
-
210
-
211
-
212
-
213
-
214
-
215
-
216
-
217
-
218
-
219
-
220
-
221
-
222
-
223
-
224
-
225
-
226
-
227
-
228
-
229
-
230
-
231
-
232
-
233
-
234
-
235
-
236
-
237
-
238
-
239
-
240
-
241
-
242
-
243
-
244
-
245
 |
 |