Toshiba Satellite A660 PSAW3C-135017 Users Manual Canada; English - Page 130
Using optical disc drive, 1 Mode Login screen
 |
View all Toshiba Satellite A660 PSAW3C-135017 manuals
Add to My Manuals
Save this manual to your list of manuals |
Page 130 highlights
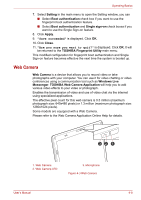
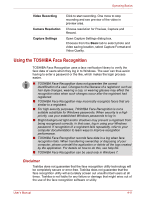
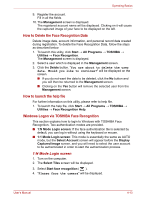
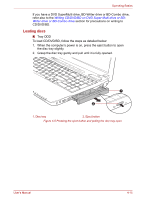
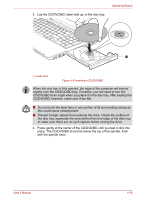
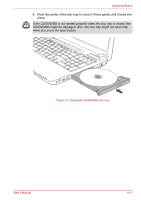
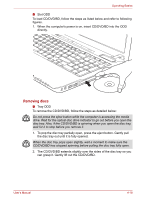
Operating Basics 5. Verification will be performed. If the authentication is successful, the image data taken in step 4 will be faded in and placed over one another. ■ If an error occurs during authentication, you will be returned to the Select Tiles screen. 6. The Windows Welcome screen will be displayed, and will be logged in automatically to Windows. 1:1 Mode Login screen 1. Turn on the computer. 2. The Select Tiles screen will be displayed. 3. Select Start face recognition ( ). 4. The Select Account screen will be displayed. 5. Select the account, and click the arrow button. 6. "Please face the camera" will be displayed. 7. Verification will be performed. If the authentication is successful, the image data taken in step 6 will be faded in and placed over one another. ■ If an error occurs during authentication, you will be returned to the Select Tiles screen. 8. The Windows Welcome screen will be displayed, and will be logged in automatically to Windows. ■ If authentication was successful, but an authentication error subsequently occurred during the login to Windows, you will be asked to provide your account information. Using optical disc drive ■ Tray ODD The full-size drive provides high-performance execution of CD/DVD/BD based programs. You can run either 12 cm (4.72") or 8 cm (3.15") CD/DVD/BD without an adaptor. A Serial ATA interface controller is used for CD/DVD/BD operation. When the computer is accessing a CD/DVD/BD, an indicator on the drive glows. ■ Slot ODD The full-size drive provides high-performance execution of CD/DVD/BD based programs. You can run 12 cm (4.72") CD/DVD/BD without an adaptor. A Serial ATA interface controller is used for CD/DVD/BD operation. ■ Use the DVD playback application to view DVD-Video discs. ■ Use only round standard (12cm) disc with this slot ODD. Any other size or shape disc may not be able to be removed from the slot and may damage the system as well as the disc. User's Manual 4-14
-
 1
1 -
2
-
3
-
4
-
5
-
6
-
7
-
8
-
9
-
10
-
11
-
12
-
13
-
14
-
15
-
16
-
17
-
18
-
19
-
20
-
21
-
22
-
23
-
24
-
25
-
26
-
27
-
28
-
29
-
30
-
31
-
32
-
33
-
34
-
35
-
36
-
37
-
38
-
39
-
40
-
41
-
42
-
43
-
44
-
45
-
46
-
47
-
48
-
49
-
50
-
51
-
52
-
53
-
54
-
55
-
56
-
57
-
58
-
59
-
60
-
61
-
62
-
63
-
64
-
65
-
66
-
67
-
68
-
69
-
70
-
71
-
72
-
73
-
74
-
75
-
76
-
77
-
78
-
79
-
80
-
81
-
82
-
83
-
84
-
85
-
86
-
87
-
88
-
89
-
90
-
91
-
92
-
93
-
94
-
95
-
96
-
97
-
98
-
99
-
100
-
101
-
102
-
103
-
104
-
105
-
106
-
107
-
108
-
109
-
110
-
111
-
112
-
113
-
114
-
115
-
116
-
117
-
118
-
119
-
120
-
121
-
122
-
123
-
124
-
 125
125 -
 126
126 -
 127
127 -
 128
128 -
 129
129 -
 130
130 -
 131
131 -
 132
132 -
 133
133 -
 134
134 -
 135
135 -
136
-
137
-
138
-
139
-
140
-
141
-
142
-
143
-
144
-
145
-
146
-
147
-
148
-
149
-
150
-
151
-
152
-
153
-
154
-
155
-
156
-
157
-
158
-
159
-
160
-
161
-
162
-
163
-
164
-
165
-
166
-
167
-
168
-
169
-
170
-
171
-
172
-
173
-
174
-
175
-
176
-
177
-
178
-
179
-
180
-
181
-
182
-
183
-
184
-
185
-
186
-
187
-
188
-
189
-
190
-
191
-
192
-
193
-
194
-
195
-
196
-
197
-
198
-
199
-
200
-
201
-
202
-
203
-
204
-
205
-
206
-
207
-
208
-
209
-
210
-
211
-
212
-
213
-
214
-
215
-
216
-
217
-
218
-
219
-
220
-
221
-
222
-
223
-
224
-
225
-
226
-
227
-
228
-
229
-
230
-
231
-
232
-
233
-
234
-
235
-
236
-
237
-
238
-
239
-
240
-
241
-
242
-
243
-
244
-
245
-
246
-
247
-
248
-
249
-
250
-
251
-
252
-
253
-
254
-
255
-
256
-
257
-
258
-
259
-
260
-
261
-
262
 |
 |