Toshiba TDP-XP1 User Manual - Page 24
Operations, Turning the power on and off, Press the ON/STANDBY
 |
View all Toshiba TDP-XP1 manuals
Add to My Manuals
Save this manual to your list of manuals |
Page 24 highlights
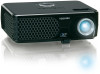
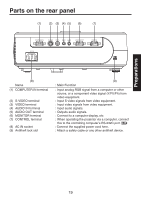
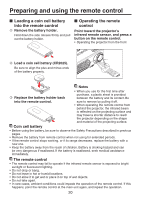
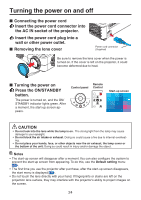
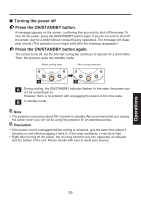
Turning the power on and off ■ Connecting the power cord 1 Insert the power cord connector into the AC IN socket of the projector. 2 Insert the power cord plug into a wall or other power outlet. ■ Removing the lens cover Power cord connector (Supplied) Be sure to remove the lens cover when the power is turned on. If the cover is left on the projector, it could become deformed due to heat. ■ Turning the power on 1 Press the ON/STANDBY button. The power is turned on, and the ON/ STANDBY indicator lights green. After a moment, the start-up screen appears. Remote Control panel Control Start-up screen CAUTION • Do not look into the lens while the lamp is on. The strong light from the lamp may cause damage to your eyesight. • Do not block the air intake or exhaust. Doing so could cause a fire due to internal overheating. • Do not place your hands, face, or other objects near the air exhaust, the lamp cover or the bottom of the unit. Doing so could result in injury and/or damage the object. Notes • The start-up screen will disappear after a moment. You can also configure the system to prevent the start-up screen from appearing. To do this, use the Default setting menu p.34 . • The first time you use the projector after purchase, after the start-up screen disappears, the start menu is displayed p.26 . • Do not touch the lens directly with your hand. If fingerprints or stains are left on the projection lens surface, they may interfere with the projector's ability to project images on the screen. 24
-
 1
1 -
2
-
3
-
4
-
5
-
6
-
7
-
8
-
9
-
10
-
11
-
12
-
13
-
14
-
15
-
16
-
17
-
18
-
 19
19 -
 20
20 -
 21
21 -
 22
22 -
 23
23 -
 24
24 -
 25
25 -
 26
26 -
 27
27 -
 28
28 -
 29
29 -
30
-
31
-
32
-
33
-
34
-
35
-
36
-
37
-
38
-
39
-
40
-
41
-
42
-
43
-
44
-
45
-
46
 |
 |