Toshiba Thrive AT1S0 PDA03C-001002 Users Manual Canada; English - Page 67
Connecting your tablet, the Mini Cradle.
 |
View all Toshiba Thrive AT1S0 PDA03C-001002 manuals
Add to My Manuals
Save this manual to your list of manuals |
Page 67 highlights
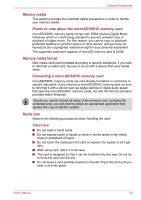
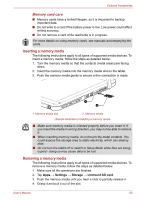
Optional Accessories 1 2 3 1. Headphone jack 3. Power interface 2. Support stand (Sample Illustration) Back of the Mini Cradle Connecting your tablet You can use the power cable/AC Adapter/replaceable plug provide with your tablet for this Mini Cradle. Please refer to the section Connecting the AC adaptor in Getting Started chapter for details about how to assemble the AC adaptor. To connect the Mini Cradle to the tablet, follow the steps below: 1. Gently pull the support stand to hold the Mini Cradle steady. (Sample Illustration) Pull the support stand 2. Plug the power connector of the power cable into the power interface on the Mini Cradle. 3. Plug the AC adaptor into a live wall outlet. User's Manual 67
-
 1
1 -
2
-
3
-
4
-
5
-
6
-
7
-
8
-
9
-
10
-
11
-
12
-
13
-
14
-
15
-
16
-
17
-
18
-
19
-
20
-
21
-
22
-
23
-
24
-
25
-
26
-
27
-
28
-
29
-
30
-
31
-
32
-
33
-
34
-
35
-
36
-
37
-
38
-
39
-
40
-
41
-
42
-
43
-
44
-
45
-
46
-
47
-
48
-
49
-
50
-
51
-
52
-
53
-
54
-
55
-
56
-
57
-
58
-
59
-
60
-
61
-
 62
62 -
 63
63 -
 64
64 -
 65
65 -
 66
66 -
 67
67 -
 68
68 -
 69
69 -
 70
70 -
 71
71 -
 72
72 -
73
-
74
-
75
-
76
-
77
-
78
-
79
-
80
-
81
-
82
 |
 |

Optional Accessories
User’s Manual
67
(Sample Illustration) Back of the Mini Cradle
Connecting your tablet
You can use the power cable/AC Adapter/replaceable plug provide with
your tablet for this Mini Cradle.
Please refer to the section
Connecting the AC adaptor
in
Getting Started
chapter for details about how to assemble the AC adaptor.
To connect the Mini Cradle to the tablet, follow the steps below:
1.
Gently pull the support stand to hold the Mini Cradle steady.
(Sample Illustration) Pull the support stand
2.
Plug the power connector of the power cable into the power interface on
the Mini Cradle.
3.
Plug the AC adaptor into a live wall outlet.
1. Headphone jack
2. Support stand
3. Power interface
1
3
2