Uniden BC780XLT English Owners Manual - Page 20
Basic Operation
 |
View all Uniden BC780XLT manuals
Add to My Manuals
Save this manual to your list of manuals |
Page 20 highlights
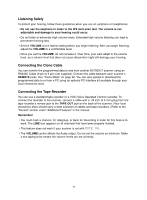
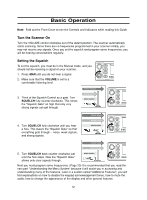
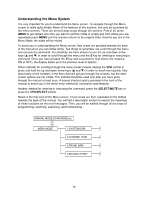
Basic Operation Note: Fold out the Front Cover to see the Controls and Indicators while reading this Guide. Turn the Scanner On Turn the VOLUME control clockwise out of the detent position. The scanner automatically starts scanning. Since there are no frequencies programmed in your scanner initially, you may not receive any signals. Once you set the squelch and program some frequencies, you will be hearing conversations regularly. Setting the Squelch To set the squelch, you must be in the Manual mode, and you should not be receiving a signal on your scanner. 1. Press MAN until you do not hear a signal. 2. Make sure that the VOLUME is set to a comfortable listening level. 3. Think of the Squelch Control as a gate. Turn SQUELCH fully counter-clockwise. This raises the "Squelch Gate" so high that only very strong signals can get through. STRONG SIGNALS MEDIUM SIGNALS WEAK SIGNALS NOISE 4. Turn SQUELCH fully clockwise until you hear a hiss. This lowers the "Squelch Gate" so that everything gets through - noise, weak signals, and strong signals. STRONG SIGNALS MEDIUM SIGNALS WEAK SIGNALS NOISE STRONG SIGNALS MEDIUM SIGNALS 5. Turn SQUELCH back counter-clockwise just until the hiss stops. Now the "Squelch Gate" allows only clear signals through. WEAK SIGNALS NOISE Next you must program some frequencies. (Page 20) It is recommended that you read the next part "Understanding the Menu System" because it will assist you in accessing and understanding many of the features. Later in a section called "Additional Features", you will find explanations on how to disable the keypad acknowledgement tones, how to mute the audio, how to change the appearance of the display and other general features. 12
-
 1
1 -
2
-
3
-
4
-
5
-
6
-
7
-
8
-
9
-
10
-
11
-
12
-
13
-
14
-
 15
15 -
 16
16 -
 17
17 -
 18
18 -
 19
19 -
 20
20 -
 21
21 -
 22
22 -
 23
23 -
 24
24 -
 25
25 -
26
-
27
-
28
-
29
-
30
-
31
-
32
-
33
-
34
-
35
-
36
-
37
-
38
-
39
-
40
-
41
-
42
-
43
-
44
-
45
-
46
-
47
-
48
-
49
-
50
-
51
-
52
-
53
-
54
-
55
-
56
-
57
-
58
-
59
-
60
-
61
-
62
-
63
-
64
-
65
-
66
-
67
-
68
-
69
-
70
-
71
-
72
-
73
-
74
-
75
-
76
-
77
-
78
-
79
-
80
-
81
-
82
-
83
-
84
-
85
-
86
-
87
-
88
-
89
-
90
-
91
-
92
 |
 |
