Uniden BC780XLT English Owners Manual - Page 45
Programming and Receiving, Trunked Systems
 |
View all Uniden BC780XLT manuals
Add to My Manuals
Save this manual to your list of manuals |
Page 45 highlights
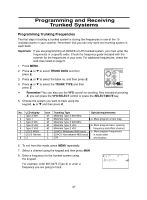
Programming and Receiving Trunked Systems Programming Trunking Frequencies The first step in tracking a trunked system is storing the frequencies in one of the 10 available banks in your scanner. Remember that you can only store one trunking system in each bank. Important: If you are programming an EDACS or LTR trunked system, you must enter the frequencies in a specific order. Check the frequency guide included with the scanner for the frequencies in your area. For additional frequencies, check the web sites listed on page 5. 1. Press MENU. 2. Press or to select TRUNK DATA and then press E. 3. Press or to select the bank no. and then press E. 4. Press or to select the TRUNK TYPE and then press E. Remember! You can also use the VFO control for scrolling. Also instead of pressing E, you can press the VFO/SELECT control or press the SELECT/MUTE key. 5. Choose the system you want to track using the keypad, or and then press E. No. LCD display 1 Type 2 800 2 Type 1 3 Type 2 900 4 Type 2 UHF 5 Type 2 VHF 6 EDCS WIDE 7 EDCS Narrow 8 LT Icon M M M M M E E L Trunking Type Motorola Type 2 800 MHz Motorola Type 1 Motorola Type 2 900 MHz Motorola Type 2 UHF Motorola Type 2 VHF EDACS Wideband 9600 baud EDACS Narrowband 4800 baud LTR Special requirements a. Must program a fleet map. b. Must program base, spacing, frequency and offset channel. c. Must program frequencies in exact order and location. 6. To exit from this mode, press MENU repeatedly. 7. Select a channel using the keypad and then press MAN. 8. Enter a frequency for the trunked system using the keypad. For example, enter 867.8375 (Type 2) or enter a frequency you are going to track. 37
-
 1
1 -
2
-
3
-
4
-
5
-
6
-
7
-
8
-
9
-
10
-
11
-
12
-
13
-
14
-
15
-
16
-
17
-
18
-
19
-
20
-
21
-
22
-
23
-
24
-
25
-
26
-
27
-
28
-
29
-
30
-
31
-
32
-
33
-
34
-
35
-
36
-
37
-
38
-
39
-
 40
40 -
 41
41 -
 42
42 -
 43
43 -
 44
44 -
 45
45 -
 46
46 -
 47
47 -
 48
48 -
 49
49 -
 50
50 -
51
-
52
-
53
-
54
-
55
-
56
-
57
-
58
-
59
-
60
-
61
-
62
-
63
-
64
-
65
-
66
-
67
-
68
-
69
-
70
-
71
-
72
-
73
-
74
-
75
-
76
-
77
-
78
-
79
-
80
-
81
-
82
-
83
-
84
-
85
-
86
-
87
-
88
-
89
-
90
-
91
-
92
 |
 |
