Uniden BC785D English Owners Manual - Page 55
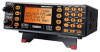
Id Scan, 9875 Nfm, M1-1:4128, 8375 Nfm, Id Tag, List Tag, Bank 10
 |
View all Uniden BC785D manuals
Add to My Manuals
Save this manual to your list of manuals |
Page 55 highlights
ID Scan Mode 1. Press SCAN to begin scanning the lists you have programmed. If you haven't programmed more than 2 IDs, ERROR appears on the display. ID SCAN 867.9875 NFM List 1234567890 Hint: Press and hold RSM for 2 seconds, the scanner will move to the next trunking bank. 2. To remove a Scan List from active scanning, press the number of the Scan List on your keypad. The Scan List indicator turns Off, and the IDs in that list are not scanned. Note: One Scan List must always be active. If you try and deactivate all the Scan Lists, Scan List 1 will automatically be active. 3. To restore a Scan List to active scanning, press its number again. 4. Press SRCH to return to Trunk Tracking Search mode. Remember! When you press and hold TRUNK for 2 seconds, you can switch Trunk Tracking modes (Scan or Search). Note: • While ID Scanning, to change all trunking banks to the Service Search mode, press SRVC. • Selecting a Scan List is also possible in the Menu mode. (LTR only) • ID SCAN appears on the display during Trunk Scan instead of simply SCAN. ID Scan Hold Feature If you want to stop on a ID during ID scanning, press /HOLD. If you want to resume scanning, press RSM. To directly access a specific channel: There are several ways to access a specific ID quickly. 1. Press /HOLD. 2. By using the keypad or rotating the VFO enter the ID location number (See page 48). 3. Press /HOLD again. M1-1:4128 867.8375 NFM ID Tag LIST Tag C1000 0000.0000 Bank 10 Trunked Search Once you have programmed all the frequencies for a trunked system, Search will let you immediately start hearing transmissions. 51
-
 1
1 -
2
-
3
-
4
-
5
-
6
-
7
-
8
-
9
-
10
-
11
-
12
-
13
-
14
-
15
-
16
-
17
-
18
-
19
-
20
-
21
-
22
-
23
-
24
-
25
-
26
-
27
-
28
-
29
-
30
-
31
-
32
-
33
-
34
-
35
-
36
-
37
-
38
-
39
-
40
-
41
-
42
-
43
-
44
-
45
-
46
-
47
-
48
-
49
-
 50
50 -
 51
51 -
 52
52 -
 53
53 -
 54
54 -
 55
55 -
 56
56 -
 57
57 -
 58
58 -
 59
59 -
 60
60 -
61
-
62
-
63
-
64
-
65
-
66
-
67
-
68
-
69
-
70
-
71
-
72
-
73
-
74
-
75
-
76
-
77
-
78
-
79
-
80
-
81
-
82
-
83
-
84
-
85
-
86
-
87
-
88
-
89
-
90
-
91
-
92
-
93
-
94
-
95
-
96
-
97
-
98
-
99
-
100
 |
 |
