Uniden BCD436HP English Owner's Manual - Page 20
Mounting Using the DIN-E Sleeve
 |
View all Uniden BCD436HP manuals
Add to My Manuals
Save this manual to your list of manuals |
Page 20 highlights
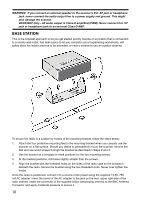
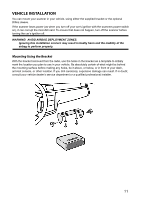
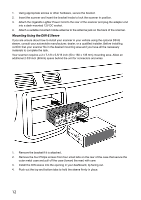
1. Using appropriate screws or other hardware, secure the bracket. 2. Insert the scanner and insert the bracket knobs to lock the scanner in position. 3. Attach the Cigarette Lighter Power Cord to the rear of the scanner and plug the adapter end into a dash mounted 12V DC socket. 4. Attach a suitable mounted mobile antenna to the antenna jack on the back of the scanner. Mounting Using the DIN-E Sleeve If you are unsure about how to install your scanner in your vehicle using the optional DIN-E sleeve, consult your automobile manufacturer, dealer, or a qualified installer. Before installing, confirm that your scanner fits in the desired mounting area and you have all the necessary materials to complete the task. Your scanner requires a 2 x 7-1/8 x 5-5/16 inch (50 x 180 x 135 mm) mounting area. Allow an additional 2-3/8 inch (60mm) space behind the unit for connectors and wires. 1. Remove the bracket if it is attached. 2. Remove the four Philips screws from four small tabs on the rear of the case that secure the outer metal case and pull off the case (toward the rear) with care. 3. Install the DIN sleeve into the opening in your dashboard, lip facing out. 4. Push out the top and bottom tabs to hold the sleeve firmly in place. 12
-
 1
1 -
2
-
3
-
4
-
5
-
6
-
7
-
8
-
9
-
10
-
11
-
12
-
13
-
14
-
 15
15 -
 16
16 -
 17
17 -
 18
18 -
 19
19 -
 20
20 -
 21
21 -
 22
22 -
 23
23 -
 24
24 -
 25
25 -
26
-
27
-
28
-
29
-
30
-
31
-
32
-
33
-
34
-
35
-
36
-
37
-
38
-
39
-
40
-
41
-
42
-
43
-
44
-
45
-
46
-
47
-
48
-
49
-
50
-
51
-
52
-
53
-
54
-
55
-
56
-
57
-
58
-
59
-
60
-
61
-
62
-
63
-
64
-
65
-
66
-
67
-
68
-
69
-
70
-
71
-
72
-
73
-
74
-
75
-
76
-
77
-
78
-
79
-
80
-
81
-
82
-
83
-
84
-
85
-
86
-
87
-
88
-
89
-
90
-
91
-
92
-
93
-
94
-
95
-
96
-
97
-
98
-
99
-
100
-
101
-
102
-
103
-
104
 |
 |
