Uniden BCD996T English Owners Manual - Page 95
Editing a Custom Search Range, Temporary L/O, Locked Out, Locked, Custom 1, Edit Custom, No] then
 |
UPC - 050633650486
View all Uniden BCD996T manuals
Add to My Manuals
Save this manual to your list of manuals |
Page 95 highlights
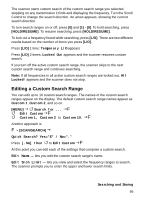
The scanner starts custom search of the custom search range you selected, stopping on any transmission it finds and displaying the frequency. Turn the Scroll Control to change the search direction. An arrow appears, showing the current search direction. To turn search ranges on or off, press [0] and [1] - [9]. To hold searching, press [HOLD/RESUME]. To resume searching, press [HOLD/RESUME]. To lock out a frequency found while searching, press [L/O]. There are two different results based on the number of times you press [L/O]. Press [L/O] 1 time: Temporary L/O appears Press [L/O] 2 times: Locked Out appears and the scanner resumes custom search. If you turn off the active custom search range, the scanner skips to the next custom search range and continues searching. Note: If all frequencies in all active custom search ranges are locked out, All Locked! appears and the scanner does not stop. Editing a Custom Search Range You can edit up to 10 custom search ranges. The names of the custom search ranges appear on the display. The default custom search range names appear as Custom 1, Custom 2, and so on. [MENU] Search for ... F Edit Custom F Custom 1, Custom 2 to Custom 10. F Another approach is F + [SCAN/SEARCH] Quick Search? Yes="E" / No="." Press [.No] then to Edit Custom F At this point you can edit each of the settings that comprise a custom search. Edit Name - lets you edit the custom search range's name. Edit Srch Limit - lets you view and select the frequency ranges to search. The scanner prompts you to enter the upper and lower search limits. Searching and Storing 95
-
 1
1 -
2
-
3
-
4
-
5
-
6
-
7
-
8
-
9
-
10
-
11
-
12
-
13
-
14
-
15
-
16
-
17
-
18
-
19
-
20
-
21
-
22
-
23
-
24
-
25
-
26
-
27
-
28
-
29
-
30
-
31
-
32
-
33
-
34
-
35
-
36
-
37
-
38
-
39
-
40
-
41
-
42
-
43
-
44
-
45
-
46
-
47
-
48
-
49
-
50
-
51
-
52
-
53
-
54
-
55
-
56
-
57
-
58
-
59
-
60
-
61
-
62
-
63
-
64
-
65
-
66
-
67
-
68
-
69
-
70
-
71
-
72
-
73
-
74
-
75
-
76
-
77
-
78
-
79
-
80
-
81
-
82
-
83
-
84
-
85
-
86
-
87
-
88
-
89
-
 90
90 -
 91
91 -
 92
92 -
 93
93 -
 94
94 -
 95
95 -
 96
96 -
 97
97 -
 98
98 -
 99
99 -
 100
100 -
101
-
102
-
103
-
104
-
105
-
106
-
107
-
108
-
109
-
110
-
111
-
112
-
113
-
114
-
115
-
116
-
117
-
118
-
119
-
120
-
121
-
122
-
123
-
124
-
125
-
126
-
127
-
128
-
129
-
130
-
131
-
132
-
133
-
134
-
135
-
136
-
137
-
138
-
139
-
140
-
141
-
142
-
143
-
144
-
145
-
146
-
147
-
148
-
149
-
150
-
151
-
152
 |
 |
