ViewSonic PJD7325 PJD6252L User Guide English - Page 29
Playing sound through the projector, About the microphone input
 |
View all ViewSonic PJD7325 manuals
Add to My Manuals
Save this manual to your list of manuals |
Page 29 highlights
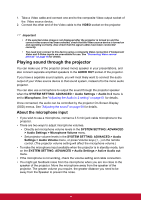
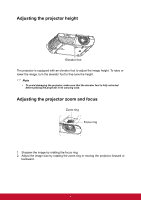
1. Take a Video cable and connect one end to the composite Video output socket of the Video source device. 2. Connect the other end of the Video cable to the VIDEO socket on the projector. Important • If the selected video image is not displayed after the projector is turned on and the correct video source has been selected, check that the Video source device is turned on and operating correctly. Also check that the signal cables have been connected correctly. • You need only connect to this device using a composite Video connection if Component Video and S-Video inputs are unavailable for use. See "Connecting Video source devices" on page 16 for details. Playing sound through the projector You can make use of the projector (mixed mono) speaker in your presentations, and also connect separate amplified speakers to the AUDIO OUT socket of the projector. If you have a separate sound system, you will most likely want to connect the audio output of your Video source device to that sound system, instead of to the mono audio projector. You can also use a microphone to output the sound through the projector speaker when the SYSTEM SETTING: ADVANCED > Audio Settings > Audio In 2 menu is set to Microphone. See "Adjusting the Audio In 2 setting" on page 51 for details. Once connected, the audio can be controlled by the projector On-Screen Display (OSD) menus. See "Adjusting the sound" on page 50 for details. About the microphone input • If you wish to use a microphone, connect a 3.5 mini jack cable microphone to the projector. • There are two ways to adjust microphone volumes. • Directly set microphone volume levels in the SYSTEM SETTING: ADVANCED > Audio Settings > Microphone Volume menu. • Set projector volume levels in the SYSTEM SETTING: ADVANCED > Audio Settings > Audio Volume menu, or press Volume keys (+, -) on the remote control. (The projector volume setting will affect the microphone volume.) • To make the microphone input available when the projector is in standby mode, turn on the SYSTEM SETTING: ADVANCED > Audio Settings > Active Audio out menu. • If the microphone is not working, check the volume setting and cable connection. • You might get feedback noise from the microphone when you are too close to the speaker of the projector. Move the microphone away from the speaker of the projector. The greater volume you require, the greater distance you need to be away from the Speaker to prevent the noise. 18
-
 1
1 -
2
-
3
-
4
-
5
-
6
-
7
-
8
-
9
-
10
-
11
-
12
-
13
-
14
-
15
-
16
-
17
-
18
-
19
-
20
-
21
-
22
-
23
-
 24
24 -
 25
25 -
 26
26 -
 27
27 -
 28
28 -
 29
29 -
 30
30 -
 31
31 -
 32
32 -
 33
33 -
 34
34 -
35
-
36
-
37
-
38
-
39
-
40
-
41
-
42
-
43
-
44
-
45
-
46
-
47
-
48
-
49
-
50
-
51
-
52
-
53
-
54
-
55
-
56
-
57
-
58
-
59
-
60
-
61
-
62
-
63
-
64
-
65
-
66
-
67
-
68
-
69
-
70
-
71
-
72
-
73
-
74
-
75
-
76
-
77
-
78
-
79
-
80
-
81
-
82
-
83
-
84
-
85
-
86
-
87
 |
 |