ViewSonic ViewPad 10pi ViewPad 10PI User Guide For All - Page 12
Connect to a wireless networks - with windows 8
 |
View all ViewSonic ViewPad 10pi manuals
Add to My Manuals
Save this manual to your list of manuals |
Page 12 highlights
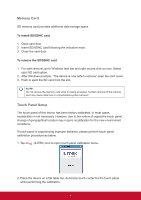
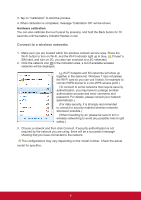
3. Tap on "Calibration" to start the process. 4. When calibration is completed, message "Calibration OK" will be shown. Hardware calibration: You can also calibrate the touch panel by pressing and hold the Back button for 10 seconds until the battery indicator flashes in red. Connect to a wireless networks 1. Make sure you are located within the wireless network service area. Press the Wi-Fi button to turn on Wi-Fi, and the Wi-Fi indicator light up in blue. ( If insert a SIM card, and turn on 3G, you also can conncect to a 3G networks) 2. Click the network icon in the notication area, a list of available wireless networks will be displayed. ( Wi-Fi hotspots and 3G networks will show up together in the same list. Windows 7 also virtualises the Wi-Fi card so you can use it twice, for example to connect WPS device to a non-WPS access point.) (To connect to some networks that require security authentication, you may have to undergo another authorization process and enter username and password. For details, please consult your network administrator.) (For data security, it is strongly recommended to connect to security-enabled wireless networks whenever possible.) (When travelling by air, please be sure to turn o wireless networking to avoid any possible risks to ight safety.) 3. Choose a network and then click Connect. If security authentication is not required by the network you are using, there will be a successful message showing that you have connected to the network. The configurations may vary depending on the model number. Check the actual model for specifics. 8
-
 1
1 -
2
-
3
-
4
-
5
-
6
-
 7
7 -
 8
8 -
 9
9 -
 10
10 -
 11
11 -
 12
12 -
 13
13 -
 14
14 -
 15
15 -
 16
16 -
 17
17 -
18
-
19
-
20
-
21
-
22
-
23
-
24
-
25
-
26
-
27
-
28
-
29
-
30
-
31
-
32
-
33
-
34
-
35
-
36
-
37
-
38
-
39
-
40
-
41
-
42
-
43
-
44
-
45
-
46
-
47
-
48
-
49
-
50
-
51
-
52
-
53
-
54
-
55
-
56
-
57
-
58
-
59
-
60
-
61
-
62
-
63
-
64
-
65
-
66
-
67
-
68
-
69
-
70
-
71
-
72
-
73
-
74
-
75
-
76
-
77
-
78
-
79
-
80
-
81
-
82
-
83
-
84
-
85
-
86
-
87
-
88
-
89
-
90
-
91
-
92
-
93
-
94
-
95
-
96
-
97
-
98
-
99
-
100
-
101
-
102
-
103
-
104
-
105
-
106
-
107
-
108
-
109
-
110
-
111
-
112
-
113
-
114
-
115
-
116
-
117
-
118
-
119
-
120
-
121
-
122
-
123
-
124
-
125
-
126
-
127
-
128
-
129
-
130
-
131
-
132
-
133
-
134
-
135
-
136
-
137
-
138
-
139
-
140
-
141
-
142
-
143
-
144
-
145
-
146
-
147
-
148
-
149
-
150
-
151
-
152
-
153
-
154
-
155
-
156
-
157
-
158
-
159
-
160
-
161
-
162
-
163
-
164
-
165
-
166
-
167
-
168
-
169
-
170
-
171
-
172
-
173
-
174
-
175
-
176
-
177
-
178
 |
 |
