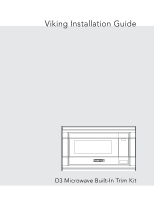
Viking RDMOS201SS 30 inch W. Built-In Trim Kit - Installation Instructions - Page 6
Bottom Duct Assembly, Mounting Bracket Assembly
 |
View all Viking RDMOS201SS manuals
Add to My Manuals
Save this manual to your list of manuals |
Page 6 highlights
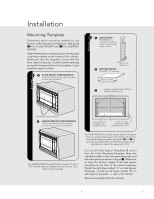
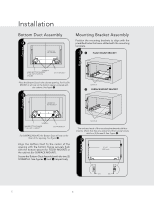
Installation Illustration 6 - for Flush Mount Bottom Duct Assembly 4 CENTER THE BOTTOM DUCT Mounting Bracket Assembly Position the mounting brackets to align with the predrilled holes that were drilled with the mounting template. 6A Flush mount BRACKET figure figure SCREW A make bottom flange flush with bottom spacer bottom duct Illustration 7 - for Surface Mount Place the Bottom Duct in the cabinet opening. For Flush Mount, it will rest on the bottom spacer centered with the cabinet. See figure 4. 5 CENTER THE BOTTOM DUCT SCREW B B SURFACE mount BRACKET figure SCREW A make bottom flange flush with CABINET bottom duct For Surface Mount, the Bottom Duct will rest on the floor of the opening. See figure 5. Align the Bottom Duct to the center of the opening with the bottom flange securely flush with the bottom spacer (for FLUSH MOUNT) or the cabinet (for SURFACE MOUNT). Secure the Bottom Duct Assembly with the two (2) SCREWS A. See figures 4 and 5 respectively. figure SCREW B The enclosed ends of the mounting brackets should face inwards. Check that they are vertical and then secure loosely with four (4) Screws B. See Figure 6. 7 27-1/2" (698.5mm) eq. eq. E 6
-
 1
1 -
 2
2 -
 3
3 -
 4
4 -
 5
5 -
 6
6 -
 7
7 -
 8
8 -
 9
9 -
 10
10 -
 11
11 -
 12
12 -
13
-
14
-
15
-
16
-
17
-
18
-
19
-
20
-
21
-
22
-
23
-
24
 |
 |
