Viking RDMOS201SS 30 inch W. Built-In Trim Kit - Installation Instructions - Page 8
Over Oven Installation, Performance Checklist, Side Decoration Assembly - manual
 |
View all Viking RDMOS201SS manuals
Add to My Manuals
Save this manual to your list of manuals |
Page 8 highlights
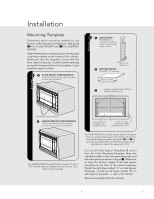
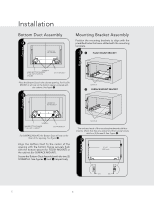
Installation Side Decoration Assembly (For Surface Mount Only) " Over Oven Installation # figure figure ALIGN TOP SURFACE OF SIDE DECORATION TO TOP SURFACE OF FRAME ASSEMBLY FRONT INNER EDGE OF SIDE DECORATION FRONT SIDE EDGE OF FRAME ASSEMBLY Peel the backing off the tape on the backside of the SIDE DECORATIONS. Align the front inner edge of the side decorations to the front side edge of the FRAME ASSEMBLY. Align the top surface of the side decorations to the top surface of the frame assembly. Secure the side decorations by pressing them firmly against the side of the frame assembly. See Figure ". 2" (5.1 cm) for 30" W Lower Oven Performance Checklist 1. Make sure the unit has been installed according to all of the Installation Instructions and the required Mounting Template. 2. Plug in the power cord. 3. Keep the Use & Care Manual and Installation Manual. Viking Range Corporation 111 Front Street Greenwood, Mississippi 38930 USA (662) 455-1200 For product information call 1-888-VIKING1 (845-4641) or visit the Viking Web site at vikingrange.com E 8
-
 1
1 -
2
-
 3
3 -
 4
4 -
 5
5 -
 6
6 -
 7
7 -
 8
8 -
 9
9 -
 10
10 -
 11
11 -
 12
12 -
 13
13 -
14
-
15
-
16
-
17
-
18
-
19
-
20
-
21
-
22
-
23
-
24
 |
 |
