Viking RDSCE2305BSS Installation Instructions
Viking RDSCE2305BSS Manual
 |
View all Viking RDSCE2305BSS manuals
Add to My Manuals
Save this manual to your list of manuals |
Viking RDSCE2305BSS manual content summary:
- Viking RDSCE2305BSS | Installation Instructions - Page 1
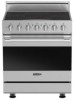
Installation Viking Range Corporation 111 Front Street Greenwood, Mississippi 38930 USA (662) 455-1200 For product information, call 1-888-VIKING1 (845-4641) or visit the Viking Website at vikingrange.com UL C UL F20942 EN (041012) Freestanding 30" Electric Range - Viking RDSCE2305BSS | Installation Instructions - Page 2
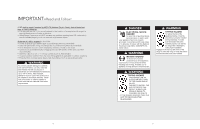
24 Service & Registration 25 2 IMPORTANT-Read and Follow! • Before beginning, please read these instructions completely and of others is very important. We have provided many important safety messages in this manual and on your appliance. Always read and obey all safety messages. This is the - Viking RDSCE2305BSS | Installation Instructions - Page 3
of a GFI is normally related to the location of a receptacle with respect to any significant sources of water or moisture. • Viking Range Corporation will NOT warranty any problems resulting from GFI outlets which are not installed properly or do not meet the requirements below. If the use of a GFI - Viking RDSCE2305BSS | Installation Instructions - Page 4
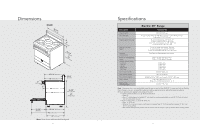
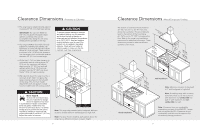
(48.9 cm) 25-3/4" (65.4 cm) 45" (114.3 cm) 24" (61.0 cm) *Note: Units shown with standard backguard. 6 Specifications Electric 30" Range Description Overall width Overall height Overall depth from rear Additions to base height Electrical requirements Maximum wattage/amp usage Surface element - Viking RDSCE2305BSS | Installation Instructions - Page 5
the bottom of the hood being WoodO/Cveormlapyosite 66" (167.6 cm) to 72" (182.9 cm) above the floor. Refer to the range hood installation instructions for additional information. These dimensions provide for safe and efficient operation of the hood. ((7611268672""t..mmo69 accinmmx..)) WoodO - Viking RDSCE2305BSS | Installation Instructions - Page 6
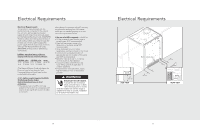
of a GFI is normally related to the location of a receptacle with respect to any significant sources of water or moisture. Viking Range Corporation will NOT warranty any problems resulting from GFI outlets which are not installed properly or do not meet the requirements below. If the use of a GFI - Viking RDSCE2305BSS | Installation Instructions - Page 7
or excessive noise coming from the cooling fan, contact a Viking Authorized Service Center before continuing operation. Failure to do so can result on the outside and inside of the range. Range - Do not discard the anti-tip metal brackets (2) supplied with the range. These are the anti-tip devices - Viking RDSCE2305BSS | Installation Instructions - Page 8
a 4-wire connection, see following section for 4-wire connection instructions. WARNING Electrical shock hazard. To avoid risk or electrical shock wire power supply cord. The cord or conduit must be secured to the range with the strain relief bracket. The electrical connection is made at the terminal - Viking RDSCE2305BSS | Installation Instructions - Page 9
information. Where local codes do not permit grounding through neutral, use a 4-wire power supply cord. The cord or conduit must be secured to the range with the strain relief bracket. The electrical connection is made at the terminal block, which is located behind the access door on the back of - Viking RDSCE2305BSS | Installation Instructions - Page 10
block. To connect eyelet style wires, use holes on right side of terminal. 5 Feed supply cord up through hole in bottom of range back. 6 1 2 Attach ground wire (green) with ground screw that was removed. 7 1 1 2 Attach line #1 (black) and line #2 (red) leads to outside terminal. Attach - Viking RDSCE2305BSS | Installation Instructions - Page 11
wall with the top left corner at measurement (A) plus 1/2" (1.3 cm) from the floor and 3-5/8" (9.2 cm) from where the right side of range (facing range) is to be located. 4 1 Mark and drill holes where bracket will be located. 2 Attach bracket with mounting hardware provided. Floor Mount Anti - Viking RDSCE2305BSS | Installation Instructions - Page 12
and check that hook and bracket are engaged. 1 2 Connect electrical in shaded area. See the "Electrical Requirements" section for more information. Slide range into place. Be sure anti-tip bracket slides into the anit-tip opening. 22 Door Replacement and Adjustment 3 1 (03.9/58"cm) Check - Viking RDSCE2305BSS | Installation Instructions - Page 13
be referred to a qualified technician. Contact Viking Range Corporation, 1-888-VIKING1 (845-4641), for the nearest service parts distributor in your area or write to: VIKING RANGE CORPORATION PREFERRED SERVICE 1803 Hwy 82W Greenwood, Mississippi 38930 USA Range - The serial number and model number - Viking RDSCE2305BSS | Installation Instructions - Page 14
26 27
-
 1
1 -
 2
2 -
 3
3 -
 4
4 -
 5
5 -
 6
6 -
 7
7 -
8
-
9
-
10
-
11
-
12
-
13
-
14
 |
 |
Installation
Viking Range Corporation
111 Front Street
Greenwood, Mississippi 38930 USA
(662) 455-1200
For product information, call 1-888-VIKING1 (845-4641)
or visit the Viking Website at vikingrange.com
F20942 EN
(041012)
U
L
C
U
L
Freestanding 30” Electric Range