Weider 350 Bench English Manual - Page 12
Tighten the M10 and M8 Nylon Locknuts 80
 |
View all Weider 350 Bench manuals
Add to My Manuals
Save this manual to your list of manuals |
Page 12 highlights
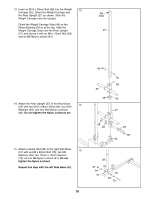
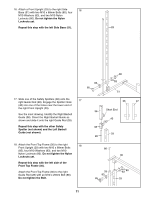
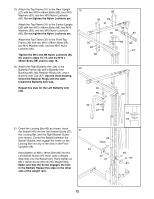
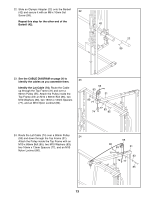
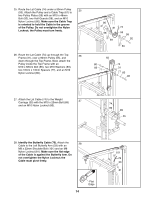
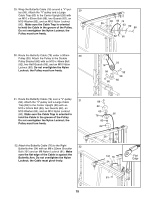
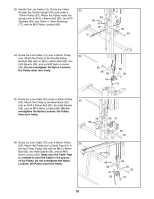
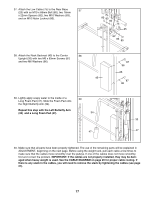
19. Attach the Top Frame (31) to the Rear Upright (27) with two M10 x 68mm Bolts (85), four M10 Washers (83), and two M10 Nylon Locknuts (80). Do not tighten the Nylon Locknuts yet. Attach the Top Frame (31) to the Center Upright (26) with two M10 x 68mm Bolts (85), two M10 Washers (83), and two M10 Nylon Locknuts (80). Do not tighten the Nylon Locknuts yet. Attach the Top Frame (31) to the Front Top Frame (30) with two M10 x 68mm Bolts (85), two M10 Washers (83), and two M10 Nylon Locknuts (80). Tighten the M10 and M8 Nylon Locknuts (80, 81) used in steps 10-19, and the M10 x 25mm Bolts (86) used in step 18. 20. Attach the Right Butterfly Arm (34) to the Butterfly Frame (32) with a Butterfly Arm Bushing (66), two Retainer Rings (44), and a Butterfly Arm Cap (67). See the inset drawing. Orient the Retainer Rings with the teeth toward the Butterfly Arm Cap. Repeat this step for the Left Butterfly Arm (33). 19 85 85 83 31 83 80 26 83 30 83 80 80 85 27 20 32 66 33 34 44 67 21. Orient the Locking Bar (43) as shown. Insert the Barbell (42) into the Left Barbell Guide (37), 21 the Locking Bar, and the Right Barbell Guide (not shown). Center the Barbell between the Barbell Guides, and engage the hooks on the Locking Bar into any of the slots in the Front Uprights (29). 43 Hand tighten an M8 x 18mm Bolt (90) into the Left Barbell Guide (37). Next, slide a Weight Stop (64) onto the Barbell (42). Hand tighten an M6 x 16mm Screw (95) into the Weight Stop. Make sure that the Screw engages the hole in the Barbell. Repeat this step on the other side of the weight rack. 29 Hook 42 37 44 67 90 95 64 12
-
 1
1 -
2
-
3
-
4
-
5
-
6
-
 7
7 -
 8
8 -
 9
9 -
 10
10 -
 11
11 -
 12
12 -
 13
13 -
 14
14 -
 15
15 -
 16
16 -
 17
17 -
18
-
19
-
20
-
21
-
22
-
23
-
24
-
25
-
26
-
27
-
28
 |
 |
