Weider 350 Bench English Manual - Page 13
Identify the Lat Cable 74.
 |
View all Weider 350 Bench manuals
Add to My Manuals
Save this manual to your list of manuals |
Page 13 highlights
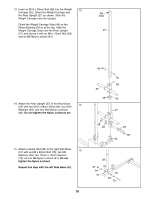
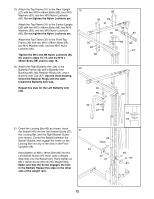
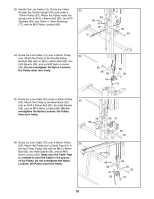
22. Slide an Olympic Adapter (22) onto the Barbell (42) and secure it with an M8 x 10mm Set 22 Screw (99). Repeat this step for the other end of the Barbell (42). 42 22 99 23. See the CABLE DIAGRAM on page 20 to 23 identify the cables as you assemble them. Identify the Lat Cable (74). Route the Cable up through the Top Frame (31) and over a 90mm Pulley (55). Attach the Pulley inside the Top Frame with an M10 x 68mm Bolt (85), two M10 Washers (83), two 16mm x 13mm Spacers (77), and an M10 Nylon Locknut (80). 55 83 31 80 77 77 83 74 85 24. Route the Lat Cable (74) over a 90mm Pulley 24 (55) and down through the Top Frame (31). Attach the Pulley inside the Top Frame with an M10 x 68mm Bolt (85), two M10 Washers (83), two 16mm x 13mm Spacers (77), and an M10 Nylon Locknut (80). 55 80 83 31 77 83 74 77 85 13
-
 1
1 -
2
-
3
-
4
-
5
-
6
-
7
-
 8
8 -
 9
9 -
 10
10 -
 11
11 -
 12
12 -
 13
13 -
 14
14 -
 15
15 -
 16
16 -
 17
17 -
 18
18 -
19
-
20
-
21
-
22
-
23
-
24
-
25
-
26
-
27
-
28
 |
 |
