Weider 9645 Instruction Manual - Page 7
How To Use The Home Gym System - pro exercise chart
 |
View all Weider 9645 manuals
Add to My Manuals
Save this manual to your list of manuals |
Page 7 highlights
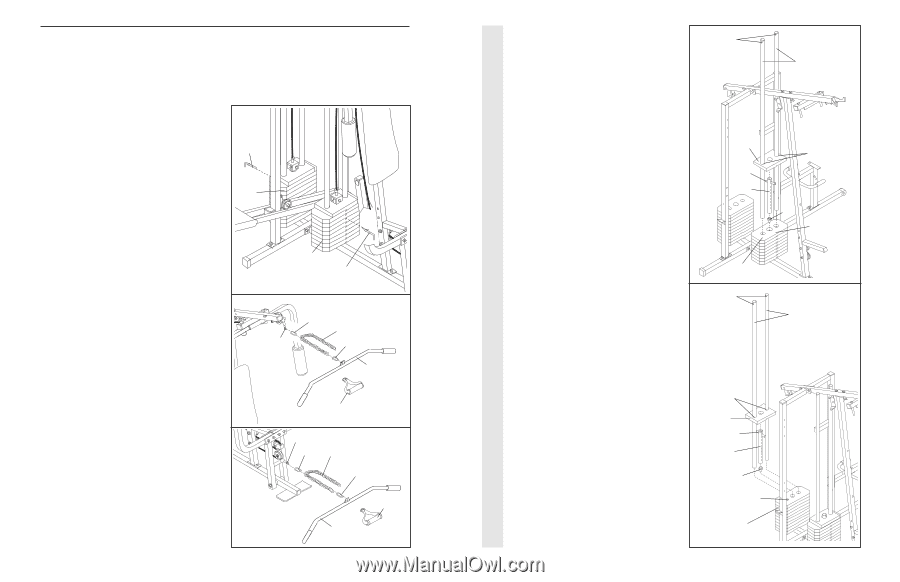
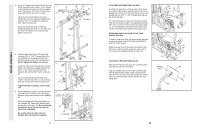
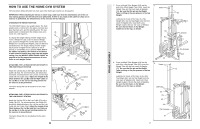
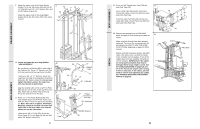
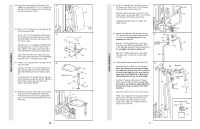
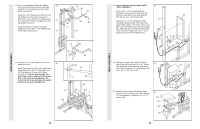
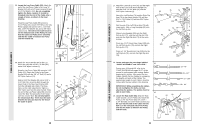
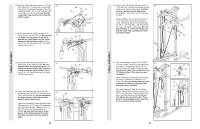
HOW TO USE THE HOME GYM SYSTEM The instructions below describe how each part of the home gym system can be adjusted. IMPORTANT: When attaching the lat bar or nylon strap, make sure that the attachments are in the correct starting position for the exercise to be performed. If there is any slack in the cables or chain as an exercise is performed, the effectiveness of the exercise will be reduced. CHANGING THE WEIGHT SETTING The PRO 9645 features two weight stacks. The front weight stack is connected to the upper and lower pul- leys, the press arm, and the butterfly arms. The rear weight stack is connected to the military press arm, 26 assist arm, and leg press. To change the weight setting of either weight stack, insert a Weight Pin (26) under the desired Weight (25). Insert the Weight Pin until the bent end of the 25 Weight Pin is touching the Weights, and turn the bent end downward. The weight setting of either weight stack can be changed from 6.5 pounds to 106.5 pounds, in increments of 12.5 pounds. Note: Due to the cables and pulleys, the amount of resistance at each exercise station may vary from the weight setting. Use the WEIGHT RESISTANCE CHART on page 24 to find the approximate amount of resis- tance at each weight station. 25 26 ATTACHING THE LAT BAR OR NYLON STRAP TO THE HIGH PULLEY STATION Attach the Lat Bar (54) to the High Cable (58) with a Cable Clip (53). For some exercises, the Chain (52) should be attached between the Lat Bar and the High Cable with two Cable Clips. Adjust the length of the Chain between the Lat Bar and the High Cable so the Lat Bar is in the correct starting position for the exercise to be performed. The Nylon Strap (39) can be attached in the same manner. 53 52 58 53 54 39 ATTACHING THE LAT BAR OR NYLON STRAP TO THE LOW PULLEY STATION Attach the Lat Bar (54) to the Low Cable (23) with a Cable Clip (53). For some exercises, the Chain (52) should be attached between the Lat Bar and the Low Cable with two Cable Clips. Adjust the length of the Chain between the Lat Bar and the Low Cable so the Lat Bar is in the correct starting position for the exercise to be performed. The Nylon Strap (39) can be attached in the same manner. 22 23 53 52 53 39 54 FRAME ASSEMBLY 7. Press a Weight Tube Bumper (64) into the 7 end of the Short Weight Tube (108). Insert the Holes Weight Tube into the front stack of Weights (25). Be sure that the pin on the Weight Tube is sitting in the pin grooves in the top Weight. Lubricate the inside of the holes in a Top Weight (65). Set the Top Weight onto the front stack of Weights (25). Insert both Long Weight Guides (62) into the stack of Weights. Be sure that the holes in the Weight Guides are at the top, as shown. 65 Pin 108 62 Lubricate 64 Pin Grooves 25 8. Press a Weight Tube Bumper (64) into the end of the Long Weight Tube (63). Insert the 8 Holes Weight Tube into the rear stack of Weights (25). Be sure that the pin on the Weight 73 Tube is sitting in the pin grooves in the top Weight. Lubricate the inside of the holes in the other Top Weight (65). Set the Top Weight onto the rear stack of Weights (25). Insert both Short Weight Guides (73) into the stack of Weights. Be sure that the holes in the Weight Guides are at the top, as shown. Lubricate 65 Pin 63 64 Pin Grooves 25 7
-
 1
1 -
 2
2 -
 3
3 -
 4
4 -
 5
5 -
 6
6 -
 7
7 -
 8
8 -
 9
9 -
 10
10 -
 11
11 -
 12
12 -
13
-
14
-
15
-
16
-
17
-
18
-
19
 |
 |