Weider Pro 4250 English Manual - Page 16
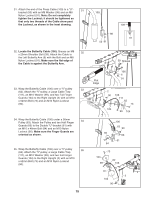
Locate the Weight Cable 110. - cable routing
 |
View all Weider Pro 4250 manuals
Add to My Manuals
Save this manual to your list of manuals |
Page 16 highlights
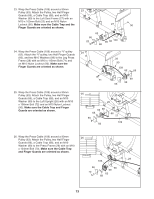
36. Grease an M8 x 20mm Shoulder Bolt (39). Attach 36 the Butterfly Cable (106) to the Right Butterfly Arm (7) with the Bolt and an M8 Nylon Locknut (91). Make sure the flat edge of the Cable is against the Butterfly Arm. 37. Locate the Short Cable (108). Attach the Cable 37 to the M8 x 95mm Bolt (83) used in step 6 with an M8 Washer (98), an M8 x 13mm Spacer (103), and an M8 Nylon Locknut (91). 38. Wrap the Short Cable (108) over a 90mm Pulley (63). Attach the Pulley and two Half Finger 38 Guards (66) to the Double "U"-bracket (61) with an M10 x 46mm Bolt (84) and an M10 Nylon Locknut (90). Make sure the Finger Guards are oriented as shown. 39. Attach the end of the Short Cable (108) to a "U"- 39 bracket (50) with an M8 Washer (98) and an M8 Nylon Locknut (91). Note: Do not completely tighten the Locknut; it should be tightened so that only two threads of the Cable show past the Locknut, as shown in the inset drawing. 39 Grease 106 7 91 Flat Edge 108 2 98 91 103 83 90 66 108 63 61 66 84 98 108 50 91 108 91 40. Locate the Weight Cable (110). Route the Cable 40 up through the Right Top Frame (5) and over a 90mm Pulley (63). Attach the Pulley inside the Top Frame with an M10 x 80mm Bolt (75), two M10 Washers (99), two M10 x 19mm Spacers (102), and an M10 Nylon Locknut (90). 16 99 75 102 5 110 63 99 102 90
-
 1
1 -
2
-
3
-
4
-
5
-
6
-
7
-
8
-
9
-
10
-
 11
11 -
 12
12 -
 13
13 -
 14
14 -
 15
15 -
 16
16 -
 17
17 -
 18
18 -
 19
19 -
 20
20 -
 21
21 -
22
-
23
-
24
-
25
-
26
-
27
-
28
-
29
-
30
-
31
-
32
-
33
-
34
-
35
-
36
-
37
 |
 |
