Weider Pro 4250 English Manual - Page 19
two Half Finger Covers 66 to the Right Base 1
 |
View all Weider Pro 4250 manuals
Add to My Manuals
Save this manual to your list of manuals |
Page 19 highlights
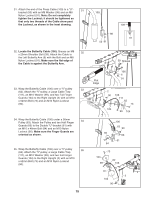
50. Wrap the Ab Cable (107) under a 90mm Pulley 50 (63). Attach the Pulley, a Cable Trap (68), and two Half Finger Guards (66) to the Right Base (1) with an M10 x 48mm Bolt (64) and an M10 Nylon Locknut (90). Make sure the Cable Trap and Finger Guards are oriented as shown. 90 66 107 63 1 68 51. Wrap the Ab Cable (107) over a 90mm Pulley 51 (63). Attach the Pulley, a Cable Trap (68), and two Half Finger Guards (66) at the second hole from the bottom of the two Pulley Plates (51) with an M10 x 48mm Bolt (64) and an M10 Nylon Locknut (90). Make sure the Cable Trap and Finger Guards are oriented as shown. 52. Wrap the Ab Cable (107) under a 90mm Pulley (63). Attach the Pulley, a Cable Trap (68), and two Half Finger Covers (66) to the Right Base (1) with an M10 x 48mm Bolt (64) and an M10 Nylon Locknut (90). Make sure the Cable Trap and Finger Guards are oriented as shown. 52 90 66 68 66 64 66 64 51 68 90 63 107 66 107 63 53. Wrap the Ab Cable (107) over a 90mm Pulley 53 (63). Attach the Pulley, a Cable Trap (68), and two Half Finger Guards (66) to the lower hole in the indicated "U"-bracket (50) with an M10 x 48mm Bolt (64) and an M10 Nylon Locknut (90). Make sure the Cable Trap and Finger Guards are oriented as shown. 54. Wrap the Ab Cable (107) under a 90mm Pulley 54 (63). Attach the Pulley, a Cable Trap (68) and two Half Finger Guards (66) to the Right Base (1) with an M10 x 48mm Bolt (64) and an M10 Nylon Locknut (90). Make sure the Cable Trap and Finger Guards are oriented as shown. 19 1 64 66 50 66 64 90 66 68 63 107 90 66 107 1 63 68 66 64
-
 1
1 -
2
-
3
-
4
-
5
-
6
-
7
-
8
-
9
-
10
-
11
-
12
-
13
-
 14
14 -
 15
15 -
 16
16 -
 17
17 -
 18
18 -
 19
19 -
 20
20 -
 21
21 -
 22
22 -
 23
23 -
 24
24 -
25
-
26
-
27
-
28
-
29
-
30
-
31
-
32
-
33
-
34
-
35
-
36
-
37
 |
 |
