Xerox XTRAVEL-SCAN User Guide - Page 10
Xerox XTRAVEL-SCAN - Travel Scanner 100 Manual
 |
UPC - 785414114351
View all Xerox XTRAVEL-SCAN manuals
Add to My Manuals
Save this manual to your list of manuals |
Page 10 highlights
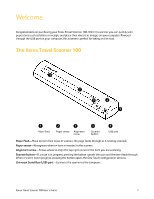
Installation Step 1: Install the Software The Installation Disc contains the necessary driver, and additional scanning software, to use your Xerox Travel Scanner 100. To install the software: 1. Start Microsoft Windows and make sure that no other applications are running. 2. Insert the installation disc into your computer's DVD-ROM drive. The disc automatically starts. 3. The Select Language window opens. Click the drop-down menu arrow and select the language to use. Click OK. 4. The disc's Main Menu window opens. NOTE: If the disc does not start, check the following Make sure the disc drive's door is completely shut. Make sure the disc was inserted in the drive in the proper direction (label side up). Open the Windows option for My Computer. You can do this by double-clicking on the My Computer icon on your desktop. Double-click the icon for your DVD-ROM drive. The Installation menu for the disc should now open. From the list of files on the disc, double-click the file named START32.EXE. To launch the disc manually: If the menu does not open: NOTE: The Scanner Readme file has late-breaking news about your scanner. The readme file is in HTML format and will open in any standard browser. Xerox Travel Scanner 100 User's Guide 5
-
 1
1 -
2
-
3
-
4
-
 5
5 -
 6
6 -
 7
7 -
 8
8 -
 9
9 -
 10
10 -
 11
11 -
 12
12 -
 13
13 -
 14
14 -
 15
15 -
16
-
17
-
18
-
19
-
20
-
21
-
22
-
23
-
24
-
25
-
26
-
27
-
28
-
29
-
30
-
31
-
32
-
33
-
34
-
35
-
36
-
37
-
38
-
39
-
40
-
41
-
42
-
43
-
44
-
45
-
46
-
47
-
48
-
49
-
50
-
51
-
52
-
53
-
54
-
55
-
56
-
57
-
58
-
59
-
60
-
61
-
62
-
63
-
64
-
65
-
66
-
67
-
68
-
69
-
70
-
71
-
72
-
73
-
74
-
75
-
76
-
77
-
78
-
79
-
80
-
81
-
82
-
83
-
84
-
85
-
86
-
87
-
88
-
89
-
90
-
91
-
92
-
93
-
94
-
95
-
96
 |
 |
