Yamaha AP-U70 Owner's Manual - Page 31
Custom keys A, B, C, Down/Up keys
 |
View all Yamaha AP-U70 manuals
Add to My Manuals
Save this manual to your list of manuals |
Page 31 highlights
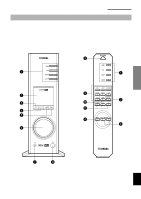
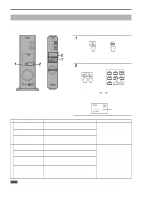
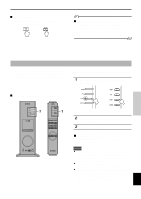
CONTROLS AND THEIR FUNCTIONS 1 Input selectors & indicators These four keys, explained below, are used to select the input source. The indicator of the selected source lights up. ● USB key This key selects input signals sent from your computer by way of the USB terminal. ● PC key This key selects your computer as the input source. Pressing this key repeatedly selects the digital (DIGITAL PC COAX IN or DIGITAL PC OPT IN) or analog (ANALOG PC IN) input. The DIGITAL PC OPT IN has priority over the DIGITAL PC COAX IN, so if you connect to both inputs, the signal received at the DIGITAL PC OPT IN is used. ● AUX1 key This key selects the equipment connected to the ANALOG AUX 1 IN or DIGITAL AUX 1 OPT IN connector as the input source. Pressing this key repeatedly selects the digital or analog input. ● AUX2 key This key selects the equipment connected to the ANALOG AUX 2 IN connectors as the input source. 2 Display The display shows various settings, selected input source, sound field program and various other information. 3 DSP key [front panel] ON/OFF key [remote control] This key activates the sound field programs produced by the internal DSP. 4 MUTE key This key is used to cut off sound output temporarily. Turning the volume control on the front panel or pressing the VOLUME keys on the remote control restores sound output. Pressing this key again also restores sound output. * Sound output will also be restored by changing the status of this unit between standby and power-on, changing the input source or the sound field program, and so on. 5 / (Down/Up) keys These keys are used to select sound field programs. These keys only work when the internal DSP is activated (when "DSP" is illuminated on the display). 6 Volume control [front panel] VOLUME (Down/Up) keys [remote control] These control and keys adjust the speaker and headphone volume. The volume cannot be adjusted when this unit is in the standby mode. 7 Headphone jack Stereo headphones can be connected to this mini-jack for private listening, with Virtual 3D effects specifically tailored for headphone listening. 8 Power switch ( ) [front panel] POWER key [remote control] Each click of this switch changes the status of this unit between standby mode and power on. * In the standby mode, this unit can be turned on remotely from your computer, using the supplied Application Software. Note that this unit uses a small amount of power in the standby mode. 9 Sound field program selector keys Each of these keys selects the corresponding sound field program. 0 TEST key This key is used to output a test tone. The test tone is used when adjusting the volume balance between the left and right front speakers, or among all speakers in the system including the virtual rear speakers. (Refer to page 13 for details.) A Custom keys (A, B, C) These keys are available when this unit and your computer are connected with the USB cable, and the supplied Application Software is installed on the computer. Each of these keys can be programmed with a set of commands (input selector, sound field program, volume setting, etc.) by using the Application Software. After storing, simply pressing each key will execute the stored command. * Refer to the online help of the Application Software for details. E-6
-
 1
1 -
2
-
3
-
4
-
5
-
6
-
7
-
8
-
9
-
10
-
11
-
12
-
13
-
14
-
15
-
16
-
17
-
18
-
19
-
20
-
21
-
22
-
23
-
24
-
25
-
 26
26 -
 27
27 -
 28
28 -
 29
29 -
 30
30 -
 31
31 -
 32
32 -
 33
33 -
 34
34 -
 35
35 -
 36
36 -
37
-
38
-
39
-
40
-
41
-
42
-
43
-
44
-
45
-
46
-
47
 |
 |