Yamaha AP-U70 Owner's Manual - Page 40
Operating this unit with the Application Software, About the Main Panel
 |
View all Yamaha AP-U70 manuals
Add to My Manuals
Save this manual to your list of manuals |
Page 40 highlights
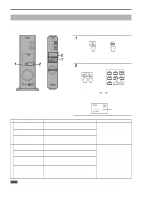
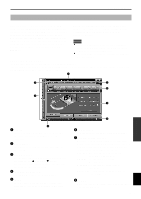
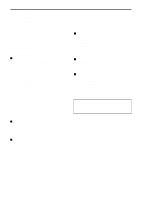
ADVANCED OPERATION Operating this unit with the Application Software If this unit is connected to your computer via the USB connection and the Application Software is installed in your computer from the supplied CD-ROM, you can operate this unit with the Application Software from your computer. Moreover, the Application Software, once installed on your computer, offers various settings unavailable from this unit or the remote control. (For instructions on how to install the Application Software, see the separate "SET UP MANUAL".) This section briefly explains how to use the Application Software, the setting screens, and the available functions. For further details, refer to the Online Help of the Application Software. Notes ● The screen images shown in this section are of the basic screens for the Windows version. The Macintosh version slightly differs in button arrangement, etc. ● The screen design, functions, etc., are subject to change due to version upgrades. About the Main Panel The Main Panel allows you to perform the following basic operations. Tabs are shown at the bottom of the detailed-setting screen. To make detailed settings of the desired function available from any detailed-setting screen, click on the tab for the function. 1 2 5 6 3 7 ADVANCED OPERATION 4 1 Display This section shows the current status of the volume, input selectors, sound field programs, etc. by characters. 2 Input selector The input selector allows you to directly change the input source. 3 Volume control You can adjust the volume by dragging the indicator or by clicking the up ( ) and down ( ) arrows. You can also alternately turn on and off the speakers by clicking the speaker icon below. 4 Changing the panel size You can minimize the size of the Main Panel. 5 SETUP Open this panel to change available settings in the Setup panel. (See page 18 for details on the Setup panel.) 8 6 DSP selector You can directly select a DSP sound field program. 7 Detailed-setting screens Select one of the detailed-setting screen tabs at the bottom of the current detailed-setting screen. The new detailed-setting screen will be displayed, where you can make detailed settings of the function. DSP-EDIT: For adjusting the DSP sound field parameters (See page 16.) VIRTUAL: For adjusting the virtual 3D (See page 17.) D-RANGE: For adjusting the dynamic range (See page 17.) EQUALIZER: For operating the graphic equalizer (See page 17.) 8 POWER Each click changes the status of the main unit between standby and power-on. E-15 English
-
 1
1 -
2
-
3
-
4
-
5
-
6
-
7
-
8
-
9
-
10
-
11
-
12
-
13
-
14
-
15
-
16
-
17
-
18
-
19
-
20
-
21
-
22
-
23
-
24
-
25
-
26
-
27
-
28
-
29
-
30
-
31
-
32
-
33
-
34
-
 35
35 -
 36
36 -
 37
37 -
 38
38 -
 39
39 -
 40
40 -
 41
41 -
 42
42 -
 43
43 -
 44
44 -
 45
45 -
46
-
47
 |
 |
