Yamaha CLP-155 Owner's Manual - Page 17
Playback
 |
View all Yamaha CLP-155 manuals
Add to My Manuals
Save this manual to your list of manuals |
Page 17 highlights
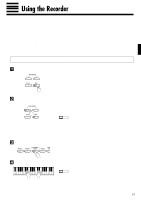
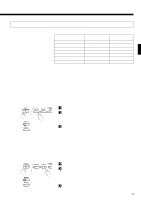
Using the Recorder BStop Recording RECORDER 1 2 PLAY REC Press either the RECORDER [REC] or [PLAY] button to stop recording. The indicator of the recorded track will glow green to indicate that it now contains data. q Changing the Initial Settings The initial voice (including dual mode and dual balance setting), damper pedal, soft pedal, tempo, reverb type, reverb depth, and brilliance (CLP-155 only) settings made in step 3 of the recording procedure are actually recorded by the CLP-154S/155. These initial settings can be changed after the recording is finished by pressing the [REC] button to engage the record ready mode, pressing the appropriate track button, making the required changes, and then pressing the [REC] button again to exit from the record ready mode and register the changes. If you do this, be careful not to press the [PLAY] button or a key on the keyboard, either of which will start recording and erase all previous recorded data on the selected track. If you start this procedure but decide to cancel, simply select a different track then press the [REC] button a second time. q Erasing a Single Track All data can be erased from either of the recorder's tracks by engaging the record mode, selecting the track you want to erase, and then pressing the [PLAY] button twice without recording any data. Playback RECORDER 1 2 PLAY REC To play back what you've recorded, first make sure that the green track indicators of the tracks you want to play are lit. If not, press the corresponding track button(s) so that they are lit. Then press the RECORDER [PLAY] button. Playback starts from the beginning of the recorded data, and will stop automatically at the end of the recorded data. You can also stop playback at any time by pressing the [PLAY] button. To mute a track so that it doesn't play back, press the corresponding track button so that its indicator goes out (press again to turn the track back on). NOTE • All recorder data will be retained in memory for about one week after the power is turned off. If you want to keep your recorded data for longer periods, turn the power on briefly at least once a week. It is also possible to store it to an external MIDI storage device such as the Yamaha DOU-10 Disk Orchestra Unit by using the Bulk Dump function described on page 20. • The track indicators will not light automatically when the power is turned on even if the recorder contains data. It is therefore necessary to press the track buttons so that the corresponding green indicators light before starting RECORDER playback. It is also a good idea to press the track buttons to check if the tracks contain data before recording. If the green indicator lights when the corresponding track button is pressed, that track contains data which will be erased and replaced by the newly-recorded data. • If the metronome is being used during playback, the metronome will stop when playback is stopped. • The playback data is not transmitted via the MIDI OUT connector. q Fast Forward Playback RECORDER 1 2 When you want to locate a specific point in a recording you can quickly move forward through the recording while monitoring the sound by pressing the [REC] button while holding the [MIDI/TRANSPOSE] button. MIDI/ TRANSPOSE PLAY REC 14
-
 1
1 -
2
-
3
-
4
-
5
-
6
-
7
-
8
-
9
-
10
-
11
-
 12
12 -
 13
13 -
 14
14 -
 15
15 -
 16
16 -
 17
17 -
 18
18 -
 19
19 -
 20
20 -
 21
21 -
 22
22 -
23
-
24
-
25
-
26
-
27
-
28
-
29
-
30
-
31
-
32
-
33
-
34
-
35
 |
 |
