Yamaha CLP-155 Owner's Manual - Page 27
Watch Your Fingers When Do, Ing This, Klemmen Sie Ihre Finger Dabei Nicht Ein
 |
View all Yamaha CLP-155 manuals
Add to My Manuals
Save this manual to your list of manuals |
Page 27 highlights
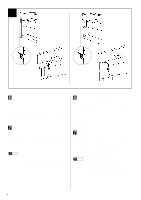
4 CLP-155 B CLP-154S B D D 4 x 25 mm round-head screws 3 Halbrundschrauben (4 x 25 mm) 3 Vis à tête ronde de 4 x 25 mm 3 Tornillos de cabeza redonda de 4 x 25 mm 3 4 x 25 mm round-head screws 3 Halbrundschrauben (4 x 25 mm) 3 Vis à tête ronde de 4 x 25 mm 3 Tornillos de cabeza redonda de 4 x 25 mm 3 V Attach panels the center (D). panel (B) to the side The center panel (B) should be screwed to the brackets on the side panels (D) using the four 4 x 25 millimeter round-head screws 3, as shown in the illustration. Make sure the center panel is attached to the side of the brackets facing the pedals. The corner cutouts in the CLP-155 center panel are on the top edge of the panel. B Install the main unit (A). Place the main unit (A) on the side panels (D) with the screws on its bottom panel (toward the rear of the main unit) just behind the grooves in the brackets located at the top of the side panels. Then slide the main unit forward until it stops. WATCH YOUR FINGERS WHEN DOING THIS!! Align the holes on the bottom panel of the main unit with the holes in the brackets on the side panels (also center the main unit to produce equal clearance on the left and right sides, as shown in the illustration), then screw in and securely tighten the four 6 x 16 millimeter flat-head screws 4. V Schrauben Sie die Rückwand beiden Seitenwände (D). (B) an die Die Rückwand (B) wird mit den vier Halbrundschrauben (4 x 25 mm) 3 an den Winkelblechen der Seitenwände (D) festgeschraubt, wie in der Abbildung gezeigt. Achten Sie bitte darauf, daß die Rückwand an den pedalseitigen Flächen der Winkelbleche angebracht wird. Beim CLP-155 müssen die Ausschnitte in den Ecken der Rückwand oben zu liegen kommen. B Montieren Sie die Tastatureinheit (A). Setzen Sie die Tastatureinheit (A) so auf den fertigen Ständer, daß die beiden Schrauben an ihrer Unterseite hinter den Winkelblechen mit Führungsschlitz an der Hinterseite des Ständers zu liegen kommen. Schieben Sie die Tastatureinheit dann bis zum Anschlag in die Schlitze. KLEMMEN SIE IHRE FINGER DABEI NICHT EIN!! Richten Sie die Schraubenbohrungen an der Unterseite der Tastatureinheit mit den Bohrungen der Winkelbleche aus (achten Sie auch darauf, daß sie mittig auf dem Ständer steht, wie in der Abbildung gezeigt). Schrauben Sie die Tastatureinheit dann mit den vier Senkschrauben (6 x 16 mm) 4 am Ständer fest. iii
-
 1
1 -
2
-
3
-
4
-
5
-
6
-
7
-
8
-
9
-
10
-
11
-
12
-
13
-
14
-
15
-
16
-
17
-
18
-
19
-
20
-
21
-
 22
22 -
 23
23 -
 24
24 -
 25
25 -
 26
26 -
 27
27 -
 28
28 -
 29
29 -
 30
30 -
 31
31 -
 32
32 -
33
-
34
-
35
 |
 |
