Yamaha CVP-701 CVP-701 Owners Manual - Page 69
Changing the Split Points, Call up the operation display., Set the Split Point.
 |
View all Yamaha CVP-701 manuals
Add to My Manuals
Save this manual to your list of manuals |
Page 69 highlights
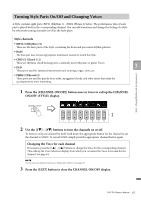
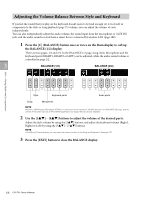
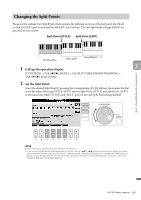
Changing the Split Points These are the settings (two Split Points) that separate the different sections of the keyboard: the Chord section, the LEFT part section and the RIGHT1 and 2 section. The two Split Point settings (below) are specified as note names. Split Point (STYLE) Split Point (LEFT) Chord section Voice LEFT Voice RIGHT1 - 2 1 Call up the operation display. 3 [FUNCTION] → TAB [-][3] MENU1 → [A] SPLIT POINT/CHORD FINGERING → TAB [-][3] SPLIT POINT 2 Set the Split Point. Select the desired Split Point by pressing the corresponding [F]-[H] buttons, then rotate the dial to set the value. Selecting "STYLE+LEFT" sets the Split Point (STYLE) and Split Point (LEFT) to the same note while "STYLE" and "LEFT" lets you set each Split Point independently. Styles - Playing Rhythm and Accompaniment - NOTE • Split Point (LEFT) cannot be set lower than Split Point (STYLE). • If you set the CHORD DETECTION AREA value to "UPPER" via the [1]/[ 2] button on the Split Point display, the Chord section will be at the right side of the Split Point (L). With this setting, pressing the [E] button turns the MANUAL BASS function on, letting you play the bass line with your left hand while using your right hand to control Style playback. For details, refer to the Reference Manual on the website (page 9.) CVP-701 Owner's Manual 69
-
 1
1 -
2
-
3
-
4
-
5
-
6
-
7
-
8
-
9
-
10
-
11
-
12
-
13
-
14
-
15
-
16
-
17
-
18
-
19
-
20
-
21
-
22
-
23
-
24
-
25
-
26
-
27
-
28
-
29
-
30
-
31
-
32
-
33
-
34
-
35
-
36
-
37
-
38
-
39
-
40
-
41
-
42
-
43
-
44
-
45
-
46
-
47
-
48
-
49
-
50
-
51
-
52
-
53
-
54
-
55
-
56
-
57
-
58
-
59
-
60
-
61
-
62
-
63
-
 64
64 -
 65
65 -
 66
66 -
 67
67 -
 68
68 -
 69
69 -
 70
70 -
 71
71 -
 72
72 -
 73
73 -
 74
74 -
75
-
76
-
77
-
78
-
79
-
80
-
81
-
82
-
83
-
84
-
85
-
86
-
87
-
88
-
89
-
90
-
91
-
92
-
93
-
94
-
95
-
96
-
97
-
98
-
99
-
100
-
101
-
102
-
103
-
104
-
105
-
106
-
107
-
108
-
109
-
110
-
111
-
112
-
113
-
114
-
115
-
116
-
117
-
118
-
119
-
120
-
121
-
122
-
123
-
124
-
125
-
126
-
127
-
128
-
129
-
130
-
131
 |
 |
