Yamaha DGX-305 Owner's Manual - Page 32
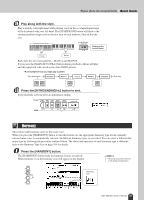
Press the [EXIT] button., Play a chord in the accompaniment range of the keyboard. - ad
 |
View all Yamaha DGX-305 manuals
Add to My Manuals
Save this manual to your list of manuals |
Page 32 highlights
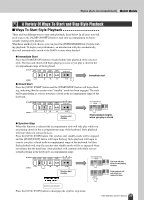
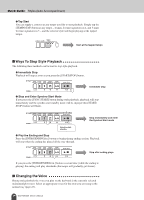
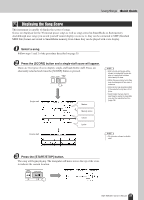
Quick Guide Styles (Auto Accompaniment) 2 Press and hold the [HARMONY] button for longer than a second. The FUNCTION display will appear. The Harmony Type title and the currently selected harmony type will be displayed. Use the dial to select a different harmony type. NOTE • You can also select the Harmony Type item after pressing the [FUNCTION] button (page 70). Hold for longer than a second The currently selected harmony type is shown here 3 Select a harmony type. Rotate the dial to select a harmony type from 01 through 26. Select "03 (Block)" for this example. 4 Press the [EXIT] button. This will take you back to the MAIN display. "03 (Block)" selected NOTE • Harmony types 01 - 05 only function when auto-accompaniment is on and a style is being played. Harmony notes are added to the right-hand melody based on the chords played in the accompaniment range of the keyboard. • Harmony types 06 - 26 can be used when auto-accompaniment is off. After step 4, try playing these harmony types after checking the operating conditions listed in the Harmony type list on page 104. 5 Perform steps 1, 2, 3, and 5 on page 29. Check that "ACMP" appears in the display. If "ACMP" is not showing in the display press the [ACMP ON/OFF]. "ACMP" appears 6 Play a chord in the accompaniment range of the keyboard. Style playback will begin. Split point Accompaniment range 7 Play the keyboard. Harmony notes will be added to a melody you play in the right-hand section of the keyboard. Accompaniment range 32 DGX-505/305 Owner's Manual Melody NOTE • The Harmony feature produces little or no effect with drum kit or sound effect voices. Use the Harmony feature with pitched instrument voices.
-
 1
1 -
2
-
3
-
4
-
5
-
6
-
7
-
8
-
9
-
10
-
11
-
12
-
13
-
14
-
15
-
16
-
17
-
18
-
19
-
20
-
21
-
22
-
23
-
24
-
25
-
26
-
 27
27 -
 28
28 -
 29
29 -
 30
30 -
 31
31 -
 32
32 -
 33
33 -
 34
34 -
 35
35 -
 36
36 -
 37
37 -
38
-
39
-
40
-
41
-
42
-
43
-
44
-
45
-
46
-
47
-
48
-
49
-
50
-
51
-
52
-
53
-
54
-
55
-
56
-
57
-
58
-
59
-
60
-
61
-
62
-
63
-
64
-
65
-
66
-
67
-
68
-
69
-
70
-
71
-
72
-
73
-
74
-
75
-
76
-
77
-
78
-
79
-
80
-
81
-
82
-
83
-
84
-
85
-
86
-
87
-
88
-
89
-
90
-
91
-
92
-
93
-
94
-
95
-
96
-
97
-
98
-
99
-
100
-
101
-
102
-
103
-
104
-
105
-
106
-
107
-
108
-
109
-
110
-
111
-
112
 |
 |
