Yamaha DGX-640 Owner's Manual - Page 59
To Play Back a User Song, To save a User Song to USB flash memory, To Record Other Tracks - midi usb
 |
View all Yamaha DGX-640 manuals
Add to My Manuals
Save this manual to your list of manuals |
Page 59 highlights
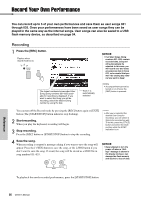
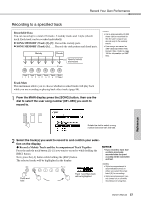
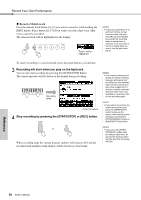
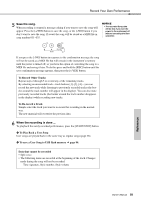
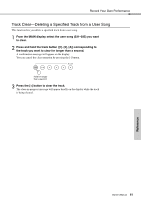
Record Your Own Performance 5 Save the song. When recording is stopped a message asking if you want to save the song will appear. Press the [+/YES] button to save the song, or the [-/NO] button if you don't want to save the song. If saved, the song will be stored as a MIDI file in song number 031-035. NOTICE • The recorded Song data will be lost if you turn the power to the instrument off without executing the Save operation. If you press the [-/NO] button in response to the confirmation message the song will not be saved as a MIDI file but will remain in the instrument's memory until the power is turned off, so you have the option of converting the song to a MIDI file and saving it later. To do this press and hold the [REC] button until the save confirmation message appears, then press the [+/YES] button. To Record Other Tracks Repeat steps 2 through 5 to record any of the remaining tracks. By selecting an unrecorded track-track buttons [1]-[5], [A]-you can record the new track while listening to previously recorded tracks (the border around the track number will appear in the display). You can also mute previously recorded tracks (the border around the track number disappears in the display) while recording new tracks. To Re-record a Track Simple select the track you want to re-record for recording in the normal way. The new material will overwrite the previous data. 6 When the recording is done ... To playback the newly recorded performance, press the [START/STOP] button. To Play Back a User Song User songs are played back in the same way as regular songs (page 28). To save a User Song to USB flash memory page 94. Data that cannot be recorded • Split voice • The following items are recorded at the beginning of the track. Changes made during the song will not be recorded. Time signature, Style number, Style volume Reference Owner's Manual 59
-
 1
1 -
2
-
3
-
4
-
5
-
6
-
7
-
8
-
9
-
10
-
11
-
12
-
13
-
14
-
15
-
16
-
17
-
18
-
19
-
20
-
21
-
22
-
23
-
24
-
25
-
26
-
27
-
28
-
29
-
30
-
31
-
32
-
33
-
34
-
35
-
36
-
37
-
38
-
39
-
40
-
41
-
42
-
43
-
44
-
45
-
46
-
47
-
48
-
49
-
50
-
51
-
52
-
53
-
 54
54 -
 55
55 -
 56
56 -
 57
57 -
 58
58 -
 59
59 -
 60
60 -
 61
61 -
 62
62 -
 63
63 -
 64
64 -
65
-
66
-
67
-
68
-
69
-
70
-
71
-
72
-
73
-
74
-
75
-
76
-
77
-
78
-
79
-
80
-
81
-
82
-
83
-
84
-
85
-
86
-
87
-
88
-
89
-
90
-
91
-
92
-
93
-
94
-
95
-
96
-
97
-
98
-
99
-
100
-
101
-
102
-
103
-
104
-
105
-
106
-
107
-
108
-
109
-
110
-
111
-
112
-
113
-
114
-
115
-
116
-
117
-
118
-
119
-
120
 |
 |
