Yamaha DGX-640 Owner's Manual - Page 96
Deleting Data from a USB Flash, Memory, Delete User Data from the Instru
 |
View all Yamaha DGX-640 manuals
Add to My Manuals
Save this manual to your list of manuals |
Page 96 highlights
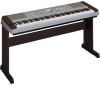
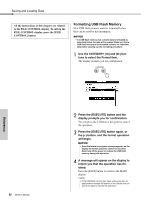
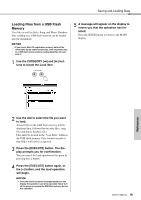
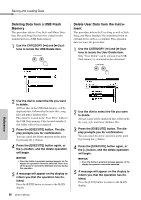
Saving and Loading Data Deleting Data from a USB Flash Memory This procedure deletes User, Style and Music Database files and Song files that were created on this instrument from a USB flash memory. 1 Use the CATEGORY [r] and [f] buttons to locate the USB Delete item. Delete User Data from the Instrument This procedure deletes the User Song as well as Style, Song, and Music Database files transferred from an external device such as a computer. This operation does not erase the preset data. 1 Use the CATEGORY [r] and [f] buttons to locate the User Delete item. Only "User Delete" can be selected if no USB flash memory is connected to the instrument. Reference 2 Use the dial to select the file you want to delete. All User files in the USB flash memory will be displayed first, followed by the style files, song files and music database files. Files must be located in the "User Files" folder in the USB flash memory. Files located outside of that folder will not be recognized. 3 Press the [EXECUTE] button. The display prompts you for confirmation. You can cancel the delete operation at this point by pressing the [-] button. 4 Press the [EXECUTE] button again, or the [+] button, and the delete operation will begin. NOTICE • Once the delete-in-progress message appears on the display the operation cannot be canceled. Never turn off the power or remove the USB flash memory during this operation. 5 A message will appear on the display to inform you that the operation has finished. Press the [EXIT] button to return to the MAIN display. 96 Owner's Manual 2 Use the dial to select the file you want to delete. All user songs will be displayed first, followed by the song, style and music database files. 3 Press the [EXECUTE] button. The display prompts you for confirmation. You can cancel the delete operation at this point by pressing the [-] button. 4 Press the [EXECUTE] button again, or the [+] button, and the delete operation will begin. NOTICE • Once the delete-in-progress message appears on the display the operation cannot be canceled. 5 A message will appear on the display to inform you that the operation has finished. Press the [EXIT] button to return to the MAIN display.
-
 1
1 -
2
-
3
-
4
-
5
-
6
-
7
-
8
-
9
-
10
-
11
-
12
-
13
-
14
-
15
-
16
-
17
-
18
-
19
-
20
-
21
-
22
-
23
-
24
-
25
-
26
-
27
-
28
-
29
-
30
-
31
-
32
-
33
-
34
-
35
-
36
-
37
-
38
-
39
-
40
-
41
-
42
-
43
-
44
-
45
-
46
-
47
-
48
-
49
-
50
-
51
-
52
-
53
-
54
-
55
-
56
-
57
-
58
-
59
-
60
-
61
-
62
-
63
-
64
-
65
-
66
-
67
-
68
-
69
-
70
-
71
-
72
-
73
-
74
-
75
-
76
-
77
-
78
-
79
-
80
-
81
-
82
-
83
-
84
-
85
-
86
-
87
-
88
-
89
-
90
-
 91
91 -
 92
92 -
 93
93 -
 94
94 -
 95
95 -
 96
96 -
 97
97 -
 98
98 -
 99
99 -
 100
100 -
 101
101 -
102
-
103
-
104
-
105
-
106
-
107
-
108
-
109
-
110
-
111
-
112
-
113
-
114
-
115
-
116
-
117
-
118
-
119
-
120
 |
 |