Yamaha DTX452K DTX402K/DTX432K/DTX452K Owners Manual - Page 17
Step 5, Rotating the pads into place, Attaching the hi-hat holder
 |
View all Yamaha DTX452K manuals
Add to My Manuals
Save this manual to your list of manuals |
Page 17 highlights
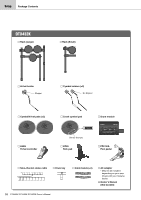
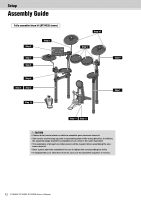
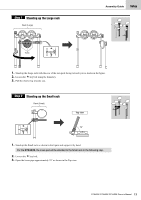
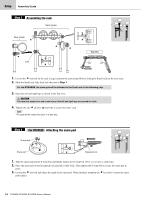
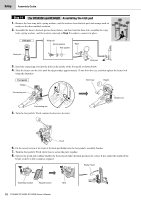
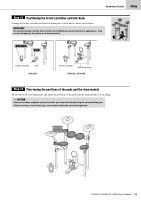
Assembly Guide Setup Step 5 Rotating the pads into place For DTX402K and DTX432K Step 5 applies to each of the four pads. For DTX452K Step 5 applies to each of the three tom pads. For adjusting the snare pad, see Step 4 . Snare pad 1. Loosen the key bolt on each of the pads. 2. Rotate the pads to positions where they will be easy to play. (If necessary, refer to the picture of the properly assembled kit on page 12.) NOTE For the snare pad, you can also adjust the angle of the joint which supports the snare pad by loosening the s key bolt. 3. Tighten each of the key bolts to secure the pads in place. Step 6 Attaching the hi-hat holder Hi-hat holder Washer Top view Stopper 1. Loosen the two key bolts in the back of the snare part. 2. Insert the hi-hat holder into the back of the snare part as shown in the figure. The hi-hat holder and the other two cymbal holders seem similar, but are actually different. Only the hi-hat holder has a washer and stopper. • When correctly inserted, the tip of the hi-hat holder will protrude slightly from the bottom of the snare part. • When correctly oriented, the hi-hat holder will be horizontal to the snare part as shown in the Top view. 3. Tighten the two key bolts to secure the hi-hat holder. DTX402K DTX432K DTX452K Owner's Manual 15
-
 1
1 -
2
-
3
-
4
-
5
-
6
-
7
-
8
-
9
-
10
-
11
-
 12
12 -
 13
13 -
 14
14 -
 15
15 -
 16
16 -
 17
17 -
 18
18 -
 19
19 -
 20
20 -
 21
21 -
 22
22 -
23
-
24
-
25
-
26
-
27
-
28
-
29
-
30
-
31
-
32
-
33
-
34
-
35
-
36
-
37
-
38
-
39
-
40
-
41
-
42
-
43
-
44
-
45
-
46
-
47
-
48
-
49
-
50
-
51
-
52
-
53
-
54
-
55
-
56
-
57
-
58
-
59
-
60
-
61
-
62
-
63
-
64
-
65
-
66
-
67
-
68
-
69
-
70
-
71
-
72
 |
 |
