Yamaha DTX452K DTX402K/DTX432K/DTX452K Owners Manual - Page 18
Step 7, Attaching the hi-hat pad, Attaching the drum module
 |
View all Yamaha DTX452K manuals
Add to My Manuals
Save this manual to your list of manuals |
Page 18 highlights
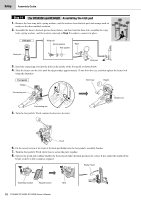
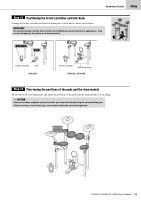
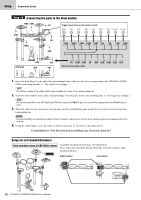
Setup Assembly Guide Step 7 Attaching the hi-hat pad Adjusting the position of the hi-hat stopper Stopper Playing position 1. Loosen the key bolt on the stopper, which is located at the top of the hi-hat holder. 2. Adjust the position of the stopper until it is straight in the back (as shown in the illustration) from your playing position. 3. Tighten the key bolt to secure the stopper. Assembling the hi-hat pad 1. Remove the wing nut, the washer, and the upper felt pad from the hi-hat holder. (Do not remove the lower felt pad.) 2. Place the hi-hat pad, which does NOT have a sticker labeled "CRASH," on the hi-hat holder with the stopper also passing through the hole provided. 3. Replace the felt pad removed in Step 1 above the hi-hat pad. 4. Replace the washer removed in Step 1 above the felt pad. 5. Tighten the wing nut to secure the hi-hat pad in place. Washer Stopper Wing nut Felt pad Hi-hat pad Felt pad Hi-hat holder Step 8 Attaching the drum module 1. Loosen the key bolt on the back left of the rack and turn the joint around before sliding the sliding the drum module (in the next step). 2. Loosen the s key bolt and slide the drum module fully back into the joint in Step 1. 3. Tighten the and s key bolts to secure the drum module in place. 16 DTX402K DTX432K DTX452K Owner's Manual
-
 1
1 -
2
-
3
-
4
-
5
-
6
-
7
-
8
-
9
-
10
-
11
-
12
-
 13
13 -
 14
14 -
 15
15 -
 16
16 -
 17
17 -
 18
18 -
 19
19 -
 20
20 -
 21
21 -
 22
22 -
 23
23 -
24
-
25
-
26
-
27
-
28
-
29
-
30
-
31
-
32
-
33
-
34
-
35
-
36
-
37
-
38
-
39
-
40
-
41
-
42
-
43
-
44
-
45
-
46
-
47
-
48
-
49
-
50
-
51
-
52
-
53
-
54
-
55
-
56
-
57
-
58
-
59
-
60
-
61
-
62
-
63
-
64
-
65
-
66
-
67
-
68
-
69
-
70
-
71
-
72
 |
 |
