Yamaha DTX452K DTX402K/DTX432K/DTX452K Owners Manual - Page 21
Step 12, Positioning the hi-hat controller and kick drum
 |
View all Yamaha DTX452K manuals
Add to My Manuals
Save this manual to your list of manuals |
Page 21 highlights
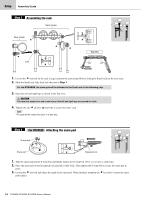
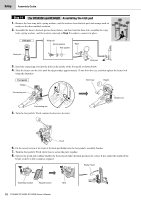
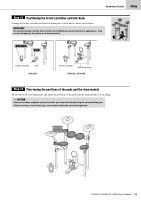
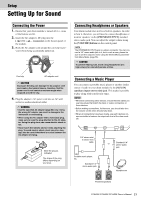
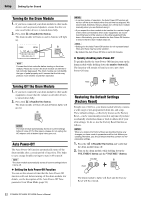
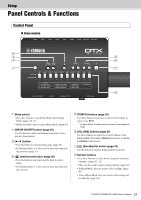
Assembly Guide Setup Step 12 Positioning the hi-hat controller and kick drum Arrange the hi-hat controller and the kick drum parts or kick unit as shown in the figure. IMPORTANT The hi-hat controller and the kick unit from the DTX402K are almost identical in appearance. They can be told apart by the sticker on the base section. Hi-hat controller Kick DTX402K Hi-hat controller Kick drum parts DTX432K, DTX452K Step 13 Fine-tuning the positions of the pads and the drum module Sit on your stool (sold separately) and adjust the positions of the pads and the drum module to your liking. CAUTION • Be sure to always retighten any key bolt after you have finished adjusting the corresponding part. • Before moving on to the next step, ensure that all key bolts have been tightened. DTX402K DTX432K DTX452K Owner's Manual 19
-
 1
1 -
2
-
3
-
4
-
5
-
6
-
7
-
8
-
9
-
10
-
11
-
12
-
13
-
14
-
15
-
 16
16 -
 17
17 -
 18
18 -
 19
19 -
 20
20 -
 21
21 -
 22
22 -
 23
23 -
 24
24 -
 25
25 -
 26
26 -
27
-
28
-
29
-
30
-
31
-
32
-
33
-
34
-
35
-
36
-
37
-
38
-
39
-
40
-
41
-
42
-
43
-
44
-
45
-
46
-
47
-
48
-
49
-
50
-
51
-
52
-
53
-
54
-
55
-
56
-
57
-
58
-
59
-
60
-
61
-
62
-
63
-
64
-
65
-
66
-
67
-
68
-
69
-
70
-
71
-
72
 |
 |
